QuickBooks customized invoices are a godsend for many small businesses. Customers appreciate an invoice that is branded with your company logo and is formatted to simplify the billing process.
Besides being practical, these elements also give your documents a more professional feel. A customized invoice is enhanced by:
- Design elements.
- Payment options.
- A layout that is set to emphasize easy readability.
Knowing how to customize invoices in QuickBooks Online and Desktop will set you apart from your competitors and make your customers feel valued.
Do you have questions about how to customize invoices in QuickBooks Online? Keep reading this post for the latest QuickBooks customized invoices best practices. Also, discover how Method CRM opens up additional customization opportunities for your business.
What is QuickBooks Online?
QuickBooks Online is a web-based accounting tool developed by Intuit. As one of the most popular accounting software solutions, it keeps your finances organized and tracks your income and expenses for you.
With it, you have remote access to your information from any location with an internet connection. This flexibility gives you the convenience of handling your company’s finances while mobile, whether you’re away on a business trip or out for a coffee run.
Get started with your free trial of QuickBooks Online here.
3 Reasons why QuickBooks customized invoices matter
Customized invoices have become the standard for professional businesses. By using QuickBooks customized invoices, you ensure your customers get the best possible experience.
Here are three reasons why you should know how to customize invoices in QuickBooks Online and Desktop:
1. Make your brand known
By the time you create an invoice, you’ve won the sale and sealed the deal.
What’s not guaranteed, however, is that your customer remembers your business for future purchases. Luckily, this is an area where branded invoices help.
With QuickBooks customized invoices, your invoice is rearranged to highlight your:
- Company logo.
- Business’ name.
- Contact details.
- Return policy.
All of which increase brand recognition and buyer stickiness. In turn, this improves the chance of your business staying top of mind for future purchases and referrals.
With QuickBooks customized invoices, you’ll provide a consistent customer experience and build a brand people don’t forget!
2. Personalization is key
84% of buyers state that “being treated like a person, instead of a transaction, is crucial to winning their business.”
“84% of buyers state that being treated like a person, instead of a transaction, is crucial to winning their business.”
– Forbes, 2026.
And your invoices are no exception to this statistic.
To ensure your customers feel valued, you should tailor your QuickBooks custom invoices to include personalized elements that show they’re more than just a number.
Whether that’s a special note to them or an exclusive discount for their next purchase, including these details in your custom templates pays off.
You can easily add your customers’ names and other details directly onto an invoice in QuickBooks. This way, you’ll effectively demonstrate that your business cares about them as individuals.
3. Make your invoices informative
An opportunity that’s often missed with QuickBooks customized invoices is to add non-transactional data to your invoice form. Here’s why this is so important.
If you include details like warranty expiration dates or upcoming service appointments, you transform your invoice from a document customers dread receiving to a useful resource they can refer back to.
The benefits of this are that your customers:
- Hold a positive memory of your business, even when paying.
- Gain value from receiving your invoices.
- Have all the post-purchase information they need upfront.
Plus, creating a custom invoice like this saves your team time as you communicate crucial information to your customers automatically.
Now let’s look at how to customize invoices in QuickBooks Online and Desktop.
How to customize an invoice in QuickBooks
If you’re looking for information on how to change your QuickBooks invoice template, you’ve come to the right place. Below is a tutorial on how to customize invoices in QuickBooks Online.
Keep reading for written instructions on:
- How to customize invoices in QuickBooks Online and Desktop.
- How to change QuickBooks invoice templates.
- How to edit email templates in QuickBooks.
For QuickBooks Online users
If you’re a QuickBooks Online user looking for custom invoices, first add your business logo in the “Company” section in your “Account and Settings.”

Photo credit: Intuit QuickBooks
You may also add it directly to your invoices when customizing through the Design tab later.
To get there, select the gear Icon in the upper right-hand corner and click “Custom Form Styles” under “Your Company.”
Then, pick “New Style” followed by “Invoice“.

Photo credit: Intuit QuickBooks
Which 3 options for customizing invoices are available on QuickBooks Online, you may ask?
Through QBO, you can play around with the following:
- Design — Edit or add a logo and customize by selecting fonts and colors.
- Content — Update company info, change labels, and adjust width.
- Emails — Draft or revise your invoicing email template.
For QuickBooks Desktop users
If you wish to change your invoice template in QuickBooks Desktop, open the “List” dropdown menu in the top bar. Then, select “Templates”
This should open a page with Intuit’s default template types. Right-click the invoice template you want to work from and select “Edit Template”
The customization modal will open, and you can add your company logo and select the color scheme and font.
If you click “Additional Customization,” you can fine-tune every field on the template and add or remove fields.
However, your modified template may not be compatible with QuickBooks’ preprinted forms. When in doubt, create a copy of the default template and work from there.
You now know how to customize invoices in QuickBooks Online and Desktop!
How to set up automatic invoices in QuickBooks
To set up recurring invoices in QuickBooks Online, select the gear icon in the upper right-hand corner and click “Recurrent Transactions,” followed by “New“.
Then, select the Transaction Type (Invoice) and click “OK.”
From there, change the Type to “Scheduled” and select “Automatically send emails.”
Once you complete the rest of the form and click “Save template,” you’ve set recurring invoicing for the chosen customer.
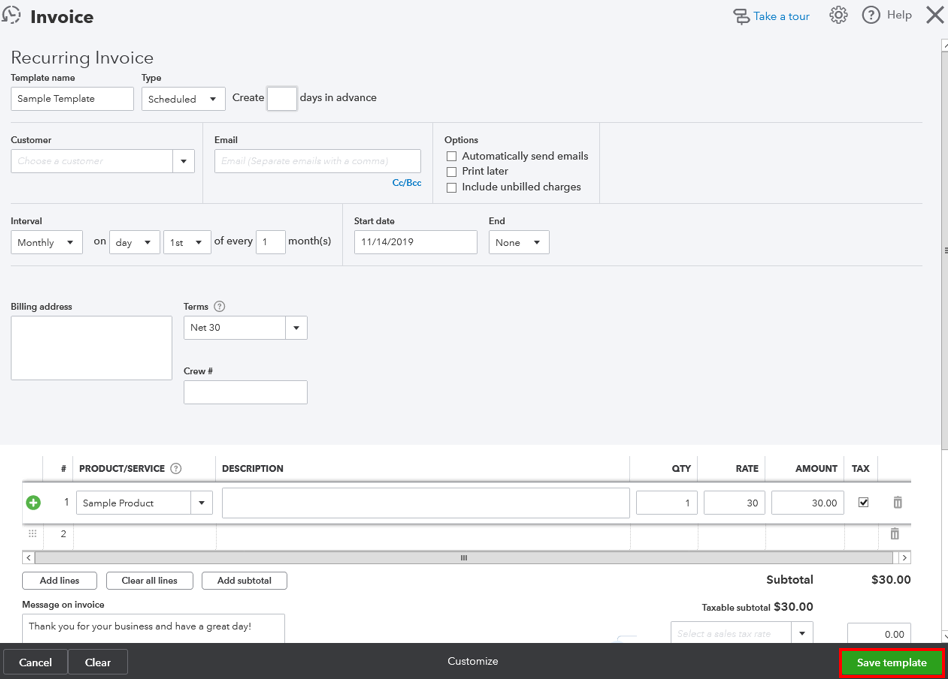
Photo credit: Intuit QuickBooks
QuickBooks Desktop users have to select “Quick Create” from their main screen, followed by “Invoice.” Then, you can either choose an existing customer or add a new one.
Populate the form fields and toggle the online payment option to “On” to get paid faster. Then, click “Save and send.”
Note that regardless of your QuickBooks version, you will have to repeat the above steps for each customer you’d like to create a recurring invoice for.
Knowing how to customize invoices in QuickBooks Online and Desktop saves you time (and money). It’s a tedious process, but luckily, there’s a better way! More on this shortly.
What to include in an invoice template
Whether you are learning how to customize invoices for QuickBooks Online or Desktop, make sure to include the following.
- Your business name and address.
- Customer’s name, address, and contact info.
- Invoice due date.
- Unique invoice number.
- Total amount due (including taxes).
- Description of services or products, including the quantity and prices.
- Mode of payment accepted.
- Terms and conditions (if any).
To download your free invoice template, click here.
Go beyond invoice templates in QuickBooks with Method CRM
With businesses around the world using invoice templates in QuickBooks, there’s more you can do to stand out and provide your customers with a great experience.
As a no-code platform, Method CRM empowers small businesses using QuickBooks with technology that does exactly what you need.
This is especially true when it comes to knowing how to customize invoices in QuickBooks Online and Desktop.
Simply drag and drop the elements you want to include in your invoice with Method’s web report designer. This could be anything, from a thank you message that automatically includes a customer’s first purchase date, to social media icons that link to your company’s accounts or videos.
Here’s an example of a customized invoice you can create with Method CRM

With Method CRM you:
- Ensure your invoice is styled based on your company branding and that the appearance is adjusted for everything from sales forms to estimates.
- Personalize every invoice to display information that is modified according to sales, customer, and accounting data.
- Improve your customer’s experience with invoice information that is transformed to showcase a variety of information, like warranty expiration date or an upcoming appointment.
- Can easily adapt when handling special invoice situations, such as mobile invoice customization.
Printing custom invoices works the same for you and your customers. And exporting custom invoices saves time when you need to apply the same format for different customers.
While you might now know how to customize invoices in QuickBooks Online and Desktop, you can really set your business apart from the competition with the powerful customization tools from Method.
Learn more about Method CRM’s capabilities with this video.
Benefits of using QuickBooks Online for creating invoices
Using QuickBooks Online for invoice creation offers several advantages for your financial management.
From template customization to real time payment tracking, QuickBooks Online simplifies the invoicing process and enhances your financial health. Better yet, it improves your:
- Accuracy.
- Time savings.
- Customer experience.
Cloud accessibility
Cloud accessibility in QuickBooks Online helps you create, send, and manage invoices from any location with an internet connection. This flexibility is essential for business owners on the go. You can handle billing and invoicing tasks from anywhere, at any time.
Customizable templates
QuickBooks Online offers simple customization options for invoice templates. A customized template is designed to match the brand identity of your business, so your customers will remember you even after they’ve made their purchase.
The customization tools provided in QuickBooks are limited. Knowing how to customize your invoices in QuickBooks Online and Desktop using a third-party integration like Method gives you greater control.
Recurring invoicing
If you have a customer who places the same order at regular intervals, you can configure a recurring invoice. That way, you don’t spend time manually creating the same invoice every month.
QuickBooks Online’s recurring invoicing features send invoices automatically according to your schedule. If an invoice is revised to include new details or discounts, you’ll need to update it manually.
See the section above, under, “How to set up automatic invoices in QuickBooks,” for more details.
Integrated online payments
The platform integrates online banking payment options to make it easier for customers to pay their invoices. This integration:
- Speeds up the payment process.
- Improves cash flow.
- Offers a convenient payment experience for your clients.
You can add e-signature capture to invoices when your QuickBooks account is integrated with Method.
Invoice tracking
Find a history of your invoices in QuickBooks Online. Your account is updated with invoice statuses to show what’s paid, pending, or overdue. Customers can also download a copy of their sales receipts to track their own expenses.
Automatic reminders
You can set up automatic reminders for customers about upcoming or overdue payments. That means you don’t need to keep tabs on payments while you maintain a steady cash flow.
This is a time-saving feature that is often used by business owners who’ve learned how to customize invoices in QuickBooks Online and Desktop, but are still experiencing delayed payments.
Multi-currency support
If you have international clients, QuickBooks Online supports multiple currencies. This feature simplifies the process of invoicing clients in different countries by giving them accurate, easy-to-read estimates and invoices.
Seamless integrations
QuickBooks Online seamlessly integrates with various business tools and applications. This connectivity allows for the easy import and export of data between QuickBooks and other systems used by your business.
Integration is one of the things that adds a lot of value to QuickBooks. Method will seamlessly integrate with your QuickBooks account to give you a powerful, two-way sync.
With Method, in addition to knowing how to customize invoices in QuickBooks Online, you gain access to customer relationship management tools that give you insights into your business to drive growth in every way possible.
QuickBooks custom invoice FAQs
How do I change the invoice layout in QuickBooks Online?
To change the layout of an invoice or estimate in QuickBooks Online, follow these steps:
- Accessing invoice customization is possible in the “Sales” menu, under “Invoices.”
- Find the invoice you want to alter and navigate to the “Action” column. Click “View/Edit” from the dropdown menu.
- Add and remove fields by clicking “Manage” beside the gear icon.
- Each section is configured to display your customization options once you set them.
- Click “Save” when you’re finished.
The changes you make will show up in the preview window.
After previewing and saving customizations how you like them, these are the setting defaults for future invoices with this customer. Emailing custom invoices to the customer is changed to reflect the update made.
Is rearranging and resizing fields on invoices possible in QuickBooks Online?
To rearrange fields on your QuickBooks invoices, select the square next to the numbers and drag the field where you want it to go. This feature is set up for easy customization that is aligned with your unique business needs.
To resize fields, click “Content” and then “Edit labels and widths” while editing your invoice. You can modify the minimum and maximum width amount in the text field.
At this time, QuickBooks invoice customization is limited. Choosing a template or integration with apps for advanced customization are two ways to gain additional options. Integrating with a platform like Method gives you more control over:
- Adding custom fields.
- Editing columns and rows.
- Customizing header information or customizing footer information.
- Applying styles and themes.
All this means each invoice is tailored to the specific needs of your customers.
How to edit invoice number in QuickBooks Online?
To edit invoice number in QuickBooks Online:
- Select the gear icon and click “Account and Settings.”
- Go to “Sales” and select “Invoice numbers.”
- Change the settings, such as the next invoice number or prefix/suffix options, according to your preferences.
How to add a picture to a QuickBooks invoice?
QuickBooks does not provide an option to add a picture directly to an invoice. However, Method CRM’s web report designer is adapted to add pictures on your QuickBooks invoices.
An invoice that is personalized with branding elements such as adding a logo, social media icons, or an image of your choice is possible with Method CRM.
Having full control over how to customize your invoices in QuickBooks Online and Desktop is easy with a Method integration.
How to change the address on an invoice in QuickBooks Online?
To change the address on an invoice in QuickBooks:
- Select the gear icon.
- Click “Account and Settings.”
- Go to “Company.”
- Select “Addresses” and adjust the bill or shipping addresses as needed.
How to add a late fee in QuickBooks Desktop?
To charge interest or a late fee on overdue invoices in QuickBooks Desktop, you need to set up billing terms. To do this:
- Go to the “Lists” menu.
- Select “Bill Terms.”
- Click on the “New Bill Term” button.
- Enter all of the necessary information.
- Apply it to any invoice that is past due by selecting the term from the drop-down menu on the top right corner of the invoice form.
Now that you know how to customize invoices in QuickBooks Online and Desktop, you can take them to the next level!
Ready to take your QuickBooks customized invoices to the next level? Then start your free trial of Method CRM.
Image credit: Austin Distel via Unsplash