
From articles to webinars, there’s plenty of content available online that covers the benefits of investing in a QuickBooks Online account.
But once you set up QuickBooks Online for your company, your path ahead isn’t as clear. Based on firsthand experience, you’ll want to begin managing estimates as soon as possible. Creating and keeping track of estimates are essential processes if you want to increase profits for your business.
This blog covers:
- How to create an estimate in QuickBooks Online (QBO).
- What you can do with your QuickBooks estimates.
- The best way to simplify your approval process.
Let’s dive in!
What’s a QuickBooks estimate and its purpose?
An estimate is a document that lets you itemize your list of products or services and show your prospective customers the amount they cost.
Estimating also makes it easier to manage your business’ financials, including:
- Budgeting.
- Forecasting.
- Bookkeeping.
Since estimates often get thrown into the same category as bidding and proposals, it’s easy to get confused between them. But it’s important to note their differences.
A contractor’s estimates serve as a benchmark for what they’ll charge to complete a project.
In contrast, a bid is an offer that someone makes on a project. It outlines what the bidder will do and how much they expect to be paid for their services.
A proposal, on the other hand, is more of a detailed outline that a bidder puts together to explain why they would be the best choice for a specific job.
While bids and proposals detail the total cost per project, estimates help set expectations for both parties involved.
That said, it’s important to note that an estimate is not a sales order because potential customers have not yet committed to buying anything. Keep reading to find out how to create an estimate in QuickBooks Online.
The importance of QuickBooks Online estimates
In QuickBooks Online, estimates are a way to report and explain costs to your customers so they know exactly where their money is going.
Estimating is also an excellent way to balance transactions with inventory, along with the other miscellaneous costs associated with running your business. This is why finding out how to create an estimate in QuickBooks Online is crucial for your bottom line.
That way, you boost transparency through a more accurate account of your income and a clearer picture of your accounts payable and receivable.
QuickBooks estimates are a huge part of running and growing your company. It’s essential to keep them organized and accurate for both your customers and your team.
In QuickBooks, what kind of account is an estimate?
Estimates are not accounts themselves, but financial approximations designed to drive transparency and boost accounts receivable. Estimates in QuickBooks are an effective way to turn potential customer interest into realized sales.
QuickBooks’ estimate functionality:
- Offers templates to simplify the drafting process.
- Allows for itemized listing of products or services.
- Allows for tracking and reviewing estimate status to increase transparency with your clients.
- Can be linked to specific projects or job codes to track individual project progress.
Consider syncing your QuickBooks Online account with Method CRM to let your sales team create QuickBooks estimates anywhere, any time.Let’s dive into how to create an estimate in QuickBooks Online.
How to create an estimate in QuickBooks Online
In order to create an estimate in QuickBooks Online, you need to follow these steps.
Sales > Customers > Estimate > Start Invoice in the Action column.
But these steps aren’t the most comprehensive. Many QuickBooks tutorials are difficult to follow. So, we’ve broken it down so you can navigate the entire estimate creation process with ease.
Step 1: Find the estimate screen
When figuring out how to create an estimate in QuickBooks Online, you should start from your home screen.
In the upper-left menu bar on your QuickBooks Online dashboard, find the “+ New” button. Then, in the drop-down navigation menu, select “Customer” and click the “Estimate” option.
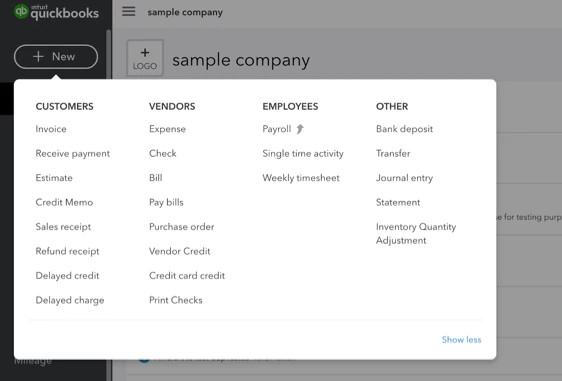
Image credit: Intuitive Accountant
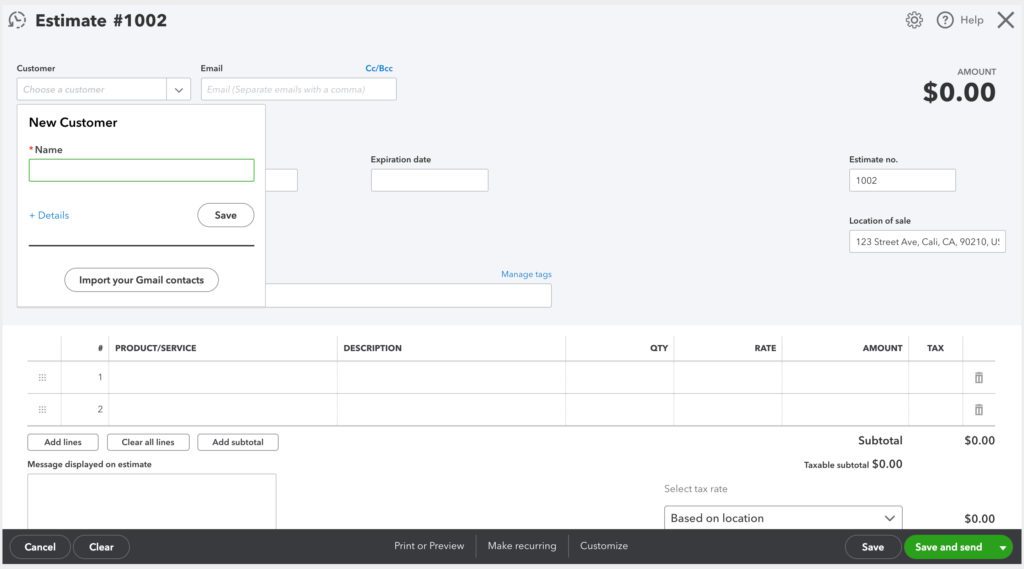
Step 2: Enter customer details
Creating an estimate requires inputting customer details, such as the address & contact details on the estimates page. There are a few fields and blank boxes here to fill out. You can pick an existing customer from the drop-down list or create a new one by pressing the “Add new” button.
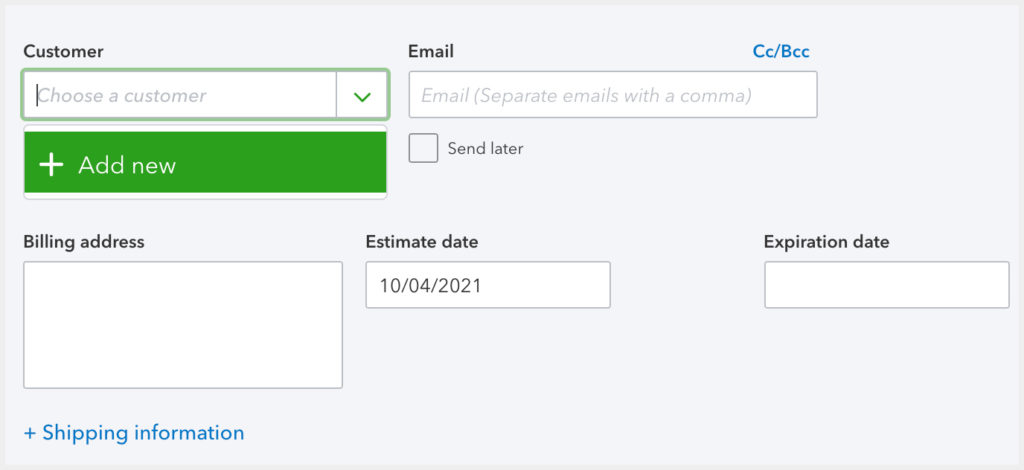
Customer details include:
- Billing address.
- Shipping address.
- Email address.
- Phone number — and more.
You can also attach documents to the customer profile and make necessary notes. To add any additional customer information, click the “+ Details” button.
Step 3: Enter estimate details
After the profile is complete, go to the search bar under the product/service selection column and choose the products or services (items) that you plan to provide to your potential customer.
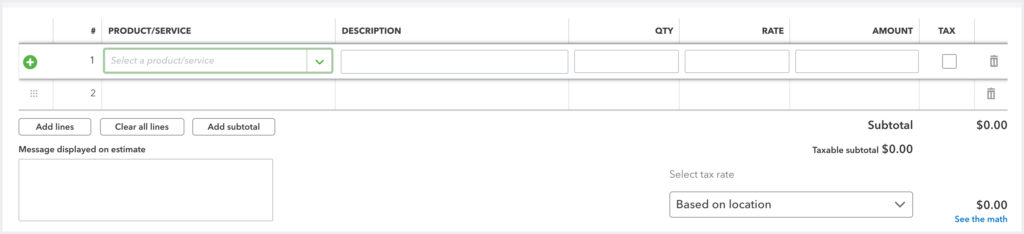
The “Estimates” section integrates with the inventory and pricing modules to maintain financial accuracy. To create a new item, click the same search bar and press the “Add new” button.
When you fill in the item details and description field, make sure to enter the:
- Quantity and rate.
- Item price.
- Expiry date.
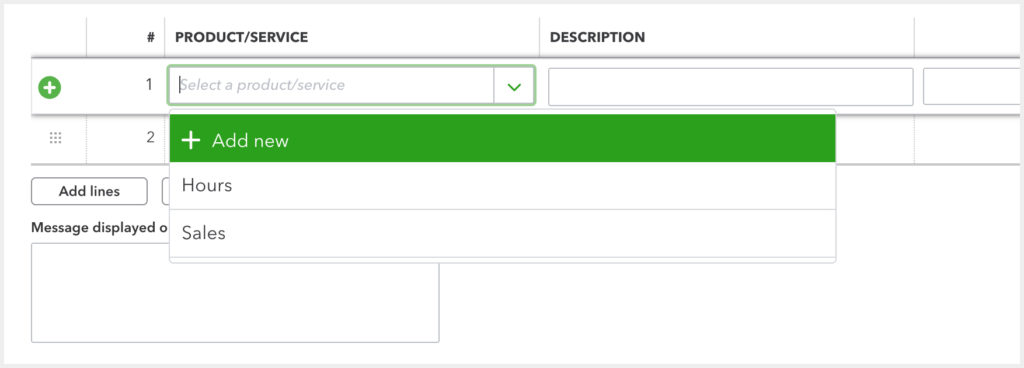
QuickBooks Online also allows for attaching relevant files or documents — and you can use the notes section so that your clients see your message displayed on estimates.
Plus, you can add custom fields to your estimates using QuickBookss’ “Custom Form Styles” feature. For example, QuickBooks provides a section for terms and conditions. You can find this in “Lists.”
But… where would you go to see the lists available in QuickBooks Online? It’s simple – you’ll see the “Lists” tab when you click the “Settings” gear icon in the top right corner.
QuickBooks Online estimates let you make ahead-of-time invoice notes and turn them into sales transactions. The sooner you finalize your estimates process, the quicker you can get a headstart on your projects!
This is just one of the many examples of features you can leverage to make your workflows more efficient. Keep reading to learn how Method CRM helps!
How to change estimate template in QuickBooks
Learning how to create an estimate in QuickBooks Online and how to change the estimate’s template are two different things. To customize estimate templates in QuickBooks and design them based on your needs:
- Open your estimate.
- In the “Formatting” tab, click “Manage Templates.”
- Preview the templates and select the version that you like.
- Click “OK” to edit the existing template, or click “Copy” to create a new one.
This lets you copy estimate features and use them for your next one.
Can you add pictures to QuickBooks estimates?
You can add pictures to QuickBooks estimates. When you open an estimate, select the “Attachments” option at the bottom left of the page. Then, browse and choose the image you wish to add.
Step 4: Save and send your estimate
One of the most important steps is to save your QuickBooks Online estimate by pressing the save button in the bottom-right corner of your screen before you hit send. Estimates also can be saved as a draft for future modifications.
If you’re wondering how to send an estimate in QuickBooks Online, you can click the bottom-right green button labeled “Save and Send.”
The platform offers a preview before finalizing and sending, so you can visualize what your customer will receive and double-check everything. Also, each estimate can be printed or saved as a PDF.

Once created, there are four status types of estimates in QuickBooks Online:
- Pending.
- Accepted.
- Closed.
- Rejected.
These statuses track how far along your estimate is in the process and if further action is needed.
How to change an estimate to an invoice in QuickBooks
Changing an estimate into an invoice
Once your customer has accepted your estimate, it’s time to convert (as in converting an estimate to an invoice) it in QuickBooks.
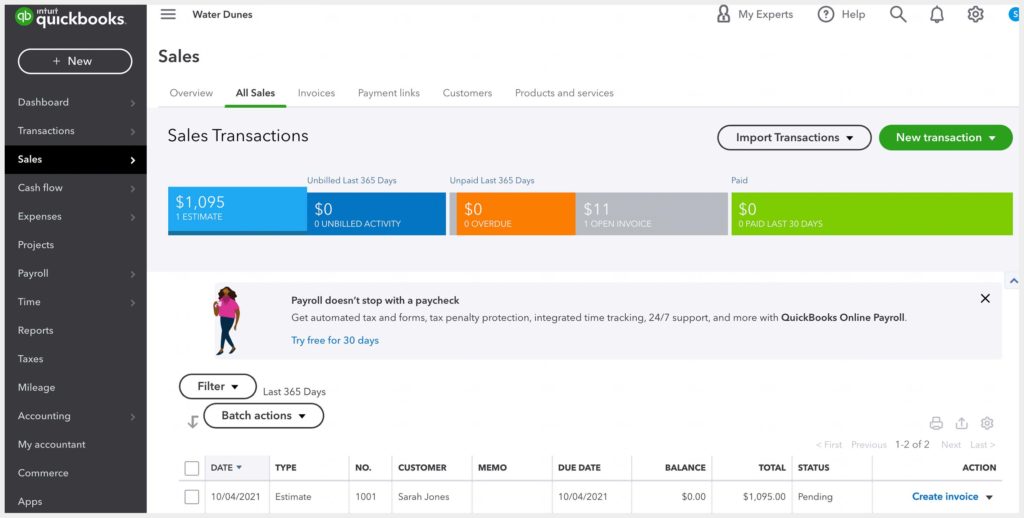
To do this, go to your dashboard and locate the “Sales” tab in the left menu bar. In the drop-down menu, click “All Sales.”
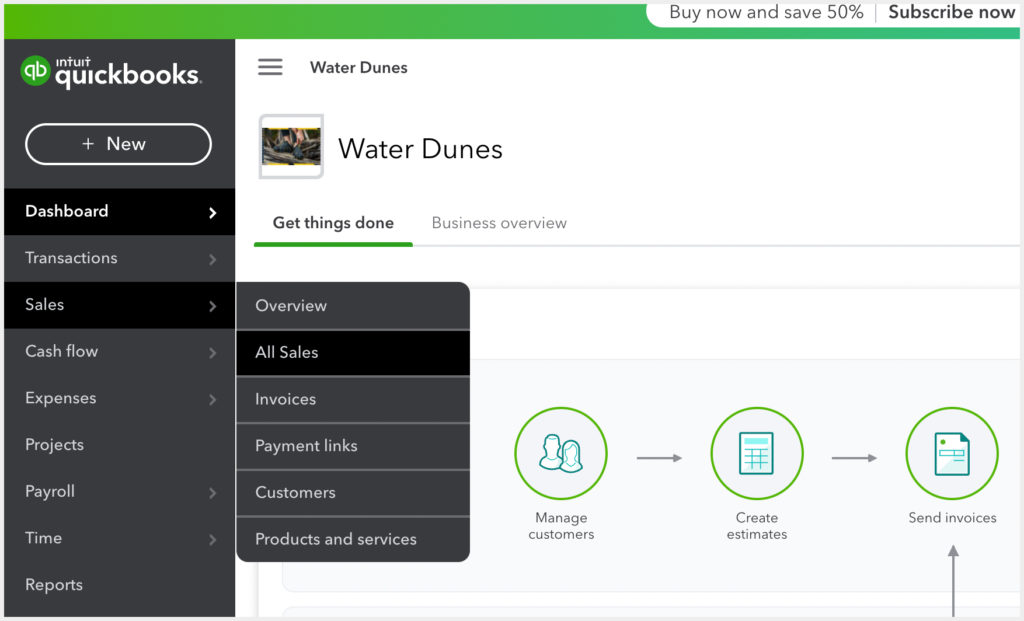
On this page, click on the blue “Estimate” tab, and your list of estimates will appear. Select the one you want to turn into a sales transaction.
Take a moment to double-check your estimate and make sure it reflects all the information that you discussed with your customer, such as:
- Discount application.
- Tax application.
- Currency selection.
- Terms selection.
QuickBooks Online supports multiple currencies and tax structures. So, if your estimate doesn’t account for taxes, you must learn how to add a sales tax.
From there, you can press the “Create Invoice” button in the top right of the window to transform your estimate into an invoice. And that’s it!
You can easily pick the print or email option for your invoice from the invoice screen, as it can be emailed directly to the customer from the platform.
Image credit: QuickBooks
Aside from invoices, QuickBooks Online also makes converting an estimate to a purchase order for your vendors easier. All you need to do is enter checks, expenses, and receipts for each item listed on your estimate.
To convert estimate to purchase order, follow the same steps as above, except:
- Instead of pressing the “Create Invoice” button, select “Copy to purchase order,” as estimates can be duplicated for similar job proposals.
- Add the respective supplier.
- Choose the appropriate customer.
- Click “Save and close.”
This is crucial for those who need to know which feature streamlines the purchasing process once a customer approves an estimate. Now, you can track your billable hours and ensure your data is accurate so that:
- Bills are paid on time.
- Income is accurately accounted for.
If you want to know how to add an existing estimate to projects in QuickBooks Online, look no further. All you need to do is:
- Open the estimate.
- Modify the customer name to give it the title of the project.
- Click “Save and close” to submit your changes.
With filters, charts, and percentage calculations at your fingertips, you can provide detailed information that captures all aspects of a project, such as its estimate date and total cost amount.
And don’t worry about how to close year-end books in QuickBooks Online, either. The accounting software automatically makes year-end adjustments based on the start month of your fiscal year.
Another popular question is, “What are 2 ways to start a credit memo in QuickBooks Online?” Here are the answers:
- The most popular way is through the plus (+) icon in the top right corner. There, you can select “Credit Memo.”
- It also is accessible from the sales menu. There, click “All Sales,” then “New Transaction,” and finally, “Credit Memo.”
QuickBooks estimates vs. quotes
With QuickBooks, you can create:
- Estimates.
- Bids.
- Quotes.
- Proposals.
All of these can be converted into an invoice once approved.
In QuickBooks Online, all these options are called “Estimates,” so you can create them following the same process outlined above.
How to link an invoice to an estimate in QuickBooks
To link an invoice to an estimate in QuickBooks:
- Click the “+ New” button, then choose “Invoice.”
- From the dropdown menu, select your customer. If there’s an open estimate for the customer, QuickBooks will open the “Add to invoice” sidebar.
- In the sidebar, locate the estimate and click “Add.”
- Determine the amount you want to invoice and select “Copy to invoice.”
- Complete the remaining details on the invoice.
- Finally, click “Save and new,” “Save and share link,” or “Save and close.”
It’s important to note that when you create an invoice, the original estimate remains unchanged. QuickBooks maintains the data of both the estimate and invoice and helps you create a sales receipt once you’ve received payment.
How to delete an estimate in QuickBooks Online
When the status of an estimate changes, you can register it in QuickBooks as accepted or declined to avoid deleting valuable information.
If you need to delete an estimate, follow these steps:
- Go to the “Sales” tab on your QuickBooks dashboard.
- In the drop-down menu, click on “All Sales.”
- Select the “Estimate” tab to view your list of estimates.
- Locate the estimate you want to delete.
- Click on the estimate to open it.
In the bottom-right corner of the estimate screen, click the “Delete” option.
The secret to smoother QuickBooks Online estimates: Method
Now that you’ve learned how to create an estimate in QuickBooks Online, you can focus on enhancing your QuickBooks estimates by syncing with Method CRM.
Knowing the value that Method brings to businesses starts with understanding some of the limitations that QuickBooks Online estimates have.
The limitations of QuickBooks Online estimates
Learning skills like how to create a mailing list in QuickBooks is useful, but time-consuming. Method CRM makes using QuickBooks all that much easier.
Also, did you know that QuickBooks Online does not have an automated estimate approval process?
As a result, mistakes happen — especially when your sales reps, admin staff, and accounting teams all want to create estimates and manage invoices.
So, learning how to create an estimate in QuickBooks Online is not enough to simplify your estimation and invoicing processes. Using a CRM like Method automates these processes from end to end.
It’s not a good idea to only have your quotes made for clients on QuickBooks Online, either.
It can be challenging to grow your business with the limitations of QuickBooks Online estimates, and many users work around this by asking customers to approve estimates through email. But this doesn’t always go as planned.
The most significant downsides to QuickBooks Online’s current estimate approval system are:
- Customers forget or refuse to reply to estimate emails.
- An increased chance of losing the approval email in your inbox.
- A lack of commitment from customers due to an informal approval system.
- Reports of bugs (i.e., QuickBooks top icon bar keeps disappearing for some users).
This is where syncing QuickBooks Online with Method CRM helps, as you can convert estimate to invoice in seconds. You’ll overcome these limitations and close sales sooner by automating your estimate-to-invoice process.
Easy estimate approval from customers
With Method, you get a fully customizable CRM that lets you:
- Get approval from your customers at the click of a button.
- Receive an email as soon as a customer approves an estimate.
Capture signatures as part of your approval process.
Close deals faster
Converting estimates into sales is easier when your sales reps can draft estimates for a job without QuickBooks Online access. The best way to do this is not by granting everyone access rights to your QuickBooks file. Rather, you should implement a designated software like Method CRM.
The advantage of empowering your teams to create estimates in Method is that it helps you speed up your quote-to-cash cycle. This results in a healthier bank account, as you get paid faster and more often because your deals aren’t slipping through the cracks.
Otherwise, sales opportunities are paused as your reps wait for your accountants to create estimates in QuickBooks Online.
You might wonder, “Can you run QuickBooks on a tablet, mobile, or other device?” Of course you can, but operating your accounting software away from your desktop without the proper tools paves the way for easy-to-make mistakes.
With Method CRM, you can create estimates and sales orders without touching QuickBooks Online, even when on the go! This is something you and your accountant will be thankful for when it comes to putting together year-end statements.
Also, your sales reps won’t be able to meddle with your financial accounts. And they won’t be blowing up your email with questions like “Where is business overview in QuickBooks?” either.
What’s more, Method CRM’s patented, two-way sync with QuickBooks ensures these estimates are up to date on both ends. It integrates with customer profiles for faster data entry, which means no more double data entry for you or your team!
Keep your leads separate from your QuickBooks customers
So many people ask, “What is a good way to handle prospective clients in QuickBooks?” That’s because — the truth is — there isn’t one without outside support.
Once you’ve learned how to create an estimate in QuickBooks Online and convert it to an invoice, keep your QuickBooks Online filing system organized and avoid costly mistakes.
Use Method CRM to keep your leads separate from your paying customers. This ensures that your potential and secured sales don’t get mixed up.
Syncing saves you and your team from a lot of headaches by giving you:
- Fewer discrepancies in your year-end accounting process.
- A reduced risk of lead information going missing.
- More efficient workflows, as you can convert a potential customer in Method to an actual customer in QuickBooks with ease.
Get paid sooner
If you want to take your QuickBooks estimate workflow to the next level, Method CRM is the way to go. Here’s why.
You can convert estimates into work orders, invoices, and sales orders in seconds. Better yet, this process only requires a mouse click instead of tedious copying and pasting.
So, while it’s important to know how to create an estimate in QuickBooks Online, Method CRM is the perfect tool to simplify the estimate process and boost your:
- Profitability.
- Productivity.
- Customer satisfaction.
With Method CRM, your sales reps create estimates without making mistakes in QuickBooks Online, and you generate invoices by pulling data directly from your approved estimate.
QuickBooks Online and Method: A sync made in heaven
Now you’ve learned how to create an estimate in QuickBooks Online and how integrated software like Method CRM enhances your operations. Let’s recap why these systems work best together. With QuickBooks + Method, you:
- Eliminate double data entry with ongoing updates between both platforms.
- Close sales sooner by letting customers accept estimates at the click of a button.
- Reduce accounting mistakes by creating leads in Method CRM and recording actual revenue in QuickBooks Online. QuickBooks automatically updates the financial records upon creation of sales in Method.
Frequently asked questions
Can I customize the estimate form in QuickBooks?
Yes, an estimate form can be customized with the company’s branding. You can also add new fields of information and layouts to personalize your forms.
With Method CRM, you can take this process to another level using its drag-and-drop capabilities. With this feature, you can customize every form to your taste and needs for informative, professional, and eye-catching estimates.
What are the types of estimate?
Different industries use different types of estimates. Some examples are:
- Preliminary: An approximate cost for a project that’s subject to change based on project adjustments.
- Detailed: This is used when the conditions of a project are known. It includes exact prices and timelines.
- Quantity: This type of estimate includes the number of units that will be used in a project and their price.
- Bid: Not technically an estimate, a bid outlines what a project would cost based on general information about its objectives and guidelines. If a bid is accepted, it should be altered with more accurate data.
What is the benefit of estimation?
Estimation plays a crucial role in several aspects of business and project management, which is why it’s so important to learn how to create an estimate in QuickBooks Online. Some of its benefits include:
- Effective cost management.
- Realistic budgeting.
- Revenue forecasting.
- Accurate project planning.
- Risk and opportunity management.
- Reasonable customer expectations.
Ready to upgrade your estimate approval process? Start your free trial of Method CRM!
Image credit: Dragana Gordic via AdobeStock