
Intuit’s QuickBooks Desktop and Online can be invaluable accounting software for helping you keep an accurate record of all transactions—tracking invoices, bills, payments, and journal entries so you have the financial data you need to make sound business decisions.
But managing transactions can be complex. And sometimes you need to streamline by deleting multiple transactions at once to keep your records accurate. That might happen for the following reasons:
- Someone entered an incorrect transaction
- System syncs, imports, or manual errors caused duplicate transaction entries
- Changes in accounting processes or compliance rules require you to remove outdated or invalid transactions
- You are merging accounts or closing books for a specific period
- You need to clear test data that was added during training or system setup
Method is the CRM built for QuickBooks-powered businesses. If you’re wondering how to mass delete transactions in QuickBooks, let us show you so you can organize your books, keep accurate financial records, and get back to focusing on your business.
Why delete multiple transactions?
Errors and duplicates can cause big problems for your business, disrupting financial reports and complicating audits and reconciliations.
Outdated or irrelevant data, such as test entries from training, can make your records disorganized and inaccurate, too. And policy changes or account consolidations can leave you with old transactions that don’t align with updated accounting practices.
Here’s how bulk transaction deletion can help:
- Ensuring your financial reports reflect accurate data.
- Making bank reconciliations smoother.
- Ensuring you’re prepared for audits and regulatory requirements.
- Cleaning up entries so you can navigate your QuickBooks account more easily.
How to delete multiple transactions in QuickBooks Online
QuickBooks Online (QBO) features tools such as Banking Center and Account Registers to help you manage transactions efficiently. While there is no direct Bulk Delete feature, Banking Center provides options like Undo and Exclude Transactions to help handle imported bank account feeds.
QBO offers limited batch actions, such as sending or printing, for some transaction types. Batch editing is available in QBO Advanced (for items like invoices), but batch deletion requires QBO Accountant and is limited to specific transaction types.
Batch editing is available under Batch Transactions in QBO Advanced.
Deleting transactions individually
Need to delete a single transaction in QuickBooks Online? Find the desired transaction, either by viewing it through the customer profile, or using the Search bar to locate it either by type, date, or amount.
Open the transaction, click Delete in the top-right corner, and confirm the action—but double-check before confirming because deletion is permanent. If you want to include additional details, like the date you’re deleting the transaction, the reason, or your name, add that info in the Memo or Message section.
Once you’re sure, hit Delete.
Bulk deleting transactions
Removing duplicate entries all at once is called bulk deletion. While this isn’t available for all transaction types in QuickBooks Online, it is commonly used for entries like invoices, bills, or expenses. Batch deleting isn’t available for all QuickBooks users, so this may not be an option depending on your access and the type of transactions you want to delete.
Bulk deletion uses the Batch Actions function in QBO Accountant, which allows for the removal of multiple transactions from a single category—like bills, invoices, or expenses—all at once.
If you’re dealing with multiple transactions that meet the criteria for bulk deletion, follow these steps:
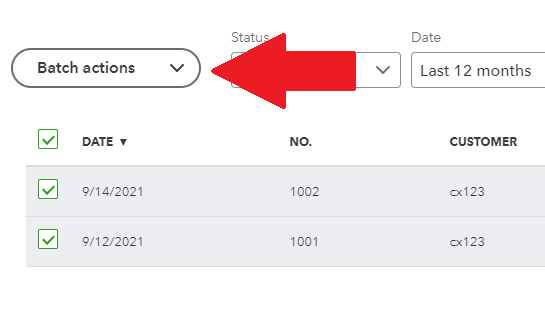
- From the left-hand menu on your dashboard, click on Transactions.
- Choose the category that contains transactions you wish to delete.
- Apply filters to narrow down the list of transactions. Filter by date, type, status, or other criteria.
- Then click on the checkbox next to each transaction you want to delete. You can select multiple entries by checking the boxes next to them.
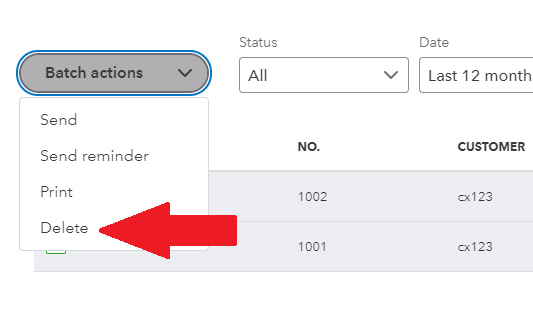
- Look for the Batch Actions dropdown at the top of the list and click it to reveal the available options.
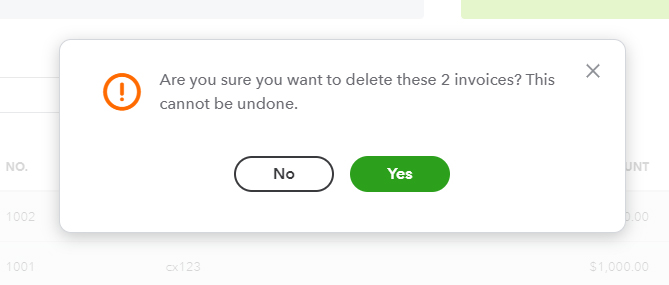
- From the Batch Actions menu, select Delete. QuickBooks will ask for confirmation.
- Confirm that you want to delete the selected transactions. Remember that deletions are permanent so be really sure before confirming.
Mass deleting transactions
Mass deletion involves removing large numbers of transactions across multiple categories or types. It’s a helpful tool to clear out outdated test entries, old bank feeds, or large batches of imported data that you no longer need.
Mass deleting often involves using filters to target specific transactions; while it’s a helpful feature, it’s important to note that it’s only available under certain conditions in QuickBooks Online, and certain options, like deleting invoices and expenses simultaneously, isn’t possible without QuickBooks Online Accountant access or third-party tools.
Always start by backing up your records. Then follow these steps:
- From the left-hand menu, navigate to Banking (for bank feed transactions) or Transactions (for invoices, expenses, etc.).
- Apply filters (e.g., transaction date range, type, status) to narrow down the transactions to delete.
- Select the checkbox next to the desired transactions. Note: you can only select transactions in the same category.
- Click Batch Actions at the top of the list and select Delete.
- Review the selected transactions and confirm—deletions can’t be undone.
If you don’t see Delete as an option in the Batch Actions menu, you may not have appropriate access, or you may need to look at a different transaction type.
How to delete multiple transactions in QuickBooks Desktop
With QuickBooks Desktop, you have two options for deleting multiple transactions: (1) manually, or (2) the Batch Delete/Void Transactions tool (BDT), which supports specific transaction types like invoices, bills, or payments.
BDT streamlines bulk deletions but you’ll need to do more setup and filtering compared to QuickBooks Online, and you’ll have to navigate registers or transaction histories. It’s currently only available for QuickBooks Desktop Accountant (2018 onwards), Enterprise, and Enterprise Accountant 18.0+ users. If you’re using QuickBooks Pro or Premier, you won’t be able to access this feature.
It’s important to note that some transactions (like payroll, sales tax, and online payments, invoices with reimbursements or billable time, and any transactions in a closed period) can’t be batch deleted. If you want to delete more than one at a time, you’ll need to do it individually.
Remember, deletions are permanent. Always back up your QuickBooks Desktop company files so you can recover your data if anything goes wrong.
Here’s a step-by-step guide to backing up your company files:
- Open QuickBooks Desktop and sign in to the company file.
- Go to the File menu, select Back Up Company, and then Create Local Backup.
- Choose Local Backup and click Next.
- Select where to save your backup (computer or external device).
- Click Save it Now and select Next.
- Confirm the backup was completed and stored in the chosen location.
Identify transactions to delete in QuickBooks Desktop
To find the transactions you want to delete, start by looking for indicators like duplicates, incorrect amounts, or test transactions, as well as those from closed periods.
QuickBooks Desktop’s tools for filtering and searching specific entries include:
- Account Registers: View detailed transaction lists for specific accounts.
- Transaction History: Access a timeline of transactions to spot old or irrelevant ones.
- Search and Filter: Use Find or Filter functions to search by date, type, amount, or account.
- Audit Trail: Track changes to identify modifications or errors.
- Reports: Run reports like Transaction List by Date to find outdated entries.
Choose and delete multiple transactions
Once you’ve filtered and located duplicate transactions, errors, or outdated records, you can use the Delete Multiple Transactions tool to delete them all at once:
- Go to the Accountant menu and select Delete Multiple Transactions.
- Choose the account from which to delete transactions.
- Apply filters to narrow down the transactions you want to remove.
- Select the transactions by checking the boxes next to them.
- Click Delete.
Confirm deletion
We can’t stress it enough: Deleting transactions is permanent. Take your time and confirm your choices to avoid accidental data loss.
That all-important confirmation step allows you to review your selections before you finalize the deletion so you only remove the transactions you want to delete.
Here are some tools for confirming deletion of multiple transactions:
- Review Screen: Verify selected transactions before deletion.
- Confirmation Dialogs: QuickBooks prompts a final confirmation before proceeding.
- Transaction Summary: Check details such as date, amount, and type before deleting.
- Reconfirm Deletion: QuickBooks shows a summary of batch deletions for final verification.
Verify deleted transactions
Once you’ve deleted your transactions, verify that they were correctly removed:
- Check carefully to make sure deleted transactions no longer appear.
- Generate a Transaction List or Balance Sheet.
- Use the Find function to check if deleted entries still show up.
- Confirm deleted transactions aren’t affecting your reconciliations.
- Review the log to confirm transactions have been properly deleted.
Reconcile your accounts regularly
Make sure you regularly reconcile your accounts to ensure your financial data is accurate, there are no discrepancies or errors, and your records are up to date.
To reconcile your bank accounts:
- In the banking menu, click on Banking and select Reconcile.
- Choose the account to reconcile.
- Input the statement date and ending balance.
- Compare QuickBooks transactions with your bank statement.
- Review discrepancies, including deleted transactions.
- Click Reconcile Now when all transactions are matched.
What to consider before deleting multiple transactions
Be careful before you delete multiple transactions. Think about the impact on your financial records and remember you will only be able to recover deleted data if you have a backup.
Only delete transactions if it’s truly necessary, whether due to errors, duplicate transactions, or outdated entries.
If you’re not sure how deleting transactions will affect reports, bank reconciliations, and potential audits, consult your accountant or review your bookkeeping records in detail first.
Audit trail concerns
An audit trail will log all changes, including transaction deletions. But without specific details on why or how entries were removed, you can be left with gaps in your transaction history.
To maintain a clear audit trail:
- Consult your accountant before deleting any transaction.
- Document all deletions, explaining why they were made.
- Back up your QuickBooks file before deleting anything.
- Delete transactions in batches to track changes easily.
- Regularly review the audit trail to address discrepancies.
Impact on financial reports
Your financial reports—balance sheets and profit and loss statements—can also be affected if you delete multiple transactions. Removing invoices or payments may affect income, accounts receivable, or cash flow, for example, and that can result in inaccurate financial data.
Tips for minimizing report discrepancies:
- Review key reports before deletion to establish a baseline.
- Re-run reports after you delete transactions and compare results for discrepancies.
- Reconcile bank and credit accounts.
- Document deleted transactions and their impact.
- Consult an accountant.
Limitations related to data recovery
There’s no ‘Undo’ option in QuickBooks. So it’s not just difficult and time-intensive to try to recover transactions after you’ve deleted them—it may even be impossible.
Here are some best practices for protecting your data if you’re planning to delete multiple transactions:
- Back up everything—locally and to the cloud.
- Export key reports.
- Save a copy of your company file.
- Check your backup to make sure it actually worked.
When it comes to backing up your data, it’s strongly recommended (and sometimes required) to run QuickBooks in Single-User Mode. Then, use the BDT option and choose Back Up and Delete or Back Up and Void.
Bank transactions and reconciliations
Deleting transactions like payments, deposits, and invoices can cause discrepancies that affect your bank register and financial statements. Make sure you do a bank reconciliation so your records match your statements.
To handle reconciliations after deleting multiple transactions:
- Review your bank statement.
- Access the reconciliation screen in QuickBooks.
- Compare transactions, ensuring deleted entries are removed.
- Adjust for discrepancies if necessary.
- Reconcile the account to match your bank statement.
- Double-check for errors before finalizing.
Key takeaways
- Bulk and mass deletions in QuickBooks Online help remove multiple transactions efficiently, but differ in scope and method.
- QuickBooks Desktop has limited bulk delete features and requires manual steps or the Delete Multiple Transactions tool.
- Deletions are permanent. Always back up your company file before removing transactions to avoid data loss.
- Audit trails and financial reports can be disrupted by deletions so consult an accountant if you’re unsure.
- Reconcile accounts after deleting transactions to ensure your books match your bank records.
Frequently asked questions about deleting multiple transactions in QuickBooks
How often should I back up my data in QuickBooks Desktop?
That depends on your business size and activity level. Consider backing up at least weekly if yours is a small business with few transactions and at least daily for larger businesses with frequent transactions—or more often if you handle sensitive data.
Automated cloud backups can be a user-friendly way to simplify this process.
Can I recover deleted transactions in QuickBooks Desktop?
No, QuickBooks does not offer a built-in Undo feature for deleted transactions, so the transaction may be permanently lost. If you’ve created a backup, you can usually use it as a workaround to recover deleted transactions—but that restores the entire file, not just the specific transactions.
Can I bulk edit transactions in QuickBooks Online?
Yes, but there are limits. You can use the Batch Actions feature to edit multiple transactions at once in areas like invoices, expenses, or payments. Select multiple transactions from a list and make changes, such as updating amounts or categories.
However, bulk editing is not available for all transaction types, and some changes, such as adding new entries or deleting transactions, must still be done individually. It also requires certain access, so it may not be available for all users. Learn more about how Method can help you with your QuickBooks integration.