Man In Black Suit Holding A Gadget

The ultimate QuickBooks chart of accounts template Excel

Download a free QuickBooks chart of accounts template Excel and learn everything you need to know to handle your finances effectively.

The ultimate QuickBooks chart of accounts template Excel Read More »

Are you looking for a clear overview of your business’ finances? By downloading the ultimate QuickBooks chart of accounts template Excel spreadsheet file, you’ll make managing your finances easier than ever.

This allows you to track all the money moving in and out of your accounts. A list of charts are the backbone of your accounting system and will help ensure your bookkeeping stays accurate.

We’ve included a downloadable chart of accounts template for QuickBooks Desktop ready for you to personalize with your own company file info. This can be done by manual data entry or copying and pasting from another document.

Keep reading this guide to learn how to:

  • Import chart of accounts into QuickBooks Desktop from Excel.
  • Manage a QuickBooks Desktop export chart of accounts to Excel file format.
  • Download the ultimate QuickBooks chart of accounts template Excel workbook.

Sick of missing invoices and other data in QuickBooks?

How to import chart of accounts into QuickBooks Desktop from Excel

Your charts of accounts is a comprehensive list of accounts and balances in your business. You can use this list to: 

  • Simplify your financial reporting.
  • Track debts.
  • View your cash flow statements.

You can import chart of accounts into QuickBooks Desktop from Excel files, or with a CSV file type.

Before you begin your import, you will need to make sure that the account types listed under the “Account Type” column header are one of the following. 

  • For balance sheet accounts:
  • Asset, Current Asset, or Fixed Asset (major purchases).
  • Bank.
  • Credit Card.
  • Equity.
  • Accounts Receivable A/R.
  • Accounts Payable A/P.
  • Other Current Liability or Long Term Liability.

For income and expense accounts:

  • Income or Other Income.
  • Expense or Other Expense.

Now, here’s how to import charts of accounts into QuickBooks Desktop:

  1. Navigate to the top menu bar and select “Lists,” then “Chart of Accounts.”

Export QuickBooks to Excel 7

Image credit: Accounting and QuickBooks

  1. At the bottom of the screen, click the tab labeled “Account,”  then select “Import from Excel.”
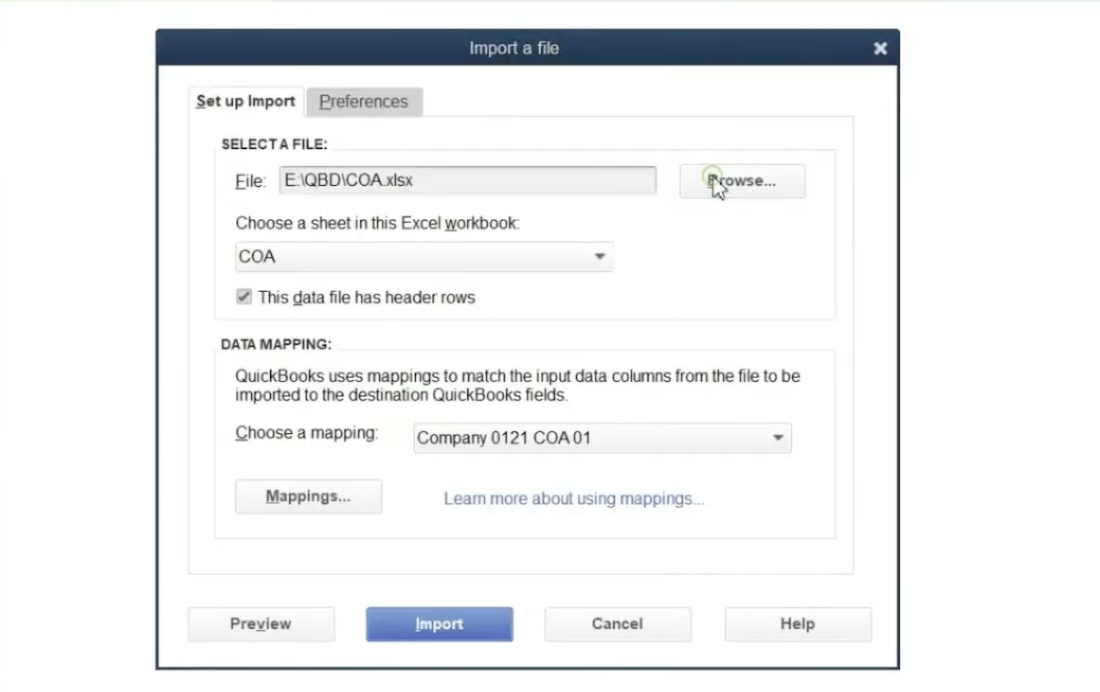
  2. In the new window, select “Browse” and navigate to where your Excel chart of accounts is located on your computer. Select your Excel chart of accounts file and click “Open.”
Export QuickBooks to Excel 6

Image credit: Accounting and QuickBooks

  1. Click the drop-down menu under “Choose a sheet in this Excel workbook” and select the name of the tab in your Excel workbook that has your chart of accounts.
  2. Make sure that the box marked “This data file has header rows” is checked.
  3. Click the bar to the right of “Choose a mapping” and select “<Add New>.”
  4. A new “Mappings” window will appear, where you need to ensure your column headings are the same in your Excel file as what’s listed in QuickBooks. For example, if you have a heading called “Type” in your Excel spreadsheet file, then you will need to select “Type” in the “Mappings” window in QuickBooks.
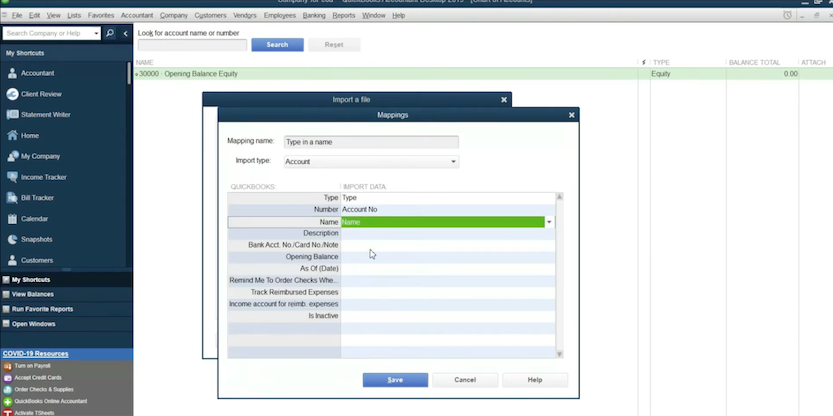
Export QuickBooks to Excel 5

Image credit: Accounting and QuickBooks

  1. In the text box labeled “Mapping name,” enter a unique name for organizational purposes.
  2. When you have finished mapping your QuickBooks chart of accounts template Excel file headers, click “Save.”
  3. Click “Import” and then “Yes.” You may need to close your Excel workbook before you can continue.
  4. If you receive a notification that prompts you to save an error log from the import: click “Save,” choose the location on your computer where you want to save the file, and click “Save” again.

And that’s it! Your imported chart of accounts is now visible in QuickBooks Desktop.
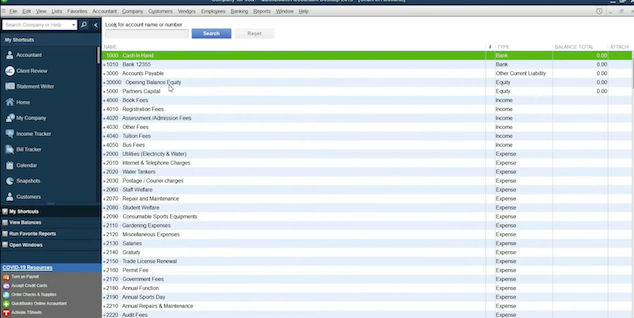
Export QuickBooks to Excel 3

Image credit: Accounting and QuickBooks

Need an easier way to keep your QuickBooks data up-to-date?

Get your QuickBooks chart of accounts template Excel file

Ready to get your copy of the ultimate QuickBooks chart of accounts template for Excel? Click the link below to download it now!

Note that this QuickBooks chart of accounts template Excel form is designed for QuickBooks Desktop. So, it’s not recommended if you use the QuickBooks Online version.

If you don’t see the download form, download template here.

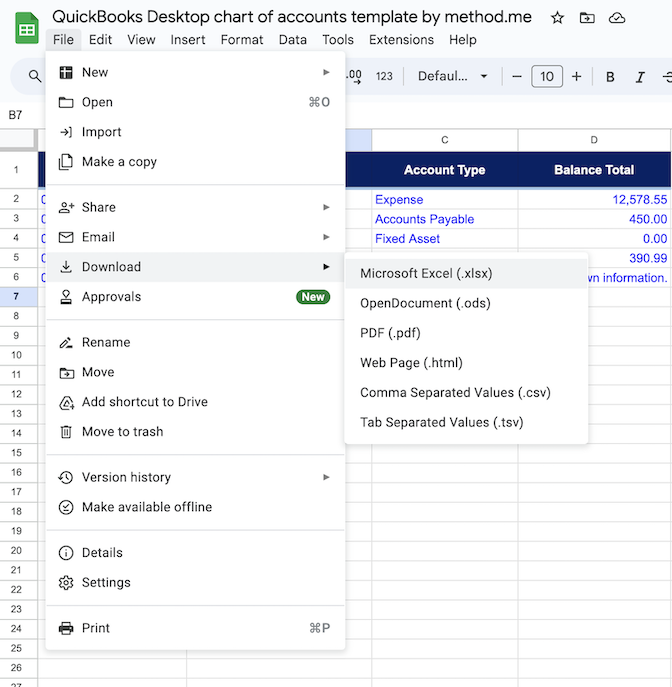
After clicking the link, your template file will open in Google Sheets. To convert the template to Excel:

  1. From the Google Docs window, navigate to the File menu and find “Download.”
  2. Select “Microsoft Excel (.xlsx).”
  1. The file saves to your computer’s “Downloads” folder unless you have specified new downloads to save elsewhere.

Wish you could get more from QuickBooks? Method makes it possible.

How to set up a chart of accounts template in QuickBooks

After downloading the above template, open it in Excel to begin editing. A few examples are listed in blue text to help you understand what information you should include in each column.

Account Number

The first column labeled “Account Number” is optional. If you don’t have an account number in your records, or your account number is a part of your account name, you can delete this column from the template.

Account Name

“Account Name” is what the account you’re entering is called. Make sure the name is brief and descriptive. It could be anything from “Payroll” to “Business purchases.”

Account Type

Your “Account Type” column correlates to the category of your “Account Name.” 

Note: You can only choose the “Account Type” from one of the transaction types listed above in the “How to import chart of accounts into QuickBooks Desktop from Excel” section of this guide.

Balance Total

The “Balance Total” column indicates the dollar value of the account. If the account doesn’t have a monetary value associated with it, you can leave this figure at 0.00.

When you’ve entered your company file information, you can follow the import process laid out above.

How to export a chart of accounts to Excel

The QuickBooks Desktop export chart of accounts to Excel process is simpler than when you import data:

  1. In QuickBooks Desktop, select “Lists” from the top menu bar and then select “Chart of Accounts.”
  2. In the “Reports” tab at the bottom of the screen, select “Account Listing.”
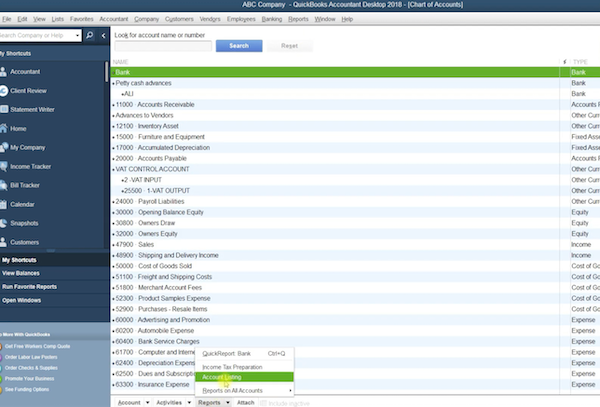
Export QuickBooks to Excel 1

Image credit: Accounting and QuickBooks

  1. At the top of the screen, select the “Excel” tab and click “Create New Worksheet.”
  2. A new window will open. Make sure to check “Create new worksheet” and “in new workbook,” then click “Export.”
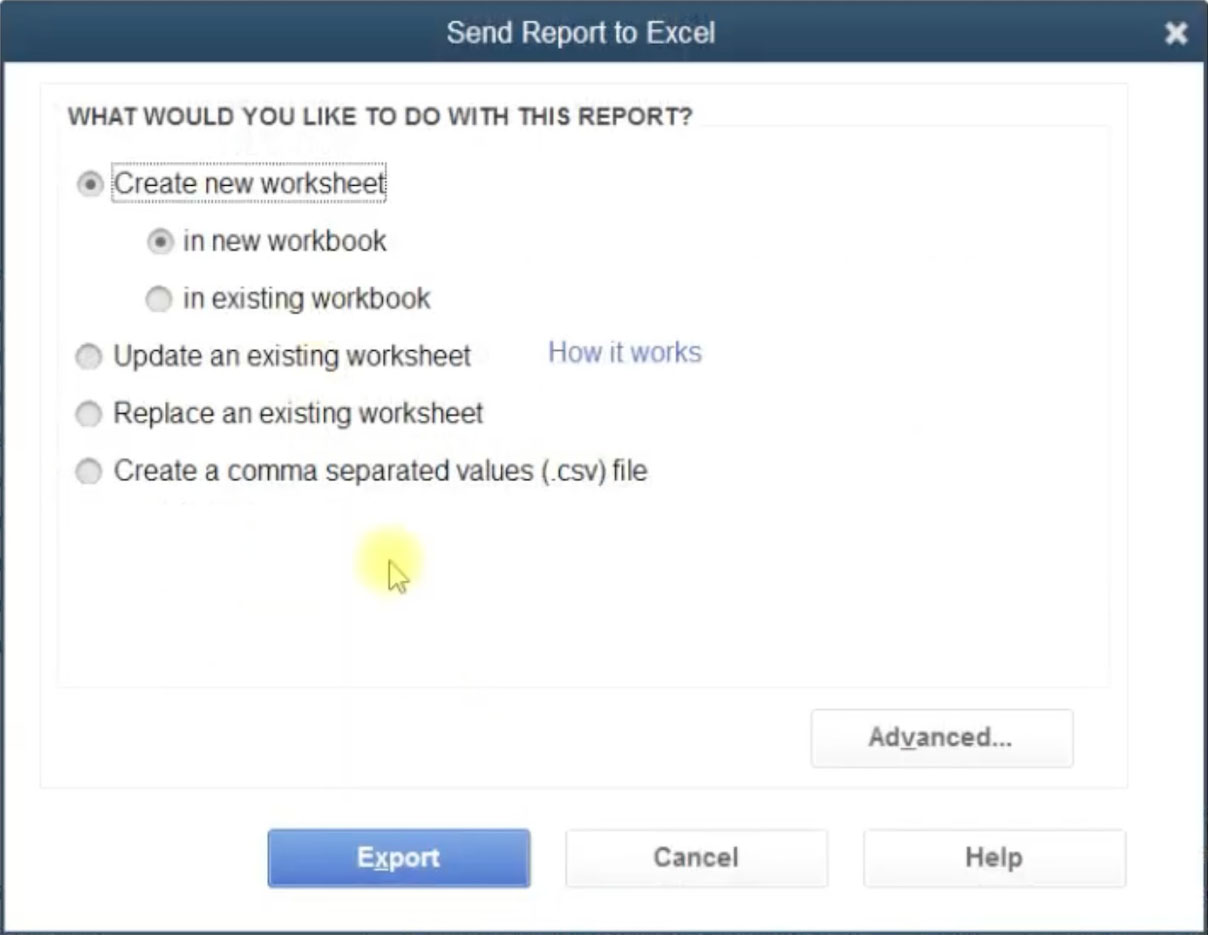
Export QuickBooks to Excel.

Image credit: Accounting and QuickBooks

  1. Your exported Excel chart of accounts will open and you can make any edits before you save it to your computer.

Learn how you can extend the power of QuickBooks Desktop and run your business better with Method in this free ebook!

Image credit: Andrea Piacquadio via Pexels

Man Sitting at the Desk and Counting Money while Using a Calculator

QuickBooks vs. Excel for small business accounting in 2026

Excel is a classic bookkeeping tool, but could QuickBooks be better? Keep reading to compare QuickBooks vs. Excel for small businesses in 2025

QuickBooks vs. Excel for small business accounting in 2026 Read More »

Tackling small business accounting? Choosing between QuickBooks vs. Excel isn’t easy. 

Excel is the familiar go-to, equipped with a comprehensive set of templates and formulas. Plus, you probably already have it. 

But as your business scales up, is QuickBooks the better bet? 

Keep reading to discover: 

  • The importance of accounting software. 
  • Key criteria for software selection. 
  • The ins and outs of QuickBooks vs. Excel. 

Let’s jump in!

QuickBooks can’t do everything, so let Method CRM help!

Why does your business need accounting software?

Before diving into QuickBooks vs. Excel, it’s important to understand why you need accounting software. 

Spreadsheets, while familiar, have their drawbacks. They are: 

  • Prone to manual errors. 
  • Time-consuming. 
  • Limited in advanced analytics. 

Without a dedicated system, managing finances is challenging. This is where modern accounting software comes in to: 

  • Simplify tax processes: Accounting software reduces the risk of inaccurate tax returns and protects you from fines. 
  • Save time: Automate administrative tasks to free up your time for more value-added activities. 
  • Ensure accurate financial data: Enjoy error-free results in your calculations, invoices, and bank statements. Software automation saves you from aggravation and reduces risks by eliminating manual data entry.
  • Track business history: Accounting software accurately logs transactions and offers advanced analytics for data-driven decision-making. 

What to look for when choosing an accounting software

When considering QuickBooks vs. Excel, you need to know what to look for in an accounting software for your unique operations. 

The right software boosts your efficiency and bottom line. Consider these key factors: 

  • Your company’s needs: Tailor the software to meet your financial and operational requirements. 
  • Business size and type: Ensure compatibility with your business’ scale and structure. Consider how many people on your team need access.
  • Additional tools: Look for features that further simplify your accounting process. 
  • Integration capabilities: Your platform should offer seamless integration with existing applications to give you a unified system. 
  • Scalability: Choose software that supports business growth and adapts to future changes. 

Carefully evaluating these aspects helps you select an accounting solution that meets your present and future financial management needs. 

QuickBooks vs. Excel

Without further ado, let’s compare Excel vs. QuickBooks for small business owners. 

What is QuickBooks?

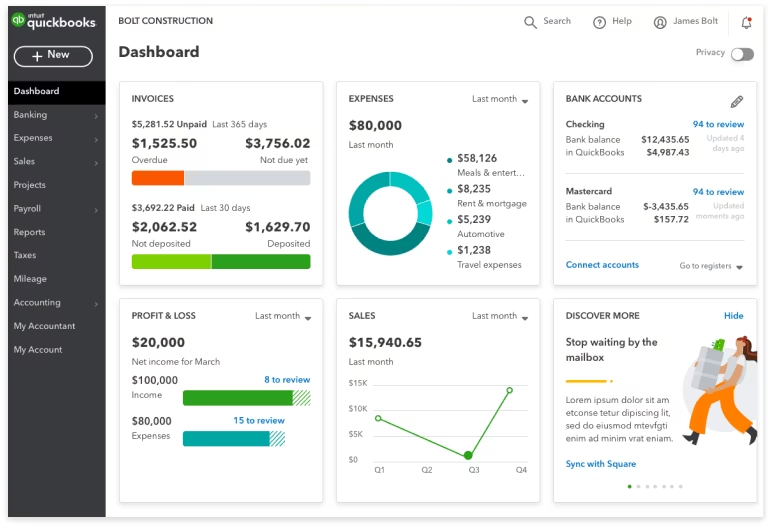
Image credit: QuickBooks

QuickBooks is a popular accounting software that helps businesses manage their finances. It offers two different versions, each with multiple pricing plans: 

  • QuickBooks Online: Ideal for flexible, cloud-based accounting. 
  • QuickBooks Desktop: Perfect for robust, local financial management. 

QuickBooks features

QuickBooks offers a suite of features designed to simplify financial management for small businesses. Here are the highlights: 

  • Invoicing: QuickBooks allows you to create custom invoices, send payment reminders, and automatically match payments to invoices.
  • Expense tracking: QuickBooks lets you track bills and expenses all in one place. 
  • Bank feeds: By connecting your bank account, QuickBooks offers a complete view of your finances, saving you time and reducing errors.
  • Tax management: QuickBooks tracks sales tax and provides a clear picture of tax liabilities.
  • Inventory management: Real-time inventory management helps keep track of orders and quantities.
  • Reporting capabilities: QuickBooks provides valuable insights into your business with its advanced reporting tools.

QuickBooks pros and cons

When weighing QuickBooks vs. Excel, it’s essential to examine each one’s strengths and weaknesses. 

QuickBooks offers a range of benefits to simplify your accounting process. It offers: 

  • Multi-device access.
  • Continuous updates.
  • A user-friendly interface.
  • Third-party integrations.
  • Online payment support.
  • Budgeting and data analysis tools.

Additionally, it supports partial payments and lets you import financial transactions from Excel to QuickBooks Desktop or Online

However, even with its strengths, QuickBooks does come with disadvantages. You have to deal with: 

  • Update costs. 
  • User cap restrictions. 
  • Limited industry-specific features. 
  • Extra charges for support and training. 

Actively weighing QuickBooks’ pros and cons simplifies your decision between QuickBooks vs. Excel. 

QuickBooks pricing

When it comes to analyzing Excel vs. QuickBooks for small business growth, your wallet takes center stage. 

The price of QuickBooks depends on whether you opt for the Desktop or Online version. Here’s a price breakdown:

QuickBooks Desktop only offers an Enterprise plan, but it comes in three tiers. Here is their pricing for your first year:

  • Enterprise Gold: $1,922 per year.
  • Enterprise Platinum: $2,363 per year.
  • Enterprise Diamond: $4,668 per year.

On the other hand, QuickBooks Online offers four different pricing models, each with a 50% discount for your first three months: 

  • Simple Start: $35 per month.
  • Essentials: $65 per month.
  • Plus: $99 per month. 
  • Advanced: $235 per month. 

Understanding these prices helps you make an informed decision between Excel vs. QuickBooks for small business budgets. 

Method CRM lets you run your business, your way.

What is Excel?

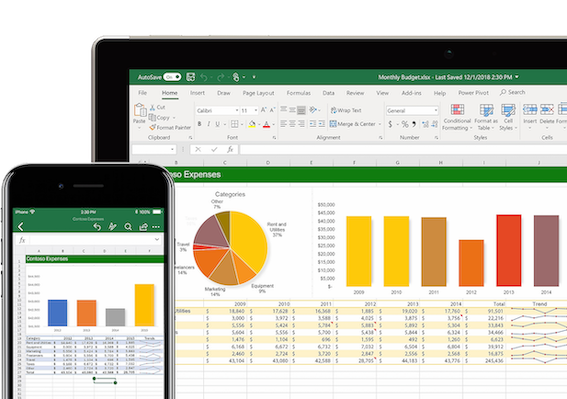
Microsoft Excel product shot with graphs

Image credit: Microsoft

Now that you’ve examined QuickBooks in your QuickBooks vs. Excel analysis, let’s turn to Excel. Developed by Microsoft, Excel is a spreadsheet software program that lets users: 

  • Handle and organize data. 
  • Analyze information. 
  • Present insights. 

Excel’s ease of use and familiarity make it a go-to choice for many small businesses, particularly for data tracking and quick calculations.  

Excel features

Excel caters to different users with its extensive range of features:

  • Formulas and functions: Take advantage of over 400 built-in functions for statistical and financial calculations. 
  • Pivot tables: Simplify data analysis and interpretation with pivot table functionality. 
  • Charts and graphs: Choose from a broad selection of visual tools for data visualization. 
  • Data filtering and sorting: Easily organize large datasets with Excel’s advanced filtering and sorting. 
  • Conditional formatting: Enhance data visibility with criteria-based cell formats. 

Excel pros and cons

Evaluating Excel’s pros and cons is key when comparing QuickBooks vs. Excel for small business owners.

Advantages of using Excel include: 

  • High versatility. 
  • Simple data storage. 
  • Reusable templates. 
  • User-friendly design.   
  • Third-party integrations. 
  • Large dataset management. 

Plus, you can import and export the QuickBooks chart of accounts into Excel. This lets you harness Excel’s powerful data analysis and visualization features for better financial reporting.

Of course, Excel isn’t without its limitations:  

  • Risk of manual data entry errors. 
  • Limited automation features. 
  • Not specialized for bookkeeping.
  • Complex calculations and formulas.  

In an environment where efficiency is key, the manual labor required for Excel gets substantial. That’s why it’s so important to consider Excel vs. QuickBooks for small business needs in particular. 

Excel pricing

Excel offers two different pricing options:

  • Cloud version pricing: Monthly subscription with Microsoft 365, starting at $6.99 per month.
  • Desktop version pricing: One-time fee of $159.99 for PC or Mac.

Users who prioritize flexibility and remote access find the cloud version ideal. In contrast, the desktop version, though initially pricier, delivers a solid, locally-based solution.

Can Excel be used as an accounting software?

When weighing QuickBooks vs. Excel, you might question if you can effectively use Excel as an accounting program.

The reality is that Excel is not great for accounting purposes. Unlike specialized tools, it lacks the key features you need for comprehensive accounting. Major limitations include:

  • The inability to generate key reports like financial statements or balance sheets.
  • No inventory tracking functionality.
  • An absence of built-in expense allocation.
  • Limited reconciliation features, which makes the process tedious and manual in Excel.
  • No built-in tax compliance, which makes tax-related accounting more challenging.

Given these constraints, using modern accounting software like QuickBooks is your better option. It’s a dedicated accounting tool that offers automated features for strong financial management. 

Navigate QuickBooks confidently with a setup that’s fully customized for your business

Method is the #1 lead-to-cash automation tool for QuickBooks users. It offers a fully customizable process that automates several business tasks for maximum efficiency. This includes your entire invoicing process, from creation to receiving payment. 

What’s more is that Method integrates seamlessly with QuickBooks, elevating personalization at every step. It offers a bi-directional sync with your accounting software, so any changes you make in one end reflect in the other.

Wrap up: Excel vs. QuickBooks for small business

When considering QuickBooks vs. Excel for small business accounting, it’s essential to recognize each platform’s strengths and limitations.

Excel is versatile and user-friendly, but it lacks advanced accounting features. Conversely, QuickBooks is tailored for accounting and enhances your bookkeeping management. 

Both tools offer varied pricing options to suit different requirements, so you can find the best-fit plan for your business.

If you’re a growing business looking for robust financial management, QuickBooks is your better choice.

Even QuickBooks has its limits. See how Method automates your workflows to save you time and money.

Image credit: Pavel Danilyuk via Pexels

Gray Laptop Beside White Printer Paper

QuickBooks Import Excel and CSV toolkit: Step by step

Discover how to simplify your data import processes with the QuickBooks Import Excel and CSV toolkit. Gain control over your data!

QuickBooks Import Excel and CSV toolkit: Step by step Read More »

Smart, data-driven decisions are the foundation of business success. This begins with how you manage and use your financial data. 

You’ve probably got your accounting data neatly organized in a CSV or Excel file, but what’s next?

Enter the QuickBooks Import Excel and CSV toolkit. It lets you easily import data directly into QuickBooks to get it ready for analysis. 

Keep reading to learn how you can use the QuickBooks Import Excel and CSV toolkit for your business. 

Need an easier way to keep your QuickBooks data up-to-date?

CSV vs. Excel: What are they?

Before diving into the QuickBooks Import Excel and CSV toolkit, let’s go over the basics of CSV vs. Excel. 

CSV

Image credit: Loader

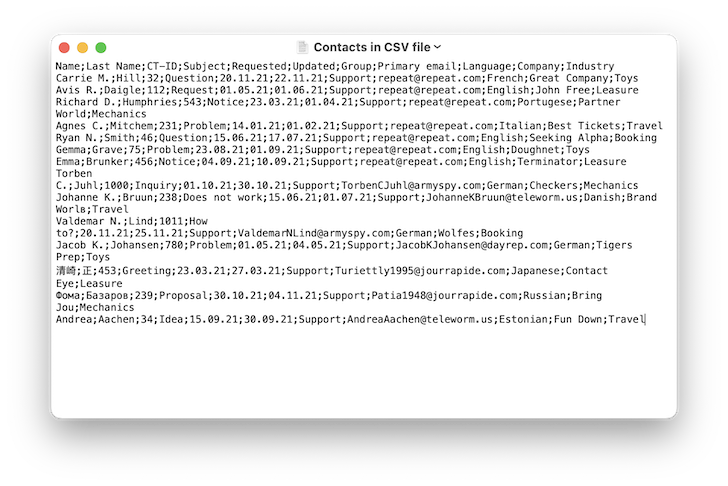
A CSV, or a comma-separated values file, is a simple text file that stores data in a tabular format. Each piece of information is separated by a comma, and the file ends with a .csv extension. 

You can open CSV files with programs like Microsoft Excel, Google Sheets, and Notepad. 

Note that CSV files have limitations. They: 

  • Contain only a single sheet per file. 
  • Don’t save cell, column, or row formatting. 
  • Can’t store formulas. 

Excel

Image credit: Microsoft 

Developed by Microsoft, Excel is a spreadsheet application that lets users manage data, including:

  • Numbers. 
  • Formulas. 
  • Text. 
  • Charts. 

Excel organizes data in a grid of columns and rows. It has two associated file types: .xls and .xlsx. It’s a great platform to help you organize detailed data and perform complex analyses.

In a nutshell, CSV files store simple text data, while Excel spreadsheets are more structured for in-depth analysis. 

Now you’re ready to learn more about the QuickBooks Import Excel and CSV toolkit. 

What is the QuickBooks Import Excel and CSV toolkit?

The QuickBooks Import Excel and CSV toolkit makes importing data into QuickBooks easy and efficient. 

It offers several resources to minimize human errors during the import process:  

  • Import from Excel and CSV manual: A step-by-step guide with best practices and tips. 
  • CSV examples folder: Four sample CSV files, each for a specific list type.  
  • XLS example folder: A sample spreadsheet with four tabs, one for each list menu. 
  • Allowed fields: A guide for advanced import fields.

This toolkit is especially useful, as it helps you: 

  • Handle large data. 
  • Conduct bulk imports. 
  • Manage finances better. 
  • Reduce your risk of errors. 

But how exactly do you import data using the toolkit? 

How to use the QuickBooks Import Excel and CSV toolkit

Using the QuickBooks Import Excel and CSV toolkit is straightforward. Here’s a step-by-step guide: 

Note that the toolkit contains Windows-based software, like .exe files, which macOS doesn’t natively support. Mac users can directly import Excel and CSV files into QuickBooks through its interface.

Download and install the toolkit

  1. Open QuickBooks and locate the download window for the toolkit. 
  2. On your Windows Desktop, click “Save.”
  3. Double-click “QuickBooks_Import_Excel_and_CSV.exe” on your desktop.
  4. In the “WinZip Self-Extractor” window, click “Browse.” 
  5. Choose the folder where you want to install the toolkit and click “OK.” 
  6. Click “Unzip” to extract the files, then “Close” to exit the extractor. 
  7. Open the QuickBooks Import Excel and CSV toolkit folder. 

Now you’re ready to import data into your accounting software!

How to import a CSV file into QuickBooks

Here’s how to use the QuickBooks Import Excel and CSV toolkit for CSV import: 

  1. Click “Banking” on the left-side menu of the toolkit. 
  2. Choose “Update drop-down menu” or “Upload Transactions Manually.”
  3. Click on “File Upload” in the file menu. 
  4. Browse and select the CSV folder. 
  5. Click “Next.”
  6. Choose the QuickBooks account. 
  7. Map the specific import fields for an accurate data transfer. 
  8. Click “Next.” 
  9. Select the CSV files to import. 
  10. Confirm with “Yes,” then “Finish.” 

Wish you could get more from QuickBooks? Method makes it possible.

How to import an Excel file into QuickBooks

Importing Excel files into QuickBooks is similar to importing CSV formats: 

  1. Click “Banking” on the left-side menu of the toolkit. 
  2. Choose “Update drop-down menu” or “Upload Transactions Manually.”
  3. Click on “File Upload” in the file menu. 
  4. Browse and select the Excel folder. 
  5. Click “Next.”
  6. Choose the QuickBooks account. 
  7. Map the specific import fields. 
  8. Click “Next.” 
  9. Select the Excel files to import. 
  10. Confirm with “Yes,” then “Finish.” 

Are there size limits or formatting requirements?

When you import Excel to QuickBooks, size limits and formatting requirements are key factors to consider. 

QuickBooks lets you import up to 1,000 rows at once. If your Excel file has more than this, you’ll need to split it into smaller files. 

From our firsthand examination, it’s best to match your file precisely with QuickBooks’ data fields. This ensures you use the correct sheet and proper column and row headers. To accurately import data and avoid errors, follow this order when you map fields: 

  1. Customers.
  2. Vendors.
  3. Products and services.
  4. Invoices.

Pro Tip: These practices are also helpful if you need to export data from QuickBooks to Excel. 

What lists can you import into QuickBooks?

When using the toolkit, it’s useful to know what exactly you can import into QuickBooks. Here are the key list types: 

  • Customer lists: Keep track of customer names, contacts, and addresses.
  • Vendor lists: Detail your vendors’ names, addresses, and contact information.
  • Employee lists: Input employee details for QuickBooks Payroll.
  • Item lists: Catalog products or services with descriptions, pricing, and stock.

Beyond lists, you can also import other data types into QuickBooks: 

  • Chart of accounts: Organize your business accounts, including names and types.
  • Transactions: Manage invoices, bills, checks, and sales receipts. 
  • Bank transactions: Record banking and credit card transactions for reconciliation.
  • Journal entries: Enter data for advanced accounting needs.
  • Budget data: Control budget details for financial planning.

You can compile all of this data easily into an Excel or CSV file for a smooth import into QuickBooks. It’s this functionality that makes QuickBooks a one-stop solution for organizing your company files. 

But, it’s just as important to ask: What lists can you not import from Excel into QuickBooks, and is the same true for CSV files?

What lists can you not import into QuickBooks?

When using the toolkit, you may wonder: 

  • What lists can you not import from Excel into QuickBooks? 
  • What lists can you not import from CSV into QuickBooks? 

The good news is that input limitations don’t depend on whether the data is in Excel or CSV format. But there are some import limitations to keep in mind:

  • Types of transactions: QuickBooks has limitations around importing transactions. Not all transaction types, like paychecks and sales orders, are supported for import.
  • Advanced inventory: You can’t import advanced inventory fields into QuickBooks.
  • Transaction linkages: QuickBooks doesn’t import links between transactions, such as connections between invoices and payments.
  • ​​Custom fields on transactions: The platform doesn’t import custom fields on transactions.

Take note of these limitations as you prepare to import your data into QuickBooks. 

Can you import bank transactions into QuickBooks as a CSV file?

The answer is yes! Here’s a quick guide: 

  1. Go to the QuickBooks Dashboard and click “Banking” on the left.
  2. Click the drop-down arrow on the “Link account” button. 
  3. Choose “Upload from file.”
  4. On the “Import bank transactions” tab, drag and drop your CSV file or click “Select files.”
  5. Select the account where you want the transactions to go.
  6. Click “Continue.”

Automate your financial reporting and say goodbye to manual data entry with Method

As the #1 QuickBooks CRM, Method automates every aspect of your business, from lead tracking to financial management. At the heart of its automation capabilities is its two-way, real-time sync with QuickBooks.

Method scales with your business without missing a beat. Say goodbye to the challenges that come with manual data entry and focus on growing your business.

Wrap-up

The QuickBooks Import Excel and CSV toolkit is an excellent tool for business owners and accounting professionals who use Excel or CSV file formats. It offers useful guides and samples for various data types, from customer lists to budget details. 

The software tool simplifies data import so you can: 

  • Make confident decisions. 
  • Be more proactive.
  • Achieve cost savings. 

To expand your limits when it comes to inputting data into QuickBooks and improve your bottom line, consider implementing a powerful automation tool like Method.

See how Method masters QuickBooks data integration.


Photo credit: Nataliya Vaitkevich via Pexels

Person in Black Long Sleeve Shirt Using Macbook Pro showing the dashboard of QuickBooks Online

How to import transactions into QuickBooks Online from Excel

Learn how to easily import transactions into QuickBooks Online from Excel. Get detailed steps plus pros and cons in our guide.

How to import transactions into QuickBooks Online from Excel Read More »

Bulk transactions are the perfect way to quickly move large amounts of data into your QuickBooks account. This fast and convenient process lets you import several types of transaction information from Excel and CSV files.

When you import transactions into QuickBooks Online from Excel, you don’t need to spend time on manual data entry, which gives you a much smaller chance of errors.

In this detailed step-by-step guide, you’ll learn:

  • How to import transactions into QuickBooks Online from Excel.
  • The pros and cons of importing into QuickBooks.
  • What spreadsheet format to use.
  • What to expect when you import transactions into QuickBooks from Excel.
  • Your import options for file and data types.

Let’s get started!

Need an easier way to keep your QuickBooks data up-to-date?

Can you import transactions into QuickBooks Online?

Yes, it’s easy to import transactions into QuickBooks from Excel. You can import and export

This bi-directional data transfer gives you total control of your information, which drives actionable insights.

What type of transactions can be imported into QuickBooks Online?

QuickBooks supports import data for several form types so that you can quickly and easily store their information in your accounting system.

You can import:

  • Customer and supplier contact information.
  • Bank transaction imports.
  • Product and service items.
  • A chart of accounts.
  • Invoices.
  • Bills and expenses.
  • Journal entries.

How to import transactions into QuickBooks Online from CSV

To import transaction details into QuickBooks Online from a CSV format file, you will want to format CSV files from your Excel spreadsheet. Then, follow the same steps outlined above. Our research indicates that CSV files are the preferred output format of most imports.

To save your spreadsheet as a CSV file format, follow this simple four-step process.

  1. Navigate to the File menu and click “Save as.”
  2. Click “Browse” and choose where you want to save the file on your computer.
  3. In the “Save as type” box, select CSV (comma delimited .csv).
  4. Click “Save” to finish saving the file.

How to import transactions into QuickBooks Online from Excel

While you can create or edit your transactions in an Excel format XLSX file, QuickBooks Online can only receive imports from a CSV, QFX, QBO, OFX, or TXT type file.

To import your transactions from an Excel XLSX file, the easiest way is to save a copy of it in a CSV file format first. Follow the instructions above to do so, then use your new CSV file to import your transactions using these steps:

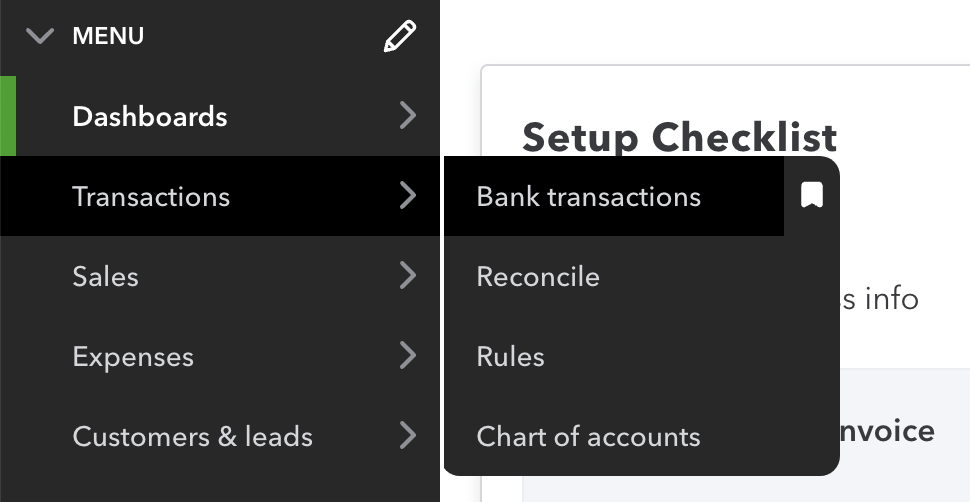
  1. Navigate to the “Transactions” tab and click on “Bank transactions.”
Import bulk transactions 1
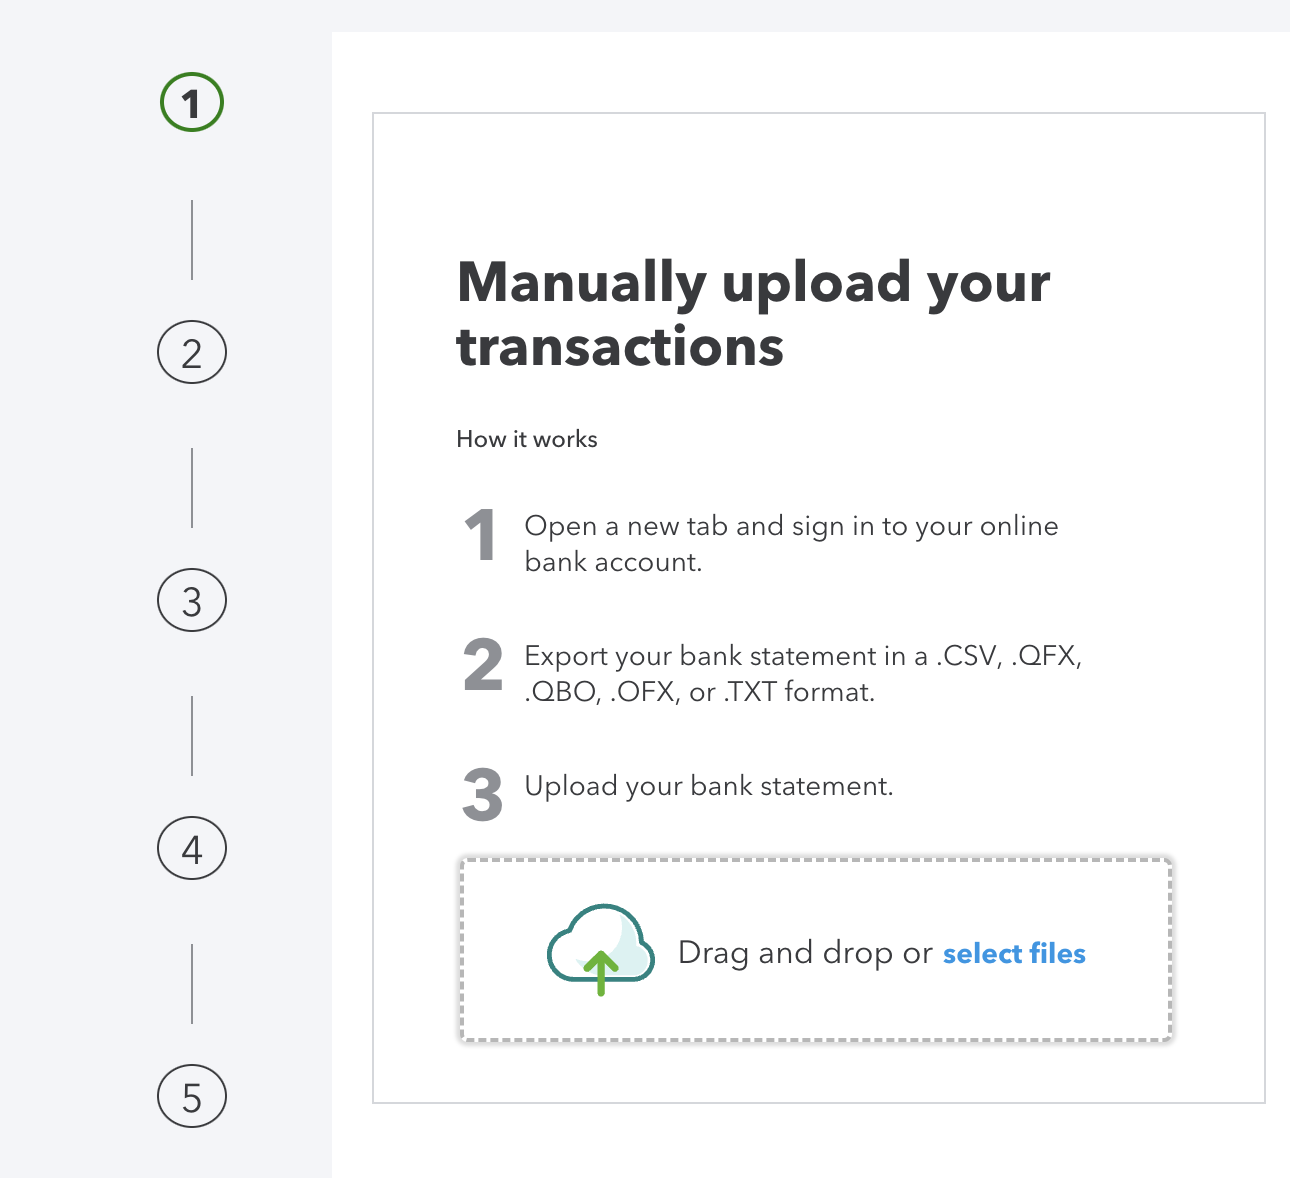
  1. Click the button labeled “Upload transactions” and then choose “Drag and drop or select files.”
Import bulk transactions 2
  1. Locate the CSV file on your computer and click “Open.”
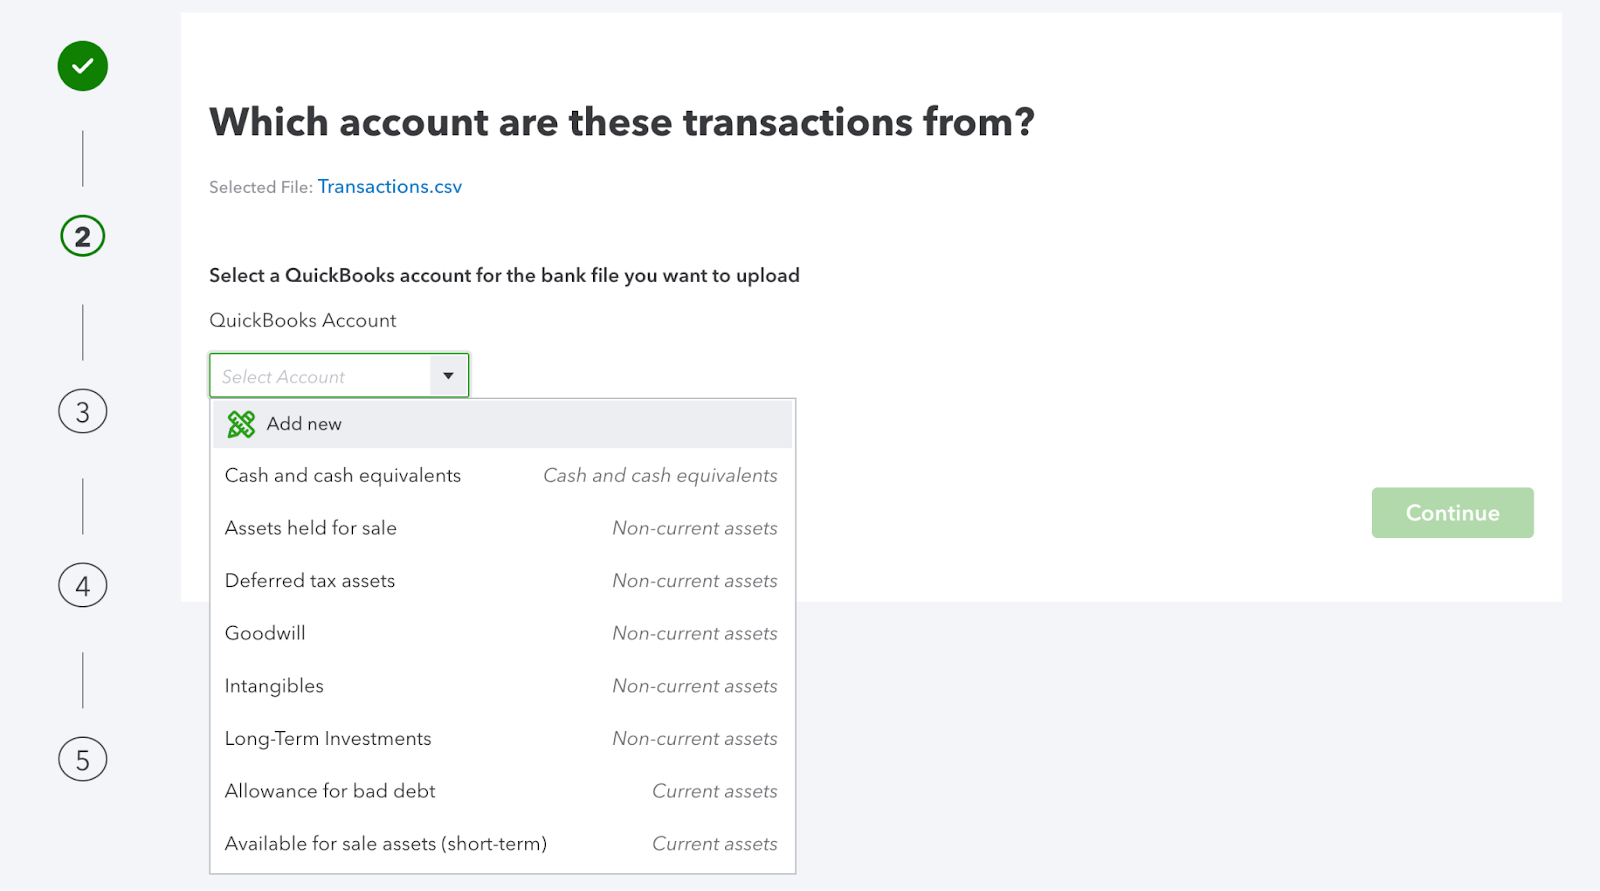
  2. Select the account you want to upload the transactions to in the QuickBooks account drop-down list, then click “Continue.”
Import bulk transactions 3
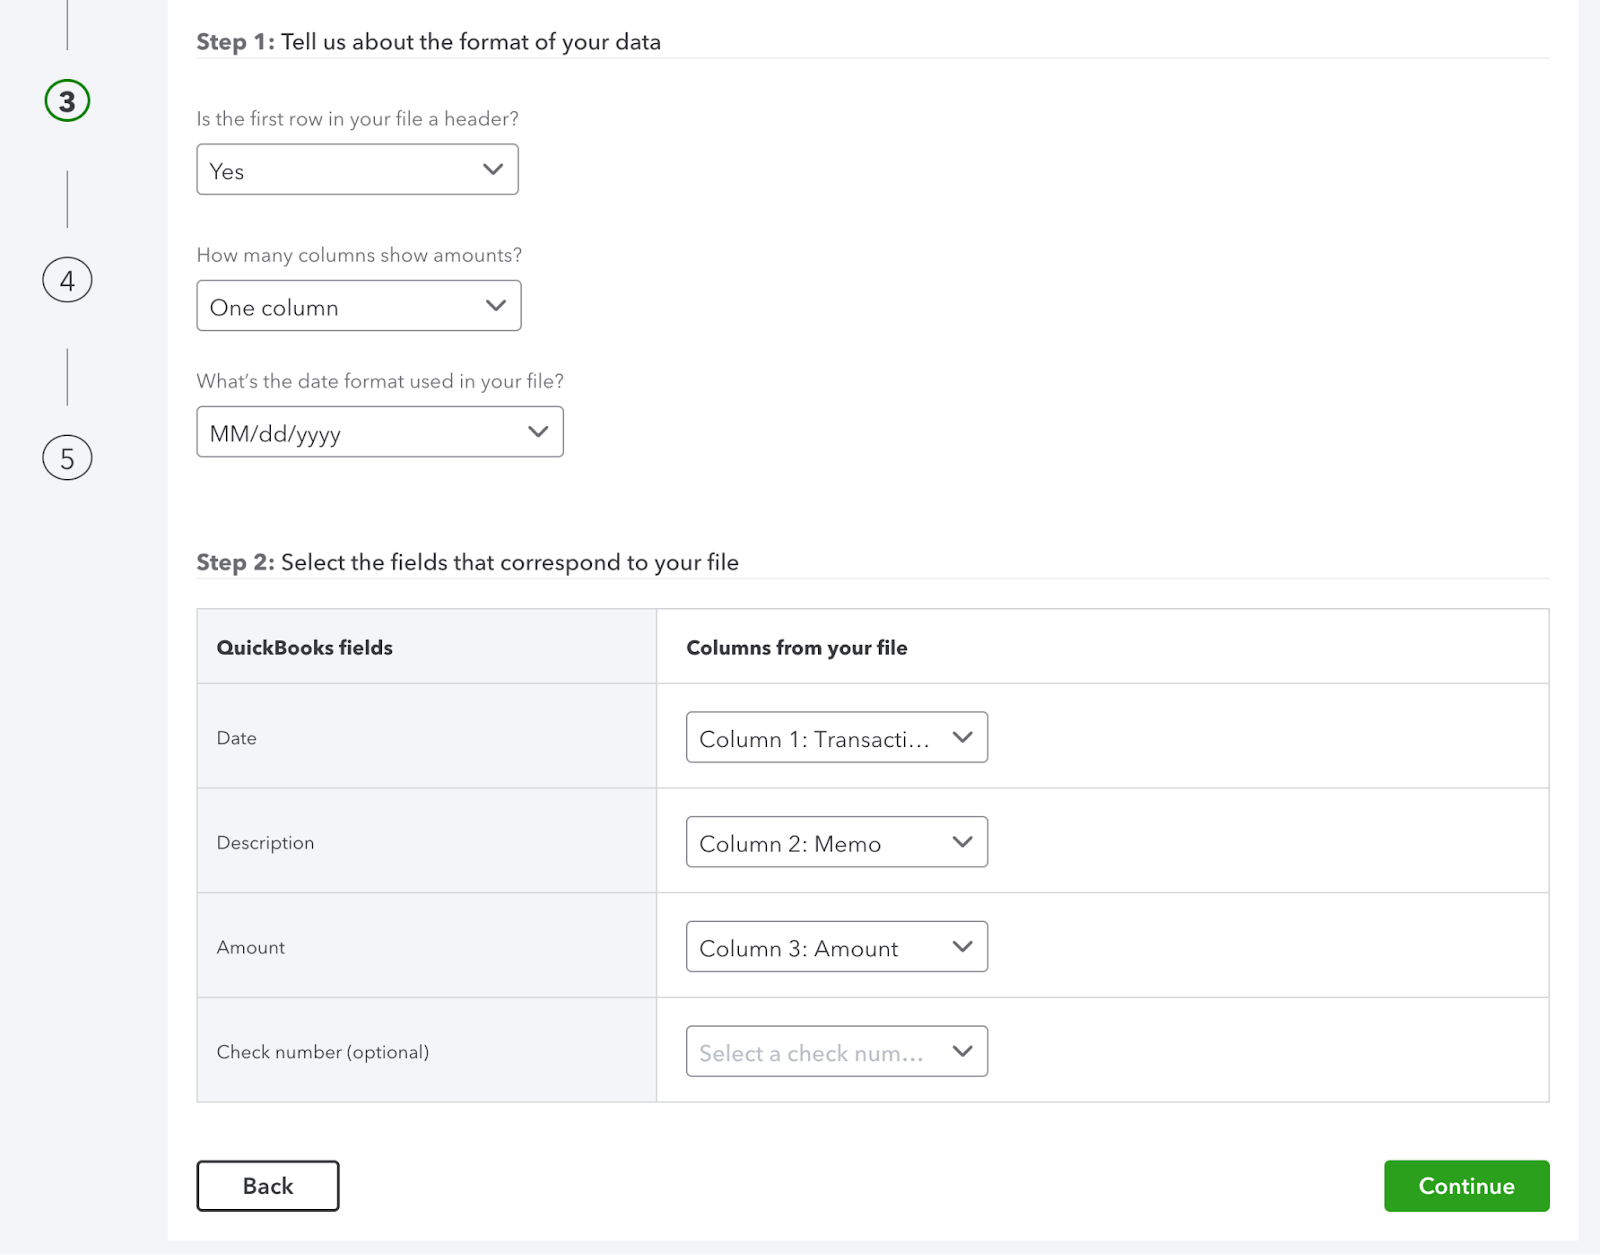
  1. Follow the instructions to match the columns in the file upload with the related fields in QuickBooks. Then click “Continue.”
Import bulk transactions 4
  1. Select the transactions and then “Yes.”
  2. To finish the import, click “Let’s go.”

Follow these same step-by-step instructions to import any additional customer, supplier, or item data from Excel.

Note that these instructions will differ if you import transactions in QuickBooks Desktop.

How to import transactions into QuickBooks Online from PayPal

QuickBooks gives you the option to import transactions from PayPal from the last eighteen months. To do so:

  1. Sign into QuickBooks Online and navigate to the “Apps” page, then “Overview.”
  2. Search for the “Sync with PayPal” app card.
  3. In the app, select “Settings.”
  4. In the newly opened tab, click “Run” in the “Manual Import” section.
  5. Enter your date range and select “Run.”

Note that if your bulk import dates overlap with previous bulk import dates, the new transactions will not overwrite the previously imported transactions unless you check “Re-Import previously imported transactions.”

As a result, the new import may create new transactions in QuickBooks. This causes duplicate records if you don’t delete the initial imported transactions.

Pros and cons of importing transactions into QuickBooks Online from Excel

Batch entry importing is included as a standard feature in the QuickBooks Accountant edition. Here are the pros and cons when you leverage this feature.

Pros

  • Supports the import of common transaction types such as checks, deposits, credit card accounts, credit card transactions, bills, invoices, and credit memos.
  • In QuickBooks Accountant, you can import transactions into QuickBooks Online from Excel and CSV files with an unlimited number of rows and company files.
  • Includes “Smart Features” that validate data before your import to add new customers and vendors that weren’t previously found in your QuickBooks account.

Cons

  • Time sheets, sales orders, and purchase orders are not possible to import.
  • You can only import transactions into QuickBooks Online from Excel and CSV files as a standard feature in the Accountants edition of QuickBooks.

If you’re not using the Accountants edition of QuickBooks, you still have options.

With Method, you can sync your customer and transaction data in real time. This powerful tool integrates seamlessly with QuickBooks to add powerful customer relationship management features and simplify lead-to-cash workflows.

This third-party platform gives you import and export functionality for QuickBooks Desktop and Online, along with several other time-saving features.

Wish you could get more from QuickBooks? Method makes it possible.

Are there size limits or formatting requirements?

Import transactions into QuickBooks Online 1

Image credit via QuickBooks

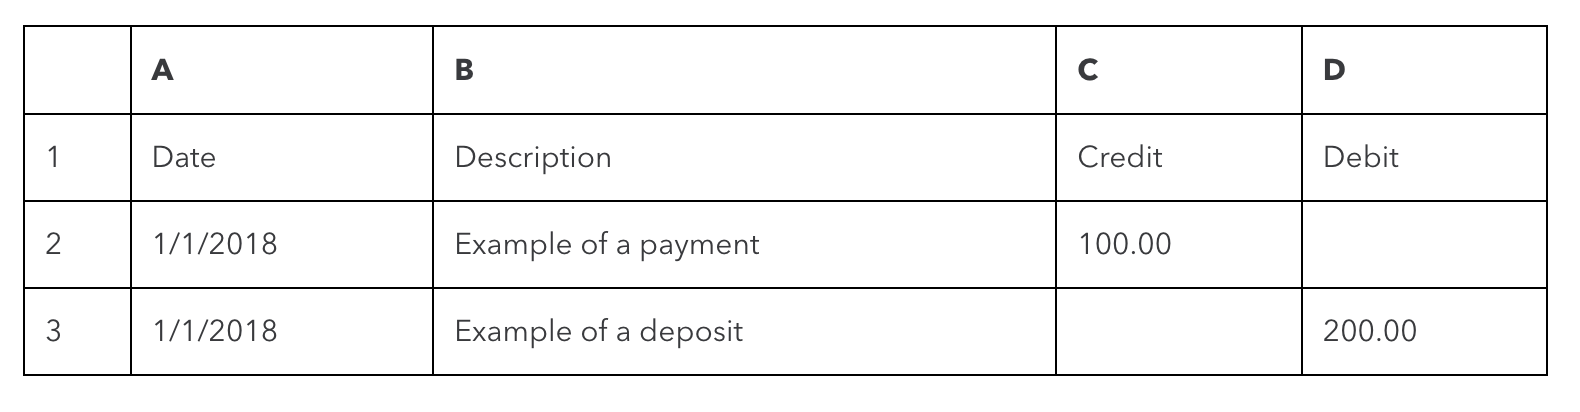
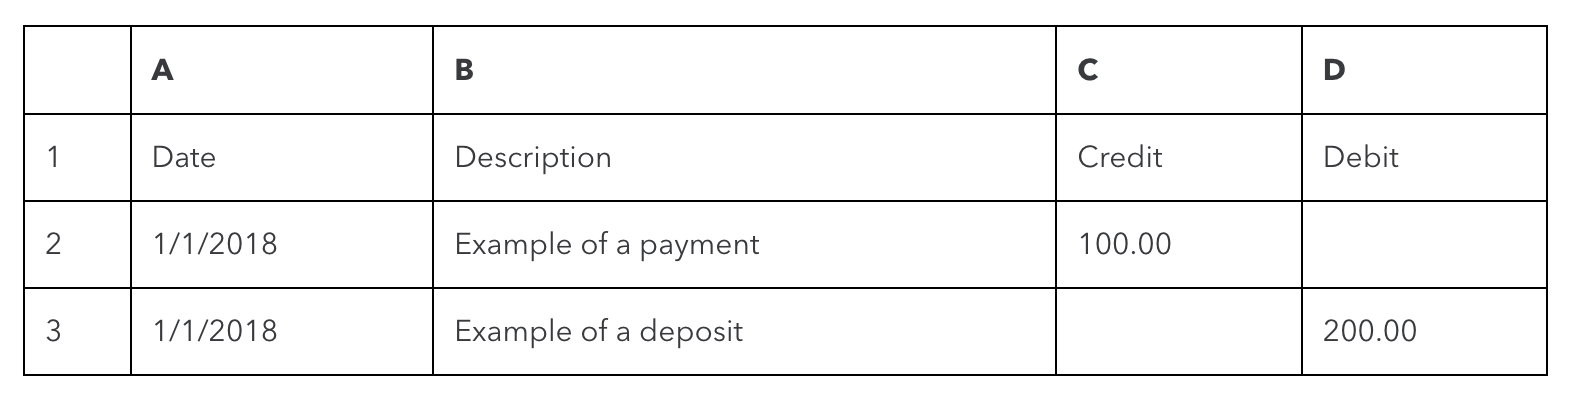
When you import transactions into QuickBooks from Excel or with a CSV file, there are no limitations on the number of rows. However, QuickBooks does require you to format your spreadsheet into three or four separate columns.

It’s important to reference QuickBooks’ guidelines on spreadsheet formatting before you begin your import.

Can you import bulk transactions into QuickBooks Online?

Yes, you can import bulk transactions from a CSV file. If your transaction file is currently saved in a XLSX file format, follow the steps outlined under “How to import transactions into QuickBooks Online from CSV” above.

Once you have your CSV file, you can bulk import transactions following the instructions under “How to import transactions into QuickBooks Online from Excel” shown above.

How to map records into columns while importing transactions into QuickBooks from Excel

Import transactions into QuickBooks Online

Image credit: QuickBooks

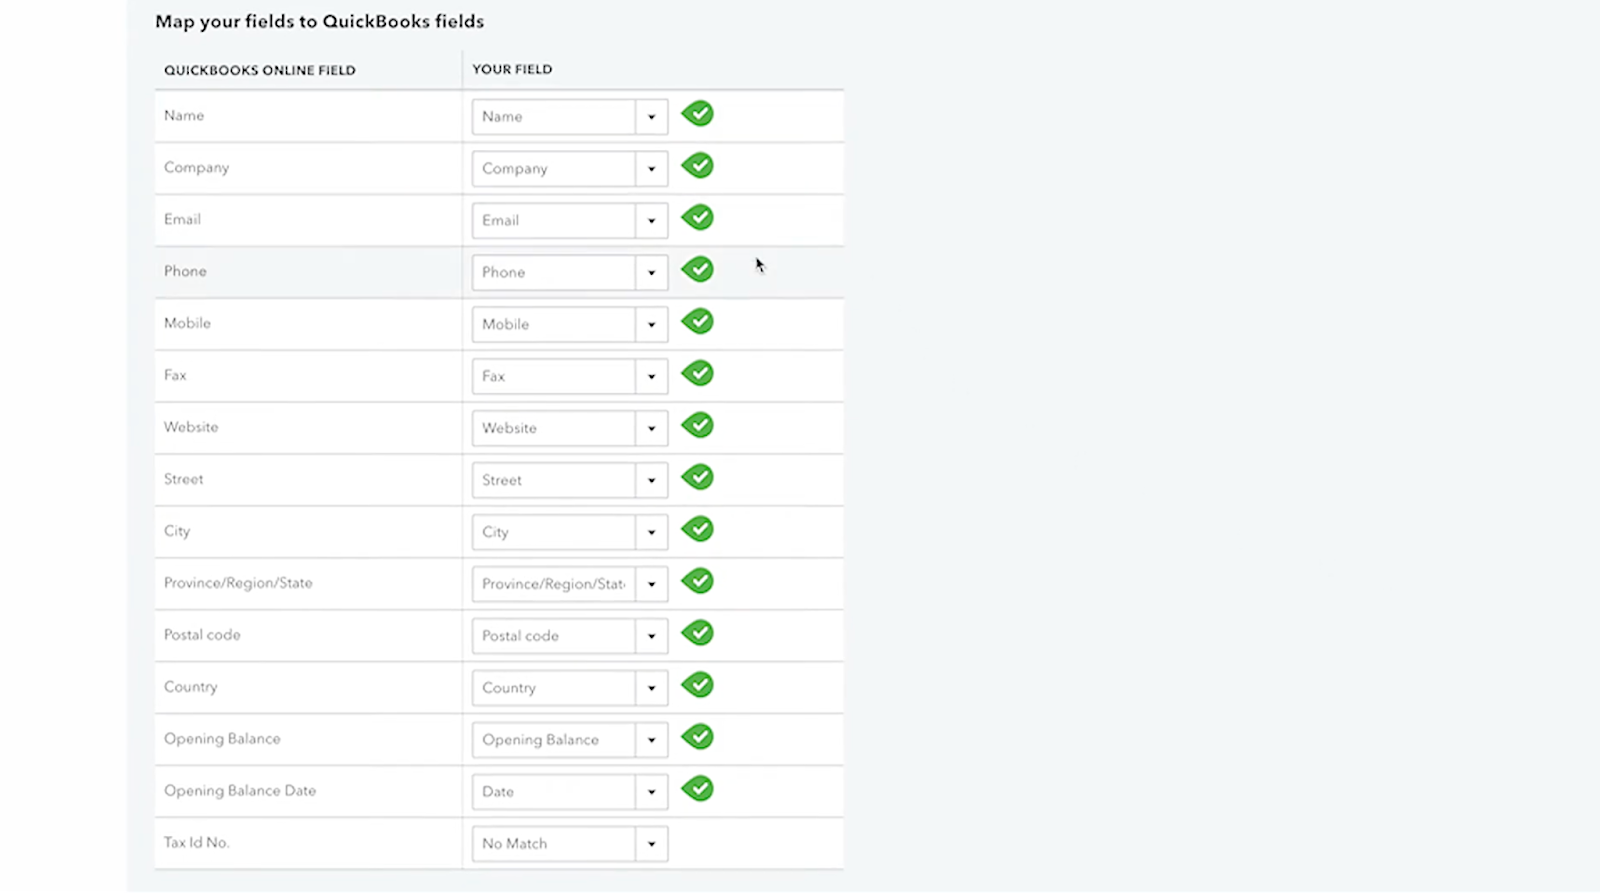
Mapping your records into columns when you import transactions into QuickBooks Online from Excel is a matter of selecting the corresponding fields for each column.

After importing your transaction file, QuickBooks provides a mapping interface where you can assign each column to its related field. This lets you ensure everything is assigned to the right category.

Step up your QuickBooks game with Method

Method is an advanced tool for QuickBooks users that enhances your QuickBooks experience with customization and automation options. It simplifies accounting tasks to keep your financial records organized and workflows efficient.

If you’re not a QuickBooks Accountant user, you can’t import data as a standard feature. But if you’re using other versions of QuickBooks as your accounting software, you still have options.

Method is a powerful platform that enhances your QuickBooks account by syncing your customer and transaction information in real time.

The platform works with every version of QuickBooks, including QuickBooks Online and Desktop versions. In addition to its two-way sync with your accounting software, you can:

  • Automate your workflows to save money.
  • Leverage powerful customer management tools.
  • Access detailed financial reporting.
  • Collect payments that connect directly to your online banking system.
  • Improve communication and engagement.

If you’re ready to add advanced features to your QuickBooks account, including transaction and customer data syncing, it’s time to integrate with Method.

FAQs

My import process failed. What should I do?

If your import process fails, check your import file to make sure it’s in the correct format.  For example, include three to four column headers and ensure that the type of data is compatible. Errors during import are most often the result of a failure to use QuickBooks-compatible formats, incorrect data types, or unsupported special characters in CSV files (such as semicolons).

Remember that while QuickBooks supports bulk importing for most common transactions, it does not produce successful imports for: 

  • Time sheets.
  • Sales orders.
  • Purchase orders.

After checking that you’re using a compatible file type and correcting any issues, try importing again. If you continue to have problems, consider an alternative solution like Method, or contact QuickBooks support for help.

I made a mistake in the import process. Can I revert or undo my import?

Unfortunately, reverting an import is not really possible. However, you can delete the imported transactions if you have not already reconciled them. It’s important to review your data carefully before you import to avoid such issues.

In our experimentation and usage of QuickBooks, we recommend that you download transactions before importing so that you have a record of the information before the change.

Make importing and exporting data easier. See how Method helps.


Image credit: Cottonbro Studio via Pexels
Colleagues in White Long Sleeve Shirts Sitting and Reading a Financial Report on a Conference Room

How to import transactions into QuickBooks Desktop from Excel

Learn how to import transactions into QuickBooks Desktop from Excel. Import transactions from Excel and CSV files into QuickBooks Desktop.

How to import transactions into QuickBooks Desktop from Excel Read More »

If you’re wondering, “Can I import transactions from Excel to QuickBooks Desktop?” the answer is yes, you can! You can import several types of transaction information, such as bank transactions, from Excel and CSV files into your QuickBooks account.

Being able to import transactions into QuickBooks Desktop from Excel helps you update your financial information without the busy work of manual data entry. Each QuickBooks Desktop version supports the import of bulk transactions to simplify this process in just a few steps.

Keep reading to learn how to import transactions into QuickBooks Desktop from Excel in this step-by-step guide!

Need an easier way to keep your QuickBooks data up-to-date?

Can you import transactions into QuickBooks Desktop?

Yes, you can import transactions into QuickBooks Desktop from Excel spreadsheets and even CSV files. There are several different types of transactions that are possible to import:

  • Account beginning balances.
  • Banking transactions like cash sales, refunds, checks, invoices, estimates, and deposits.
  • Credit card transactions, including credit card refunds and credit memos to customers.
  • Account transfers of funds.
  • Vendor bills and vendor bill refunds.
  • Journal entries.
  • Purchase orders.

It’s also possible to import lists, including items, vendors, and the chart of accounts.

Note: Intuit will stop selling all QuickBooks Desktop versions (except Enterprise) to new U.S. subscribers after September 30th, 2024.

Can QuickBooks Desktop pull data from Excel?

A common question is, “Can I import transactions from Excel to QuickBooks Desktop directly through QuickBooks?” The answer is yes! QuickBooks can pull data from Excel spreadsheets quickly and easily to keep your financial information organized and up to date.

How to import transactions into QuickBooks Desktop from Excel

Here are the steps to import transactions into QuickBooks Desktop from Excel:

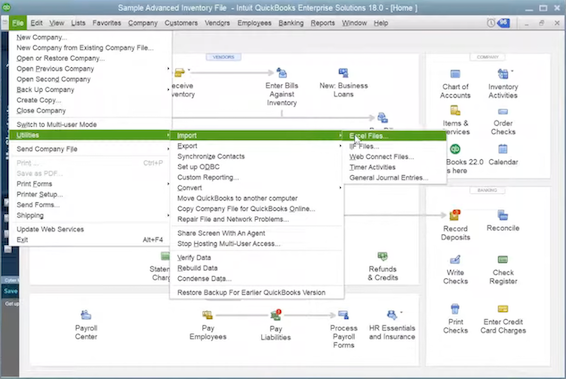
  1. In the “File menu,” select “Utilities.”
  2. Select “Import,” then “Excel Files.”
QuickBooks Desktop import transactions

Image credit via Steve Batten

  1. Depending on your version of QuickBooks, you may have a window pop-up that mentions “Add/Edit Multiple List Entries.” If you do, click “No.”
  2. Following the prompts to import your file, select the relevant data type.
  3. QuickBooks will show you an example Excel spreadsheet to follow. Use this example to format your Excel data file.
  4. Once you’ve matched the sheet’s columns to the appropriate QuickBooks fields, save it to your computer and select “Add My Data Now” to import it.
  5. Review the results and edit any mismatched data with the closest-related column headings.
  6. Click “Close” when you’re done.

Note that the instructions on how to import transactions into QuickBooks Online will differ.

Exporting Excel files

To save your spreadsheet as an Excel file:

  1. Navigate to the “File menu” and click “Save as.”
  2. Click “Browse” and choose where you want to save the file on your computer.
  3. In the “Save as type” box, select XLSX (Excel Workbook .xlsx).
  4. Click “Save.”

Tired of entering data manually into QuickBooks Desktop?

How to import transactions into QuickBooks Desktop from CSV

CSV files are a file type that lets you save spreadsheets without additional text formatting. That means your information is saved in plain text, which excludes formatting like bolded text, special characters, or images.

To save your spreadsheet as a CSV file:

  1. Navigate to the “File menu” and click “Save as.”
  2. Click “Browse” and choose where you want to save the file on your computer.
  3. In the “Save as type” box, select CSV (comma delimited .csv).
  4. Click “Save.”

Pros and cons of importing transactions into QuickBooks Desktop from Excel

If you’re asking, “Can I import transactions from Excel to QuickBooks Desktop?” you’ll be glad to know that it’s a quick and accurate process. That said, it’s good to be aware of the pros and cons that come with it.

Pros

  • You can import transactions into QuickBooks Desktop from Excel with an unlimited number of items, so use as many rows as you need.
  • QuickBooks Desktop supports the import of the most common transaction types, such as checks, deposits, credit cards, bills, invoices, and credit memos.
  • You get access to “Smart Features” that ensure data accuracy before importing, letting you add new customers and vendors not previously listed in your QuickBooks account.

Cons

  • Importing time sheets, sales orders, and purchase orders is not supported.
  • The ability to import transactions into QuickBooks Desktop from Excel is exclusive to the Accountants edition of QuickBooks.

If you’re not using the Accountants edition of QuickBooks, don’t worry! You still have an alternate solution.

Method offers a two-way sync service for customer and transaction data in real time. It is fully integrated with every version of QuickBooks, including QuickBooks Online and QuickBooks Desktop.

Method is an external platform that expands import functionality for QuickBooks, along with offering other features that save you time and improve productivity.

Are there size limits or formatting requirements?

QuickBooks bulk transactions

Image credit via QuickBooks

When you import transactions into QuickBooks Desktop from Excel or with a CSV file, there aren’t limitations on the number of rows you can use. However, you still need to format the spreadsheet with three or four columns as pictured above.

We recommend that you reference QuickBooks’ guidelines on spreadsheet formatting before starting your import.

Can you import bulk transactions into QuickBooks?

Yes, you can import bulk transactions into QuickBooks by following these step-by-step instructions:

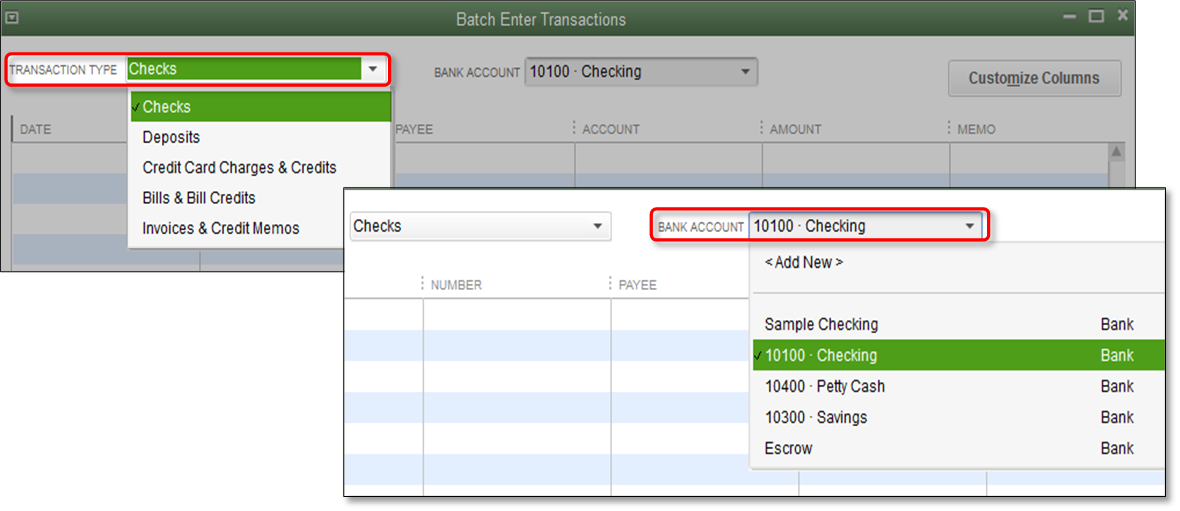
  1. Navigate to the “Accountant” menu and select “Batch Enter Transactions.”
  2. Select the “Transaction Type” you want to import and “Account.”
QuickBooks bulk transactions

Image credit via QuickBooks

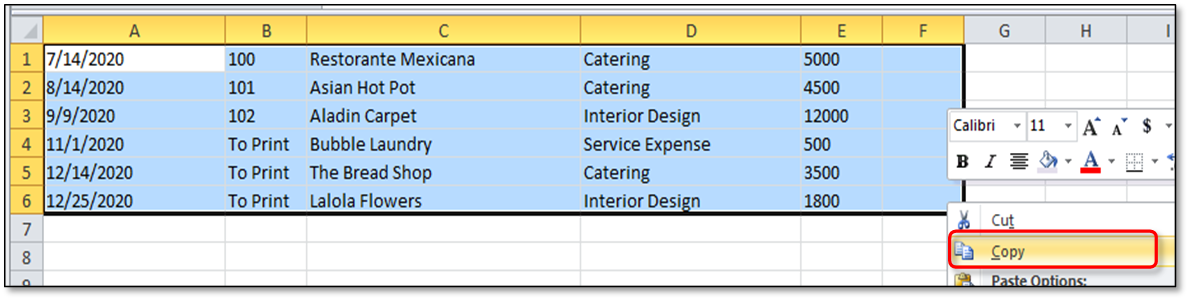
  1. Ensure that the columns in the spreadsheet you import from match the order of the columns in the “Batch Enter Transactions” window.
  2. Select the information in your spreadsheet, right-click, and select “Copy.”
QuickBooks bulk transactions

Image credit via QuickBooks

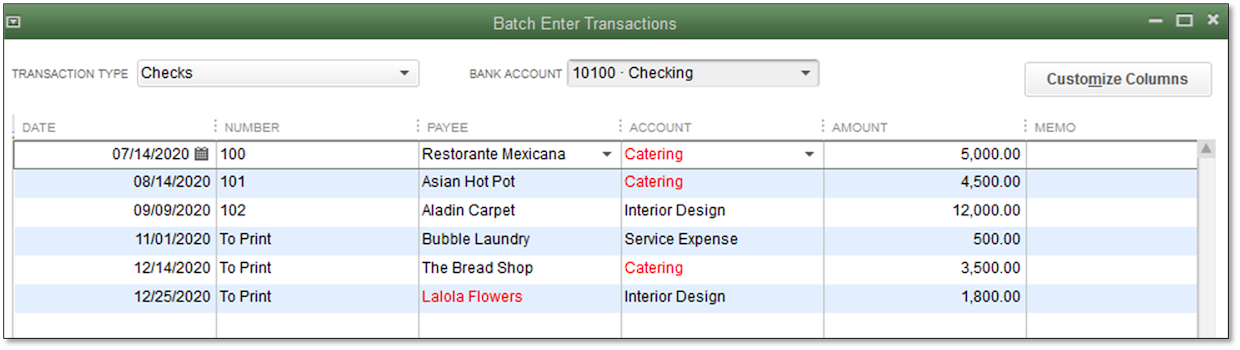
  1. In the “Batch Enter Transactions” window, move your cursor to the first date field, right-click, and select “Paste.”

If you have information that turns red, it means they aren’t listed in the company file. Select the red cell and choose “Quick Add” or “Set Up” to add it.

QuickBooks bulk transactions

Image credit via QuickBooks

What to consider after importing transactions into QuickBooks Desktop

After importing transactions, follow the simple three-step process below to make sure your data is reflected accurately in your QuickBooks account.

Mapping the data

After importing your data, QuickBooks opens a mapping interface where you can assign columns to their corresponding field. This ensures that you assign each column to the correct category.

To map your data:

  1. Enter a mapping name and choose the “Import type” for your account. Choose the mapping name that is most appropriate for the category.
  2. Match the information in QuickBooks with the columns in your imported spreadsheet.
  3. Select “Save” to complete your import.

Verifying the import

Through our practical knowledge, we recommend checking the data in your QuickBooks Desktop account after you complete an import. This lets you catch any mistakes right away.

Step up your QuickBooks game with Method

If you’re not using the Accountant version of QuickBooks, you won’t be able to import transactions into QuickBooks Desktop from Excel or a CSV file as a standard feature. Enter Method.

Method is a powerful third-party application that enhances your QuickBooks account. It gives you powerful automation tools and the ability to customize workflows. In a nutshell, Method simplifies accounting processes to keep your financial records organized and running smoothly.

You can use Method’s patented, two-way sync with QuickBooks to update your customer and transaction data in real time. Better yet, Method is compatible with all versions of QuickBooks, so you don’t need to own the Accountant version to import transactions.

In addition to syncing your transaction data, Method offers key benefits such as:

  • Workflow automation to improve efficiency.
  • Powerful customer management tools.
  • The ability to view detailed financial reports.
  • Features to collect payments with online banking.

If you’re ready to add advanced features to your QuickBooks account — including transaction and customer data syncing — it’s time to integrate with Method.

Get time back to focus on growth with Method.

FAQs

What is the QuickBooks Desktop stop-sell initiative?

After September 30th, 2024, Intuit will no longer sell QuickBooks Desktop (except Enterprise versions) to new U.S. subscribers. 

If you currently use QuickBooks Desktop, this will have no impact on your experience. You will continue to receive: 

  • Security updates.
  • Product updates.
  • Support from Intuit. 

Method’s integration with QuickBooks Desktop will also remain unaffected.

My import process failed. What should I do?

If your import process fails, check your import file to make sure it’s in the correct format. Remember to format your spreadsheet with three to four column headers, and check that the type of transactions is compatible.

If you receive an error log during import, it is often the result of incompatible formats, data types, or unsupported special characters in CSV format files (such as semicolons).

I made a mistake in the import process. Can I revert or undo my import?

Unfortunately, there isn’t a way to undo an import with the simple click of a button. However, it’s a straightforward process if you’re using the Accountant version of QuickBooks Desktop to batch delete or void transactions from the import.

To batch delete or void transactions:

  1. Navigate to the “File” menu and click “Switch to single-user mode.” Note: If you see the option to “Switch to multi-user mode,” don’t click it.
  2. Go to the “Accountant” menu and choose “Batch Delete/Void Transactions.”
  3. Select all the transactions you want to delete or void from the “Available Transactions” list.
  4. When you’re finished, click “Review & Delete” to delete them, or if you want to void the transactions, click “Review & Void.”
  5. If you’re deleting the transactions, select “Back Up & Delete” — and if you’re voiding them, “Back Up & Void.” If you want to skip the backup, then choose “Delete only” or “Void only.”
  6. Click “Yes” to confirm you want to delete or void the transactions.

Don’t let the limits of QuickBooks hold you back. See how Method can help.


Image credit: Mikhail Nilov via Pexels

Successful mature businesswoman in glasses smiling, using laptop and doing some paperwork at the office. People, business, career concept

How to import Excel into QuickBooks 

Want to transfer data from Excel to QuickBooks? Discover how to import Excel into QuickBooks for your financial reports.

How to import Excel into QuickBooks  Read More »

Are you bogged down by the tedious task of manual data transfer from Excel to QuickBooks? If so, you’re not alone — many businesses struggle with this very issue. Fortunately, there’s a solution that saves time and reduces errors. 

In this blog, you’ll find out how to import Excel into QuickBooks to simplify your financial management. You’ll learn about:

  • How to import Excel into QuickBooks for invoices, transactions, and reports. 
  • Common import Excel to QuickBooks issues and solutions. 
  • The best way to extend your QuickBooks’ potential. 

Let’s get started!

QuickBooks can’t do everything, so let Method CRM help!

Can you import Excel into QuickBooks?

Yes, importing data from Excel into QuickBooks is a common practice among all kinds of businesses. This is useful if you manage financial data in Excel spreadsheets and want to integrate your information into your QuickBooks accounting software.

The process involves a few simple steps, and QuickBooks supports the import of various data types. Overall, it ensures a seamless transition of your critical financial information from Excel to QuickBooks.

Types of data you can import from Excel to QuickBooks

Before you learn how to import Excel into QuickBooks, it’s important to understand the different types of data you can work with. 

Bank transactions

Importing bank transactions from Excel to QuickBooks simplifies the process of updating your financial records. It makes account reconciliation a breeze to keep your records accurate.

Invoices

Next, you can use your import Excel to QuickBooks process for invoices. This is particularly beneficial if you generate custom invoices outside of QuickBooks, but need to reflect the data in your accounting system for record-keeping and financial analysis.

Reports

Importing reports from Excel to QuickBooks is also possible. This comes in handy when you perform extensive data analysis in Excel and need to integrate these insights into QuickBooks. Overall, you get a comprehensive view of your financial health.

PayPal transactions

If your business uses PayPal for online transactions, you can import Excel into QuickBooks for this data to simplify your accounting process. This import feature helps you track sales, expenses, and fees associated with PayPal transactions.

How to import an Excel invoice into QuickBooks

Whether you’re using QuickBooks Online or QuickBooks Desktop, the import Excel to QuickBooks process is straightforward for invoices. 

Here are step-by-step instructions outlining how to import Excel into QuickBooks Online and QuickBooks Desktop.

How to import an Excel invoice into QuickBooks Online

  1. Make sure your Excel file is formatted correctly. QuickBooks Online requires specific columns like date, invoice number, customer name, item description, quantity, rate, and amount.
  1. Log into your QuickBooks Online account. 
  1. Click on the gear icon at the top, then select “Import Data” from the “Tools” menu.
  1. In the “Import Data” menu, select “Invoices.”
  1. Click on “Browse” to select and upload your Excel invoice file from your computer.
  1. QuickBooks Online will prompt you to map the columns in your Excel file to the corresponding fields in QuickBooks. This ensures that you import Excel into QuickBooks correctly.
  1. Once the mapping is complete, review the data for accuracy and click “Import.”
  1. After you review and import, QuickBooks Online will confirm the successful import of your invoices.

How to import an Excel invoice into QuickBooks Desktop

The steps outlining how to import Excel into QuickBooks Desktop are just as simple:  

  1. Make sure your Excel file is ready and matches the required format for QuickBooks Desktop.
  2. Start your QuickBooks Desktop application.
  1. Under “File” in the menu bar, select “Utilities” followed by “Import” and “Excel Files.”
  1. For a more advanced import option, use the “Add/edit multiple list entries” feature under the “Lists” menu to manage your invoice data.
  1. QuickBooks Desktop will then launch an import wizard. Follow the prompts, starting by selecting the type of data you want to import (in this case, “Invoices”).
  1. Upload the file when you’re prompted.
  1. As with QuickBooks Online, map the columns in your Excel file to the corresponding fields in QuickBooks Desktop.
  1. Review all mapped data for accuracy. Once you’re satisfied, proceed to complete the import process. You’ll see a confirmation once your invoices have imported successfully.

How to import Excel transactions into QuickBooks

If you want to import transactions like sales, expenses, and others, the steps are also straightforward. 

How to import Excel transactions into QuickBooks Online

  1. Prepare your Excel file by ensuring that your transactions are formatted correctly. The standard columns should include date, description, amount, etc., depending on the type of transaction.
  1. Log into QuickBooks Online.
  1. To access the import tool, click on the gear icon located at the top right corner. Then select “Import data” in the “Tools” section.
  1. Choose the type of transaction you want to import (e.g., banking transactions, sales receipts, invoices, etc.).
  1. Upload your Excel file: Click “Browse” to locate and select your Excel file. Once selected, upload the file.
  1. Map your Excel columns to QuickBooks fields. This step ensures that when you import Excel to QuickBooks, the data is moved to the correct places.
  1. Now it’s time to review and import. Before completing the import, review and confirm the data for accuracy. Make any necessary changes if needed.
  1. After reviewing, click “Import” to finalize the process. QuickBooks Online will confirm once the transactions have been successfully imported.

Online payments, automated leads, and customer management?

How to import Excel transactions into QuickBooks Desktop

  1. Open your QuickBooks Desktop application.
  1. Format your Excel file correctly with columns for date, description, amount, etc.
  1. In QuickBooks Desktop, go to “File” > “Utilities” > “Import” > “Excel Files.”
  1. Launch the import wizard to help you import Excel into QuickBooks. Start by choosing the type of data you are importing (e.g., bank transactions, sales, etc.).
  1. When prompted, upload the Excel file that contains your transactions.
  1. Next, match the columns in your Excel sheet to the corresponding fields in QuickBooks. This step is crucial for accurate data import.
  1. Make sure to review the data and ensure that all the information is correct and in the right fields.
  1. Click the “Import” button once you are satisfied with the setup to complete the import process. QuickBooks Desktop will notify you once the transactions are successfully imported.

How to import Excel reports into QuickBooks

If you’re looking to integrate your Excel-based reports into QuickBooks, understanding how to import Excel into QuickBooks is essential. Moving your reports to QuickBooks simplifies accounting tasks and keeps your data in one place. 

Although both processes are easy, the steps to import Excel to QuickBooks for reports vary slightly between QuickBooks Online and QuickBooks Desktop.

How to import Excel reports into QuickBooks Online

  1. Make sure that you format your Excel reports correctly. Ensure you organize data in columns and rows appropriately. Double-check that the report contains all necessary information, such as dates, amounts, account names, etc.
  1. Open QuickBooks Online and sign in to your account.
  1. Click on the gear icon in the upper right corner, then select “Import data” from the “Tools” menu.
  1. Since QuickBooks Online doesn’t directly import Excel reports, you will need to choose the closest matching data type for your report (e.g., “bank data,” “invoices,” “sales receipts,” etc.).
  1. Next, click on the “Browse” button, find your Excel file, and upload it.
  1. Match the columns in your Excel file with the corresponding fields in QuickBooks Online.
  1. Carefully review the mapped data for accuracy. Once you’re satisfied, click on the “Import” option to import Excel into QuickBooks. QuickBooks Online will display a confirmation message once the import is successful.

How to import Excel reports into QuickBooks Desktop

  1.  Open your QuickBooks Desktop application.
  1. Under “File” in the menu bar, then select “Utilities,” followed by “Import,” then “Excel Files.” This opens up your import wizard. 
  1. The wizard will guide you through the process. Choose the type of data that your report corresponds to (such as “Transactions,” “Lists,” etc.).
  1. When prompted, upload the Excel file containing your report.
  1. Align the columns in your Excel report with the appropriate fields in QuickBooks Desktop. This step ensures accurate data transfer when you import Excel to QuickBooks.
  1. Lastly, check the data for accuracy. Once you’re confident that everything is correct, complete the import process. QuickBooks Desktop will notify you once the import has been completed successfully.

Common QuickBooks import errors and how to resolve them

QuickBooks occasionally faces hiccups during data import, which disrupt your business flow if left unchecked. Let’s look at some common import errors in QuickBooks and how to solve them. 

1. Unsupported file format:

Cause: This occurs when you import a file format that’s not supported by QuickBooks.

Resolution: Convert the file into a format that QuickBooks supports, such as .CSV or .QBO. Use QuickBooks’ import data tool to ensure compatibility.

2. Data doesn’t match QuickBooks fields:

Cause: Sometimes, the data columns in the file do not match the fields in QuickBooks.

Resolution: Adjust the columns in your import file to align them with the fields in QuickBooks. You may need to rename, reorder, or reformat these columns.

3. Transaction errors during import:

Cause: This occurs when transactions in the import file conflict with existing transactions in QuickBooks.

Resolution: Review the transactions in the file for duplicates or inconsistencies. Ensure that the dates and amounts match and are unique where needed.

4. Missing data after import:

Cause: Incomplete or incorrect data due to filtering issues or errors in the import file.

Resolution: Double-check the import file for completeness and accuracy. Make sure all necessary fields are included and correctly formatted.

5. Import process freezes or crashes:

Cause: Large import files or insufficient system resources can cause crashes.

Resolution: Try importing smaller batches of data. Also, check that your computer meets QuickBooks’ system requirements and close unnecessary programs to free up resources.

Get more out of QuickBooks with Method

When you connect QuickBooks to Method, you get a powerful toolset to enhance your business’ efficiency and data management. 

Here’s how you can take QuickBooks to the next level with Method:

  • Enjoy a powerful, two-way sync between QuickBooks and Method for accurate and up-to-date information across platforms.
  • Make it easier to import Excel into QuickBooks for all your documents so you minimize errors and save time.
  • Tailor your CRM workflows to align with your business processes.
  • Generate detailed reports that combine financial data and CRM insights for better decision-making.

Don’t let the limits of QuickBooks hold you back.

Watch Method in action.

Image credit: Kostiantyn via Adobe Stock

Happy mature middle aged elderly woman reading good news looking at laptop

QuickBooks export to Excel: What you need to know 

Master your data by learning how to do a QuickBooks export to Excel. Accurately transform QuickBooks data into an accurate worksheet!

QuickBooks export to Excel: What you need to know  Read More »

An emphasis on data increases annual revenue by 5.32%. So, mastering the art of data management is crucial for all business owners. 

This is especially true when it comes to your financial data, where accuracy is non-negotiable. One key aspect of keeping accurate numbers is your ability to efficiently move data between platforms, such as making a QuickBooks export to Excel. 

Understanding how to export QuickBooks to Excel and leverage this functionality transforms your business operations and makes data analysis and sharing easier than ever.

In this blog, you’ll explore everything you need to know about how to export QuickBooks to Excel, including:

  • How to export QuickBooks invoices to Excel. 
  • Common issues you might encounter in a QuickBooks export to Excel and their solutions. 
  • The benefits of a QuickBooks expert to Excel.

As a result, you’ll unlock a more efficient workflow. Let’s dive in!

Tired of entering data manually into QuickBooks Desktop?

Why export QuickBooks to Excel?

You might be familiar with the importance of importing data to Excel, but what about a QuickBooks export to Excel? A QuickBooks export to Excel is essential as it offers numerous benefits. Here’s how.

For one, it makes it easy to share files. QuickBooks, while robust, isn’t as universally accessible as Excel. When it comes to spreading financial reports and other key information among various departments, stakeholders, and external partners or business owners, Excel is a more universally accepted format. It ensures that everyone can access, view, and understand data easily.

Secondly, Excel’s flexibility lets you incorporate data that QuickBooks does not support directly. This means you can add extra layers of analysis, annotations, or even integrate data from other sources for a more comprehensive view of your financial status.

Lastly, moving data to Excel makes other data transfer easier. Transferring data within QuickBooks is sometimes complex, especially when dealing with large files or a detailed custom report. Overall, a QuickBooks export to Excel simplifies this process and ensures your information is up to date across all platforms.

Types of data you can export from QuickBooks to Excel

A QuickBooks export to Excel lets you transfer various types of data to enhance your data analysis and sharing capabilities. Here are some of the key data types you’ll deal with when you export QuickBooks to Excel:

  • Customer, vendor, and payroll lists and transactions: You can export lists containing customer, vendor, and employee data — including names, balances, and contact information. You can also export transactional data by name or transaction type​​. Examples include estimates and purchase orders. 
  • Items list: QuickBooks lets you export all items listed in your inventory, which is useful for inventory management and analysis. In Excel, you can manipulate this data more for further insights​​.
  • Reports: A QuickBooks export to Excel enhances your reporting capabilities. It lets you take advantage of formulas for subtotals, totals, and other calculations, as well as row labels and headers/footers from the QuickBooks report. This is particularly useful for customizing reports in ways otherwise unavailable in QuickBooks​​.

Can I export QuickBooks invoice to Excel?

It’s possible to export QuickBooks invoices to Excel. The best part is that this feature is available in both QuickBooks Online and QuickBooks Desktop.

How to export QuickBooks invoice to Excel

Learning how to import and export QuickBooks data is challenging at first. But don’t worry — we’ve got you covered with easy-to-follow steps. Whether you’re dealing with partial payments or a full sum on invoices, here’s how to export QuickBooks invoices to Excel. 

Our practical application of the product showed that without a third-party tool, you can only export QuickBooks invoices to Excel in the form of an “Invoice list” report. Here’s how.

How to export invoices from QuickBooks Online

  1. Click on “Report” from the list of functions.
  2. Enter “Invoice list” in the text box and hit Enter. This brings up a list of invoices for a specific date range.
  3. Click “Customize” if you wish to change the report (e.g., date range, filters).
  4. Once customized, click on the “Export” function drop-down menu and select “Export to Excel” to proceed with your invoice export.

How to export invoices from QuickBooks Desktop

  1. In QuickBooks Desktop, click “Reports.”
  2. Enter “Invoice list” in the text box and press Enter.
  3. Under ‘Report period’, filter the dates, then select “Run Report”
  4. Click the “Export” button and choose “Export to Excel.”

Now that you’ve learned how to export QuickBooks invoices to Excel, let’s take a look at reports.

How to export QuickBooks reports to Excel

When it comes to a QuickBooks export to Excel, reports are one of the most powerful tools you’ll deal with. Here’s how to export reports from QuickBooks. 

How to export reports from QuickBooks Online

Exporting reports from QuickBooks Online follows the same steps as exporting your invoice list:

  1. Navigate to the “Reports” tab in QuickBooks Online.
  2. Use the search box and select the specific report you wish to export.
  3. At the top of the report, click on the “Export” icon, then select “Export to Excel”.
  4. Save the Excel file in a location that is easy for you to access, such as your Downloads folder or desktop.

How to export reports from QuickBooks Desktop

  1. Go to “Reports,” then “Reports Center” in QuickBooks Desktop.
  2. Find the report you want to export and double-click on it.
  3. Select the “Excel” dropdown, then choose either “Create New Worksheet” or “Update Existing Worksheet.”
  4. If a message appears stating that your report has too many columns, select “Advanced,” then uncheck the “Space between columns” checkbox and click “OK.”
  5. To proceed with the export, select “OK.”

Method CRM lets you run your business, your way.

How to export QuickBooks transactions to Excel

Apart from a QuickBooks export to Excel for invoices and reports, you may want to export your financial transactions, like sales and expenses. Here are the steps. 

How to export transactions from QuickBooks Online

  1. Access your QuickBooks Online account by entering your login details.
  2. Go to the “Transactions” tab in the left sidebar. 
  3. Use the available filters to select the specific transactions you want to export. You can filter by date, transaction type, customer/vendor, and more, depending on your needs.
  4. After applying the necessary filters, look for the “Export” button. Click on it and select “Export to Excel”. This downloads the transactions in an Excel format (.xlsx or .xls).
  5. Open the downloaded file in Microsoft Excel to check that all your transactions are correctly exported. Then, save the file on your computer for your records.

How to export transactions from QuickBooks Desktop

  1. Start the QuickBooks Desktop application on your computer and log in.
  2. Navigate to the section where your transactions are listed. This could be under “Sales,” “Expenses,” “Customers,” or “Vendors,” depending on what transactions you want to export.
  3. Customize the view to display only the transactions you need. You can filter by date range, type of transactions, customer detail, customer/vendor name, and more.
  4. Once you have the list of transactions you need, look for the “Export” button, which might be displayed as an Excel icon. Click on it and choose to export the list to Excel. In some versions, you might need to select “File” > “Export” > “Export to Excel.”
  5. The file automatically opens in Excel if you have the program installed. Check to ensure all data appears as expected. Save the file on your system for further use.

Common QuickBooks export errors and how to resolve them

Exporting data from QuickBooks sometimes leads to errors or issues, especially when exporting to formats like Excel. These range from format issues to data not exporting correctly. Here are some common export errors in QuickBooks and the steps to resolve them:

1. Export not working

Cause: This issue often occurs due to a mismatch in the software versions of QuickBooks and Microsoft Office, or due to a problem with the installation of QuickBooks.

Resolution: Make sure that you’ve updated QuickBooks and Microsoft Office to their latest versions. If the problem persists, try repairing QuickBooks using the installation CD or downloaded installer file.

2. Excel option is grayed out

Cause: The Excel option being unavailable usually means there’s a compatibility issue or that QuickBooks isn’t recognizing the Excel installation.

Resolution: Ensure that Excel is properly installed on your computer. If it is, try reinstalling QuickBooks while Excel is installed, as this sometimes helps QuickBooks recognize Excel.

3. Crashes during export

Cause: This problem often occurs due to large data files or limited system resources.

Resolution: Try exporting your data in smaller batches. Additionally, make sure your computer meets the system requirements for running your version of QuickBooks.

4. Slow performance during export

Cause: Exporting large amounts of data uses significant resources and may cause slow performance.

Resolution: Close unnecessary programs to free up system resources. Consider upgrading your system’s RAM or processing power if this is a frequent issue.

5. Missing data after export

Cause: Missing data can result from incorrect filter settings or issues with specific data entries in QuickBooks.

Resolution: Recheck your filter settings in QuickBooks before exporting. If certain data entries are consistently missing, inspect them in QuickBooks for any errors.

Say goodbye to manual exports with Method’s real-time sync

Method is the #1 lead-to-cash workflow automation tool for QuickBooks users.

With its real-time sync feature, you can effortlessly synchronize your QuickBooks data to eliminate the need for manual exports. This seamless integration ensures that your information stays up to date and accessible, which simplifies your workflow and improves data accuracy.

Here’s a taste of what you can enjoy with Method:

  • A powerful, two-way QuickBooks sync to eliminate errors and double-data entry.
  • Customizable workflows to tailor your data management to suit your specific business needs.
  • Seamless integration with other business applications to centralize operations.
  • Scalability with your business as you grow. 

Watch how Method extends your potential with QuickBooks.

Image credit: Teksomolika via Adobe Stock

Person holding debit card

6 best credit card processing for QuickBooks

Are you interested in lower transaction fees? Discover the six best credit card processing for QuickBooks.

6 best credit card processing for QuickBooks Read More »

Accepting credit cards is not just a convenience — it’s a necessity. However, the fees associated with these transactions eat into your profit margins. 

To counter this, you must integrate a top-notch credit card processor with Intuit QuickBooks. Implementing the best credit card processing for QuickBooks optimizes your financial management and protects your bottom line. 

In this blog, you’ll tackle: 

  • Why you need a credit card processor. 
  • Key features that define the best credit card processing for QuickBooks. 
  • How to make the right choice for your business. 

Let’s get started! 

QuickBooks can’t do everything, so let Method CRM help!

Benefits of using credit card processing integrations for QuickBooks

Before exploring the best credit card processing for QuickBooks, let’s highlight their integration benefits: 

  • Lower transaction fees: Third-party processors offer competitive rates, which reduces transaction costs and boosts your bottom line. 
  • Efficient reconciliation: Integrating with QuickBooks automates the reconciliation process to save time and reduce errors. 
  • Enhanced security: Processor features like tokenization protect against fraud and chargebacks. 
  • Improved cash flow: Faster credit card processing ensures quicker fund availability. 
  • Better reporting: Integration provides real-time transaction recording for informed decision-making. 

What to look for in credit card processing integrations for QuickBooks

When choosing the best credit card processing for QuickBooks, here’s what to look for: 

  • Seamless integration with QuickBooks: Your credit card processor should automatically sync with QuickBooks to minimize manual data entry and boost efficiency. 
  • Transparent pricing: Look for providers with clear rates, like flat-rate or interchange fees to avoid unexpected costs. 
  • Flexible terms: Choose services with month-to-month agreements to avoid long-term contract penalties. 
  • Strong security: Your processor should be PCI compliant to protect customer data, minimize fraud, and stay within legal requirements. 
  • Reliable customer support: Ensure accessible in-house support for quick troubleshooting. 
  • Effective chargeback handling: A robust chargeback system is essential to handle disputes and fraud, especially for high-risk merchants. 

Does QuickBooks charge for credit card payments?

As you search for the best credit card processing for QuickBooks, you may wonder: Does QuickBooks charge for credit card payments

The answer is yes. QuickBooks Online charges credit card processing fees through QuickBooks Payments. Fees per transaction vary based on your: 

  • Pricing plan. 
  • Sales volume. 
  • Transaction volume. 

So, those who don’t ask, “Does QuickBooks charge for credit card payments?” end up paying more than they expect.

Best credit card processing integrations for QuickBooks in 2026

Without further ado, here are your six best credit card processing for QuickBooks in 2026. 

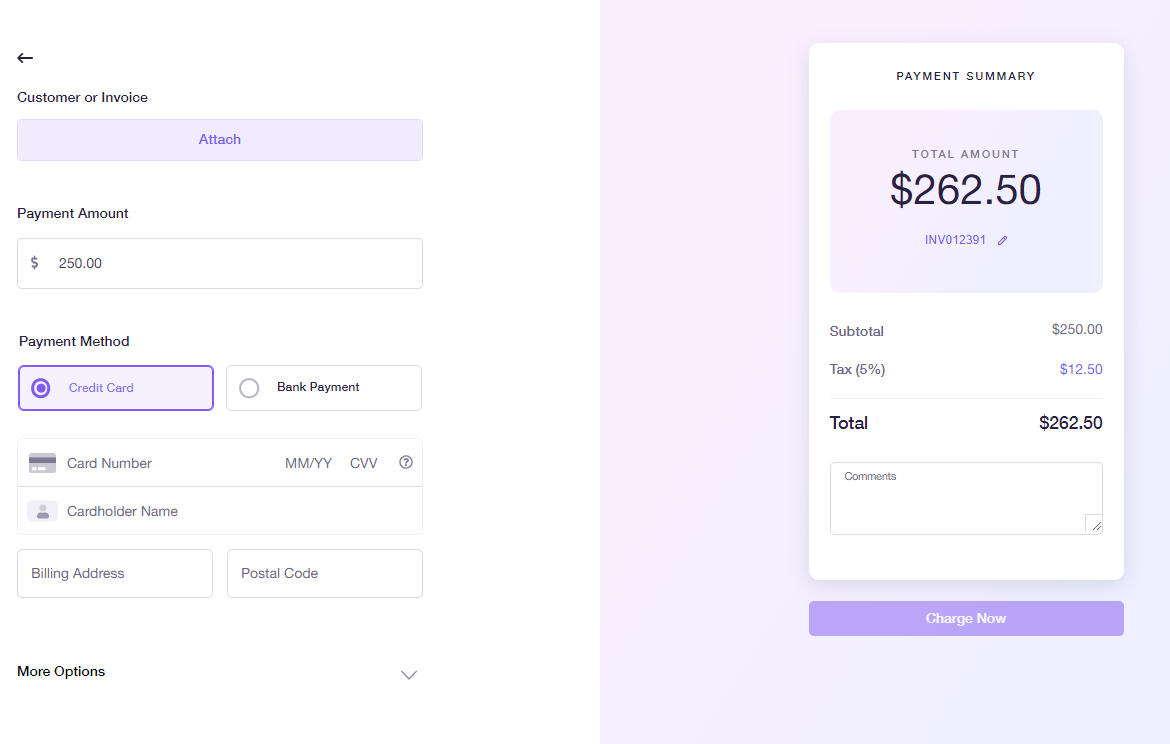
Method

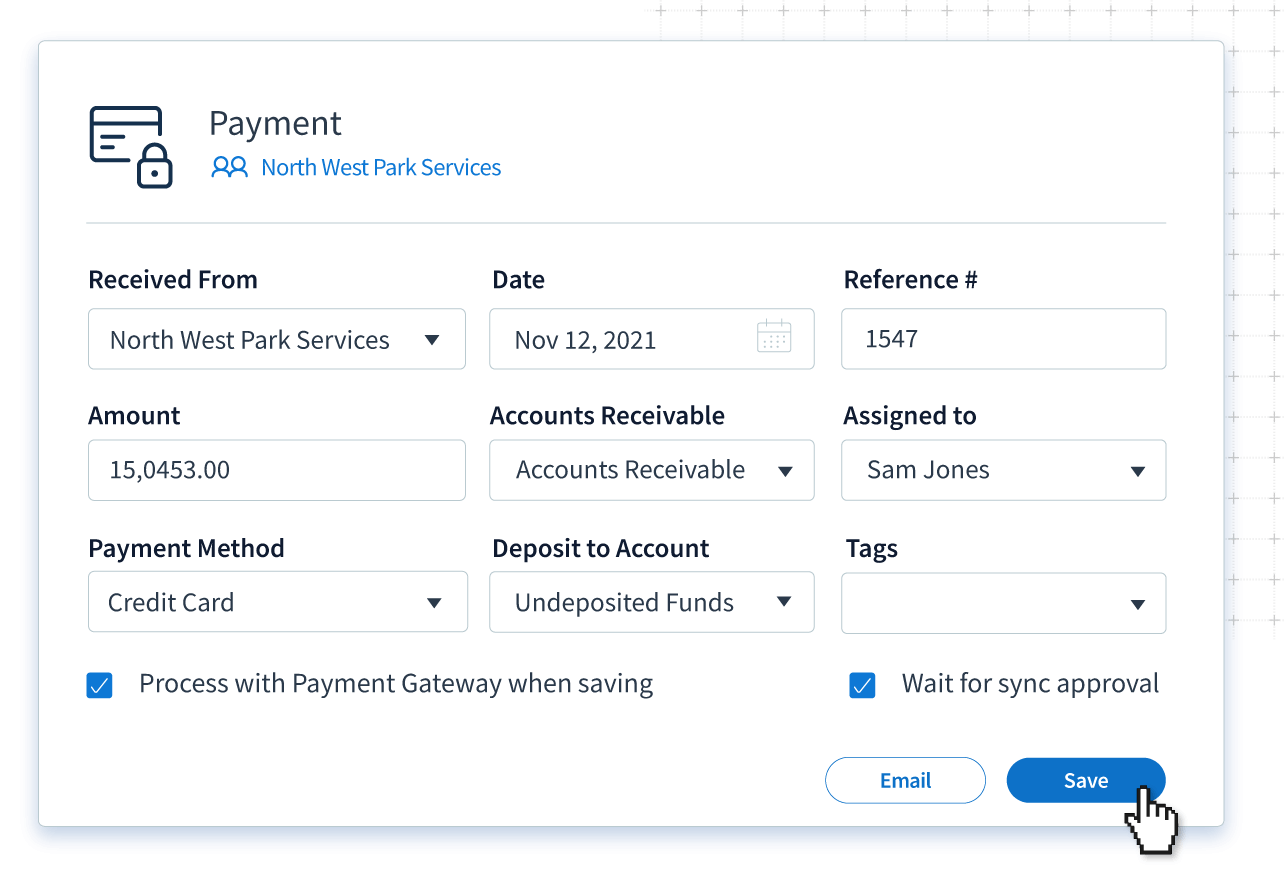
Screenshot of Method payment processing

First on the list of best credit card processing for QuickBooks users is Method. As the #1 lead-to-cash automation tool for QuickBooks, Method enables credit card payments directly through your CRM. Its compatibility with various payment gateways ensures quick and hassle-free processing. 

What’s more is that Method boosts accuracy and reduces payment errors with its real-time, two-way sync with QuickBooks. 

Features

  • Multi-payment provider support. 
  • Real-time credit card payment management. 
  • Secure transaction processing. 
  • Two-way sync with QuickBooks. 
  • Secure online invoice payments. 

Pros

  • Data security. 
  • Reliable customer support. 
  • Seamless third-party integrations. 
  • Customized, automated workflows.  

Cons

  • Only available in English. 
  • Limited to QuickBooks and Xero users. 

Pricing

Method offers three pricing plans, charged per user: 

  • Contact Management: $27 per month billed annually, or $28 billed monthly. 
  • CRM Pro: $45 per month billed annually, or $49 billed monthly. 
  • CRM Enterprise: $73 per month billed annually, or $85 billed monthly. 

There is also a, free trial with no credit card or contract required.

Stripe

Screenshot of stripe payment processor

Image credit: Stripe

Stripe is a leading name in credit card processing, known for its efficient payment handling. Its seamless APIs and robust functionality help users accept payments and transfer money globally. 

Features

  • Accepts all major debit and credit cards. 
  • Payment support in over 135 countries. 
  • Mobile-optimized checkout experience. 
  • Recurring payment management. 
  • Advanced fraud protection. 
  • Detailed reporting and reconciliation. 

Pros

  • Intuitive user interface. 
  • Diverse payment options. 
  • Customized payment automation. 

Cons

  • Clunky navigation.
  • High processing fees. 
  • Slow search functionality. 
  • Limited merchant acceptance. 

Pricing

Stripe follows a per-transaction pricing model: 

  • Domestic cards: 1.75% plus $0.30. 
  • International cards: 3.5% plus $0.30. 
  • Custom pricing is also available. 

Online payments, automated leads, and customer management?

QuickBooks Payments vs. Stripe

When evaluating the best credit card processing for QuickBooks, a comparison between QuickBooks Payments vs. Stripe often comes up. 

Here are the key differences between QuickBooks Payments vs. Stripe: 

  • Payment options: QuickBooks Payments focuses on bank transfers and credit cards. On the other hand, Stripe supports a wide range of options like digital wallets and international payments. 
  • User interface: QuickBooks Payments seamlessly integrates with QuickBooks, while Stripe has a more general, developer-friendly API. 
  • Pricing structures: QuickBooks offers competitive pay-as-you-go plans and a monthly subscription fee. Stripe is also pay-as-you go, but has no monthly fee. 
  • Reporting: While QuickBooks Payments offers simpler reporting features, Stripe stands out with its robust, real-time reporting. 
  • Security: QuickBooks Payments benefits from QuickBooks security through an all-in-one system. Stripe is also secure and offers advanced fraud detection. 

In a nutshell, QuickBooks Payments is more integrated and cost-effective for QuickBooks users. In contrast, Stripe offers greater flexibility for diverse payments.

Chargezoom

Screenshot of ChargeZoom online payment terminal

Image credit: Chargezoom 

Next up is Chargezoom. It’s a software that integrates digital payments and automates tasks. Its payment processor centralizes payment handling and minimizes payment friction. 

Plus, adding new gateway connections is easy, so you can leverage as many as you want to secure the best rates. 

Features

  • ACH, debit, and credit card processing. 
  • Electronic and mobile payments. 
  • Payment fraud prevention. 
  • Integrations with accounting and payment platforms. 

Pros

  • Quick set-up and ease of use. 
  • Robust gateway support. 
  • Real-time, bi-directional syncs. 
  • Full suite of payment management tools. 

Cons

  • Limited customization features. 
  • Basic reporting tools. 
  • No mobile app. 

Pricing

Chargezoom offers three pricing plans:

  • Pro: $9 per month.
  • Business: $29 per month. 
  • Plus: Over $59 per month.

ProMerchant

Screenshot of ProMerchant payments hub

Image credit: Payments Hub 

ProMerchant focuses on credit card processing for: 

  • Retailers. 
  • Restaurants. 
  • E-commerce. 

It emphasizes easy payment processing and exceptional service. Unlike others, ProMerchant outsources its software to two transaction processing platforms: Payments Hub and Authorize.Net. 

Features

  • Point-of-sale (POS) systems. 
  • Mobile payment processing. 
  • Virtual terminals. 

Pros

  • Month-to-month agreements. 
  • No set-up fees. 
  • Personalized support. 
  • Easy to use reporting tools and analytics. 

Cons

  • Additional fees for other payment types. 
  • No proprietary dashboard or mobile app. 
  • Limited online information. 

Pricing

ProMerchant charges a monthly fee. To get a quote, you need to contact their sales department.

Helcim

Screenshot of Helcim payment processor

Image credit: Helcim

Helcim offers credit card processing for new and experienced business owners. It supports in-person and online payments at competitive rates. Not to mention, Helcim simplifies credit card acceptance without additional fees or up-sells. 

Features

  • Zero-cost payments with Helcim Fee Saver. 
  • Quickbooks Online payments sync. 
  • Invoicing, recurring plans, and ACH payments. 
  • Contactless payment support. 
  • E-commerce website features.

Pros

  • Affordable pricing. 
  • Secure payments. 
  • Multi-device access. 
  • Automatic volume discounts. 

Cons

  • High interchange rates. 
  • Frequent crashes and freezes. 
  • Limited back-office integration. 

Pricing

Like Stripe, Helcim follows a per-transaction pricing model: 

  • In-person rate (average): 1.76% plus $0.08.
  • Online and keyed transaction rate (average): 2.39% plus $0.25.

Rates also depend on factors like total monthly volume and average transaction size. 

HoneyBook

Image credit: HoneyBook 

Your final best credit card processing for QuickBooks option is HoneyBook. It’s a cloud-based CRM with easy-to-use online payment features. It supports all major credit cards, debit cards, and bank transfers to ensure a smooth client experience.

Plus, with its Instant Deposits feature, you get paid quicker and maintain steady cash flows. 

Features

  • Multi-payment options. 
  • Third-party app integrations. 
  • Automatic payment reminders. 
  • Competitive payment processing fees. 
  • Recurring payments and mobile invoicing. 

Pros

  • Intuitive and easy to use.
  • All-in-one client management tool. 
  • Custom task automation and sales pipelines. 
  • Online payment acceptance.  

Cons

  • Limited reporting metrics. 
  • Lacks project pipeline customization. 
  • Limited customer management features. 

Pricing

HoneyBook offers three pricing plans.

  • Starter Plan: $19 per month, or billed annually at $16 per month. 
  • Essentials Plan: $39 per month, or billed annually at $32 per month. 
  • Premium Plan: $79 per month, or billed annually at $66 per month. 

Recap: Best credit card processing for QuickBooks

In your search for the best credit card processing for QuickBooks, choosing the right option is a game-changer. Integrating credit card processing with QuickBooks improves your cash flow and financial management.  

Tools like Method simplify payment processing with:

  • Faster online transactions. 
  • A two-way data sync with QuickBooks. 
  • Multi-payment gateway support. 

As you explore your options, consider your business’ unique needs and how each software caters to them. With the right choice, success is in your reach. 

Find the perfect payment processor for your business. Start your free trial of Method.


Image credit: Pixabay via Pexels
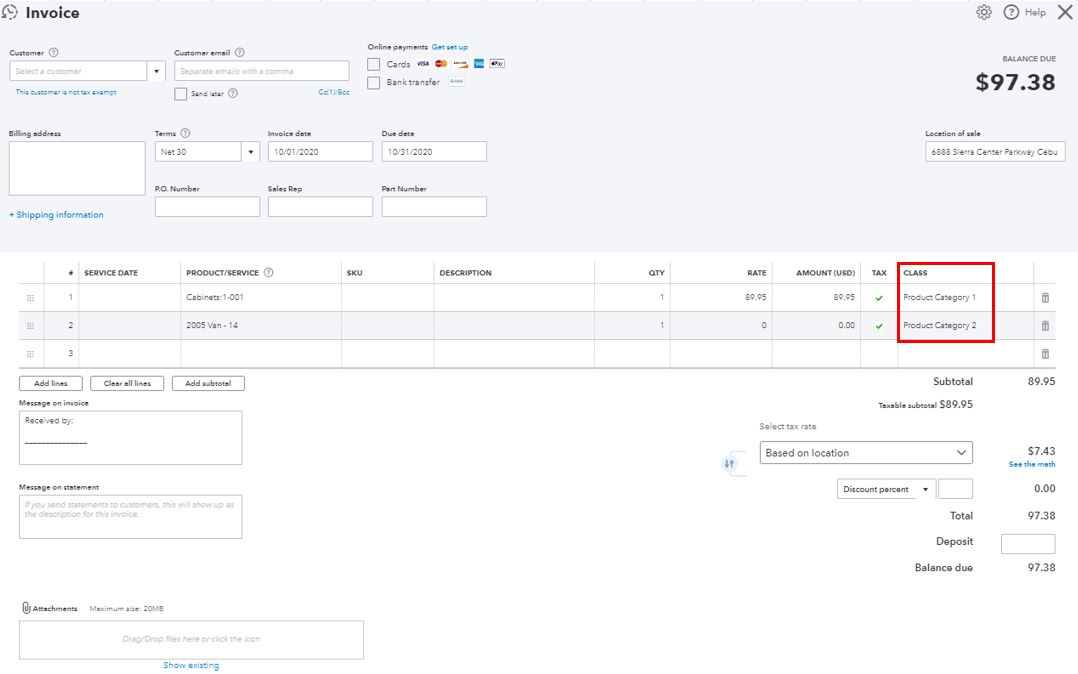
Young woman looking at a laptop and smiling in an office

How to set up recurring payments in QuickBooks Online 

Discover how to set up recurring payments in QuickBooks Online with our comprehensive guide.

How to set up recurring payments in QuickBooks Online  Read More »

Are you juggling numerous invoices and an over-complicated billing process? Or maybe you’ve been struggling to keep track of due dates? 

When it comes to business, efficiency is key. That’s where learning how to set up recurring payments in QuickBooks Online comes in as a game-changer. 

Whether you want to simplify your expenses or ensure timely payments to your vendors, this blog is your guide. 

Let’s uncover how to set up automatic payments in QuickBooks Online and learn why it’s important for your financial management.

Sick of missing invoices and other data in QuickBooks?

What are recurring payments?

Before mastering how to set up recurring payments in QuickBooks Online, it’s important to define what it is. 

A recurring payment is a transaction that is repeated at regular intervals. This is especially useful if you have regular, consistent expenses or incomes.

Can you set up recurring payments in QuickBooks Online?

QuickBooks makes it possible to schedule regular, automatic payments. Here’s how to set up recurring payments in QuickBooks Online:

  1. Navigate to the “Pay Bills” section.
  2. From the dropdown menu, select the vendor you want to make recurring payments to.
  3. Choose the frequency of payments — it could be weekly, monthly, quarterly, etc.
  4. Enter the payment details, such as the scheduled amount and your account information.
  5. Save the settings to automate payments according to the specified schedule.

And that’s it! Those are all the steps outlining how to set up automatic payments in QuickBooks Online.

Benefits of setting up recurring payments

Whether the type of transaction is partial or full, setting up recurring payments brings several advantages to your business. Here are some key benefits of learning how to set up recurring payments in QuickBooks Online:

Saves time

Automating payments eliminates the need to manually process each transaction. This is beneficial for regular expenses like: 

  • Utility bills.
  • Rent.
  • Subscriptions. 

By setting future payments up just once, you save a lot of time that your accounting professionals would otherwise spend on repetitive tasks.

Never miss a deadline

Recurring payments ensure that you make your payments on time. As a result, you avoid late fees and maintain good relationships with vendors and service providers.

Better cash flow

Knowing exactly when money is debited from your account helps with financial planning and budget management. With a clear picture of your cash flow, it’s easier to manage finances effectively. 

Reduces errors

Manual payments are prone to errors, such as entering incorrect amounts or missing deadlines. When you automate payments, you reduce these risks and boost the accuracy of your transactions.

Convenience

Once set up, recurring payments run in the background without any need for regular intervention. This adds convenience, especially if you have a busy schedule or a large number of transactions.

Enhances security

Digital payment methods and systems have powerful security measures in place. This means that you have more secure payments than if you were to use manual methods. As a result, you reduce fraud risks and unauthorized transactions.

Better record keeping

Most systems that support recurring payments also keep a detailed transaction history. This helps you: 

  • Track expenses.
  • Simplify accounting processes.
  • Prepare for tax season.

Peace of mind

One of the most underrated benefits of learning how to set up recurring payments in QuickBooks Online is the peace of mind that comes with knowing your bills and payments are being handled automatically and accurately.

Method CRM lets you run your business, your way.

Your options for recurring payments in QuickBooks Online

Let’s take a look at your payment options for recurring payments. 

Method — The best lead-to-cash automation tool for QuickBooks users

Method is a powerful tool for QuickBooks users, especially if you’re looking to automate your lead-to-cash workflows. It bridges the gap between your customer relationship management and financial transactions.

With its powerful QuickBooks integration and advanced features, you can automatically generate, send, and track invoices. With a Method invoice template, for example, you reduce manual data entry and the potential for errors. 

The platform syncs in real time with QuickBooks so that your financial data is always up to date. This integration means less time spent on data reconciliation and more time growing your business.

Method lets you set up and manage recurring payments seamlessly, which is crucial if you have regular billing cycles.

Beyond handling payments, Method offers robust CRM capabilities with additional features. You can track customer interactions, manage leads, and convert them into loyal customers – all within the same platform.

Autopay

Autopay in QuickBooks Online is a direct, integrated feature for managing recurring payments. With smart features, it lets you set recurring vendor payment options and receive customer payments easier. 

It automates your payment process to ensure timely transactions and reduce your manual workload.

Here’s a step-by-step guide for how to set up automatic payments in QuickBooks Online using Autopay: 

For paying vendors

  1. Navigate to the “Vendors” section in QuickBooks Online.
  2. Select the correct vendor and choose the option to set up Autopay for your automatic payments.
  3. Specify the payment info, including the amount, frequency interval, and start date.
  4. Confirm using the Autopay checkbox to automatically schedule payments. 

You’ll receive a confirmation email for each successful payment.

For receiving payments from customers

  1. Go to the “Sales” or “Invoices” section.
  2. From the drop-down menu, choose the customer and set up a recurring invoice.
  3. Enable the Autopay option on the invoice.
  4. Define the payment details and frequency.
  5. Save and activate the recurring payment schedule.

Can customers set up Autopay?

Yes, customers can set up Autopay to make recurring payments for invoices you send them. Here’s how:

  1. Set up a recurring invoice in QuickBooks Online for the customer.
  2. Select the option for Autopay when creating the invoice.
  3. The customer will need to authorize Autopay, typically by adding their payment details.
  4. Once set up, the invoice amount will automatically get deducted from the customer’s account based on the specified schedule.

Can recurring payments be canceled?

Yes, you can cancel recurring payments. This gives you crucial flexibility and control over your financial commitments. Here’s a simple guide on how to cancel a recurring payment:

  1. Log in to your QuickBooks Online account.
  2. Navigate to the gear icon in the top-right corner. Under “Lists,” select “Recurring Transactions.”
  3. In the “Recurring Transactions” list, find the payment you want to cancel. You can use the search field if you have many transactions.
  4. Click on the recurring payment to open it. Here, you’ll see an option to “Edit.”
  5. Within the editing options, find and select “Cancel” or “Delete.” This stops the recurring payment.
  6. A prompt status field will appear asking you to confirm the cancellation. Click “Yes” to confirm.

Wrap-up: How to handle recurring payments on QuickBooks Online

Learning how to set up recurring payments in QuickBooks Online is the best way to efficient financial management. Embracing this tool simplifies your payment processes and strengthens the financial backbone of your business.

The key to success lies in sticking to best practices like updating vendor information consistently and regularly reviewing payment schedules. 

Integrating tools like Method enhances this process. Method shows you how to set up automatic payments in QuickBooks Online easier while it also provides a centralized place to manage customer relationships and financial data. 

With these strategies and tools, you’ll transform the way you manage finances. As a result, you ensure efficiency, accuracy, and peace of mind in your business operations.

Save hard costs and real time. Start your free trial with Method.

Image credit: wichayada via Adobe Stock

Man in warehouse counts items.

How to use categories in QuickBooks Online

Learn how to use categories in QuickBooks Online to stay financially organized and track every sale.

How to use categories in QuickBooks Online Read More »

Do you ever find yourself struggling to stay financially organized, even with the support of a designated accounting software like QuickBooks Online?

If so, you need to take advantage of categories so that your data is always easy to find. In this blog, you’ll uncover:

  • What categories are in QuickBooks, and why they matter.
  • How to use categories in QuickBooks Online.
  • Tips and tricks for managing them effectively.

Let’s jump in!

Grow your business without leaving QuickBooks Online.

What are categories in QuickBooks Online?

Image credit: Intuit QuickBooks

If you’re wondering how to use categories in QuickBooks Online, you’re in the right place. But what are they?

In QuickBooks, categories are your secret weapon for classifying the products and services your business offers. Think of a category in QuickBooks as a digital label that helps you organize and track your sales more efficiently. 

Categories are important as they help you stay coordinated, specifically with:

  • Income categorization.
  • Expense tracking.
  • Transaction tagging.
  • Sub-categories management.
  • Filtering transactions by category.
  • Category-specific attachments.

Through this category feature, QuickBooks Online simplifies transaction tracking and enhances financial reporting accuracy. It’s a game-changer, especially when you’re dealing with an overload of inventory items.

Plus, when you integrate with Method’s Items App, you can create and edit these categories in a few clicks, and they’ll sync with your QuickBooks account​ immediately.

QuickBooks tutorials and trial

For those just starting out or adding new products or services to their portfolios, QuickBooks Online offers a range of video tutorials and even a trial period to support you. They have guides and forums with helpful comments on how to set your company up for success.

These resources teach you how to use categories in QuickBooks Online and how they streamline your bookkeeping and accounting processes.

Categories: More than just labels

Think of categories as a way to organize, integrate, and manage different aspects of your business. From tracking your inventory to categorizing expenses and income, this feature streamlines tax preparation processes through versatile types and classes of items, whether they’re products or services. 

Not to mention, QuickBooks Online allows for detailed expense breakdown, which ensures consistency across financial documents and transparency for those involved. 

But the best part is that category-specific insights and trends facilitate budgeting and enable precise income segmentation. They help you track your transactions with clients and your payments to vendors and merchants.

Manage categories

Managing categories in QuickBooks is straightforward. In the “Products & Services” section, the “Manage Categories” link takes you to a list where you can add, update, or customize categories and sub-categories. 

In this tab, you’ll see:

  • Category name: Pick the right name for your category.
  • Active?: Check this box to enable this category. You won’t be able to use it if the box is unchecked.
  • Parent: You can pick a parent category if you’re working with a sub-category.

This feature supports multi-level categorization, which helps in organizing inventory items. It also more effectively integrates with other accounting features like class and location tracking.

Creating and editing categories

When you create or edit a category, you’ll encounter various fields. You can: 

  • Name your category.
  • Decide if it’s active.
  • Set it as a sub-category in the dropdown.

QuickBooks Online also offers customizable labeling options, so you can merge and rename categories when needed.

Utilizing categories for better insights

When you categorize your transactions, QuickBooks Online provides clearer views of business performance. And you can tailor who sees those insights by setting up multi-user permissions by category to provide access to the right accounts on your team and avoid sharing sensitive or confidential information.

However, fully understanding how to use categories in QuickBooks Online goes beyond just setting them up. Let’s see how they impact your operations.

When do I use categories in QuickBooks Online?

Categories in QuickBooks Online let you know what’s selling and what’s not. 

When you run sales or inventory reports, products and services are grouped by category. This grouping optimizes the sales and expense analysis and improves data visualization in charts. 

You can then use this information to get a sense of what areas you should pay more attention to.

Benefits of using categories

Using categories in QuickBooks Online boosts overall bookkeeping productivity. It:

  • Lets you track income and expenses in a more organized way.
  • Provides insights into your financial health.
  • Simplifies reporting processes. 

Categories also play a crucial role in budgeting and forecasting by giving you a detailed view of your company’s financial standing.

Learning how to use categories in QuickBooks Online also:

  • Assists in identifying spending patterns.
  • Reduces manual data entry errors.
  • Increases efficiency in account reconciliation. 
  • Makes invoice and payment categorization easier.
  • Strengthens financial forecasting capabilities.

Get everything you need to run your business in one place.

Can you create your own categories in QuickBooks?

When learning how to use categories in QuickBooks Online, creating your own is key! 

Custom category creation is a feature that lets you tailor QuickBooks to your business needs. You can also manage sub-categories to ensure that you accurately categorize every item or service.

Category-specific features

QuickBooks Online’s category feature also includes options like:

  • Profit and loss reports by category.
  • Budgeting by category.
  • Import and export category lists.
  • Recategorize bulk transactions.
  • Tax line mapping.
  • Bank feed rules.

For businesses with a variety of products and services, this feature is invaluable. When you save files under the correct category, you don’t need to separate invoices, customers, and companies manually or organize them into a bunch of confusing rows in Excel.

Tips for effective category management

To effectively use categories, it’s important to regularly update and review them. Automated category suggestions help you decide how to categorize new items. Additionally, the mobile app category management feature lets you manage categories on the go, which is especially useful for businesses in field services.

Also note that in order for your categories to be effective, all your system’s users need to know the logic behind them. You should make sure that your team follows the right steps to categorize items and transactions correctly.

The people involved in daily processes will have the most to say about what would increase their productivity. So, make sure to support your team members through the implementation of new categories and get their input to make them functional.  

Now that you know how to use categories in QuickBooks Online, you can extend the power of your accounting software with Method — the #1 automation tool for QuickBooks users.

Frequently asked questions (FAQs)

Can I assign multiple categories to a single transaction?

Unfortunately, you can’t currently assign multiple categories to a single transaction in QuickBooks Online. 

However, there are other things you can do to segment your sales data for a more detailed analysis. For example, a QuickBooks CRM like Method facilitates better budgeting insights and enables precise income segmentation. Integrations let you monitor and record financial activities in a more organized way.

How do categories affect my financial reports in QuickBooks Online?

Categories are a game-changer for your QuickBooks reports. They bring you clarity and insight by grouping products and services in your sales and inventory reports. This means you can easily see which categories are driving your business and make informed decisions accordingly. 

For example, if you notice that you allocate a lot of resources to one product category and it consistently underperforms in sales, you might decide to cut it from your product line. So, categories give you a clearer picture of your company’s performance for a better bottom line.

Can I change or delete a category after I’ve used it for transactions?

Yes, you can change or delete a category in QuickBooks Online after you’ve used it for transactions. Just remember, if you delete a category that’s been used in transactions, it can affect your historical data. 

QuickBooks Online ensures that changes you’ve made to categories are reflected across all linked transactions. The platform provides historical category edits and audit log functionality. This feature is particularly useful for maintaining accuracy in your bookkeeping and accounting records.

QuickBooks gets you started, Method helps you grow. See how.

Image credit: cottonbro studio via Pexels