
If you’re wondering, “Can I import transactions from Excel to QuickBooks Desktop?” the answer is yes, you can! You can import several types of transaction information, such as bank transactions, from Excel and CSV files into your QuickBooks account.
Being able to import transactions into QuickBooks Desktop from Excel helps you update your financial information without the busy work of manual data entry. Each QuickBooks Desktop version supports the import of bulk transactions to simplify this process in just a few steps.
Keep reading to learn how to import transactions into QuickBooks Desktop from Excel in this step-by-step guide!
Can you import transactions into QuickBooks Desktop?
Yes, you can import transactions into QuickBooks Desktop from Excel spreadsheets and even CSV files. There are several different types of transactions that are possible to import:
- Account beginning balances.
- Banking transactions like cash sales, refunds, checks, invoices, estimates, and deposits.
- Credit card transactions, including credit card refunds and credit memos to customers.
- Account transfers of funds.
- Vendor bills and vendor bill refunds.
- Journal entries.
- Purchase orders.
It’s also possible to import lists, including items, vendors, and the chart of accounts.
Note: Intuit will stop selling all QuickBooks Desktop versions (except Enterprise) to new U.S. subscribers after September 30th, 2024.
Can QuickBooks Desktop pull data from Excel?
A common question is, “Can I import transactions from Excel to QuickBooks Desktop directly through QuickBooks?” The answer is yes! QuickBooks can pull data from Excel spreadsheets quickly and easily to keep your financial information organized and up to date.
How to import transactions into QuickBooks Desktop from Excel
Here are the steps to import transactions into QuickBooks Desktop from Excel:
- In the “File menu,” select “Utilities.”
- Select “Import,” then “Excel Files.”
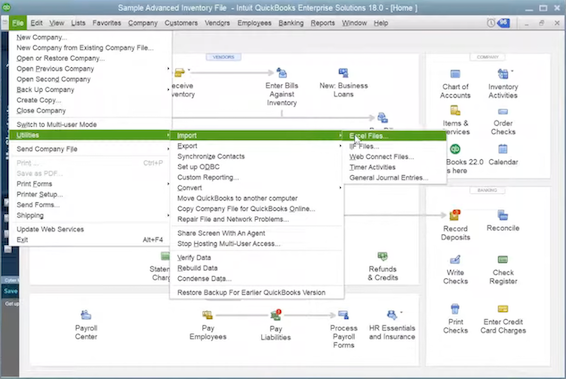
Image credit via Steve Batten
- Depending on your version of QuickBooks, you may have a window pop-up that mentions “Add/Edit Multiple List Entries.” If you do, click “No.”
- Following the prompts to import your file, select the relevant data type.
- QuickBooks will show you an example Excel spreadsheet to follow. Use this example to format your Excel data file.
- Once you’ve matched the sheet’s columns to the appropriate QuickBooks fields, save it to your computer and select “Add My Data Now” to import it.
- Review the results and edit any mismatched data with the closest-related column headings.
- Click “Close” when you’re done.
Note that the instructions on how to import transactions into QuickBooks Online will differ.
Exporting Excel files
To save your spreadsheet as an Excel file:
- Navigate to the “File menu” and click “Save as.”
- Click “Browse” and choose where you want to save the file on your computer.
- In the “Save as type” box, select XLSX (Excel Workbook .xlsx).
- Click “Save.”
How to import transactions into QuickBooks Desktop from CSV
CSV files are a file type that lets you save spreadsheets without additional text formatting. That means your information is saved in plain text, which excludes formatting like bolded text, special characters, or images.
To save your spreadsheet as a CSV file:
- Navigate to the “File menu” and click “Save as.”
- Click “Browse” and choose where you want to save the file on your computer.
- In the “Save as type” box, select CSV (comma delimited .csv).
- Click “Save.”
Pros and cons of importing transactions into QuickBooks Desktop from Excel
If you’re asking, “Can I import transactions from Excel to QuickBooks Desktop?” you’ll be glad to know that it’s a quick and accurate process. That said, it’s good to be aware of the pros and cons that come with it.
Pros
- You can import transactions into QuickBooks Desktop from Excel with an unlimited number of items, so use as many rows as you need.
- QuickBooks Desktop supports the import of the most common transaction types, such as checks, deposits, credit cards, bills, invoices, and credit memos.
- You get access to “Smart Features” that ensure data accuracy before importing, letting you add new customers and vendors not previously listed in your QuickBooks account.
Cons
- Importing time sheets, sales orders, and purchase orders is not supported.
- The ability to import transactions into QuickBooks Desktop from Excel is exclusive to the Accountants edition of QuickBooks.
If you’re not using the Accountants edition of QuickBooks, don’t worry! You still have an alternate solution.
Method offers a two-way sync service for customer and transaction data in real time. It is fully integrated with every version of QuickBooks, including QuickBooks Online and QuickBooks Desktop.
Method is an external platform that expands import functionality for QuickBooks, along with offering other features that save you time and improve productivity.
Are there size limits or formatting requirements?
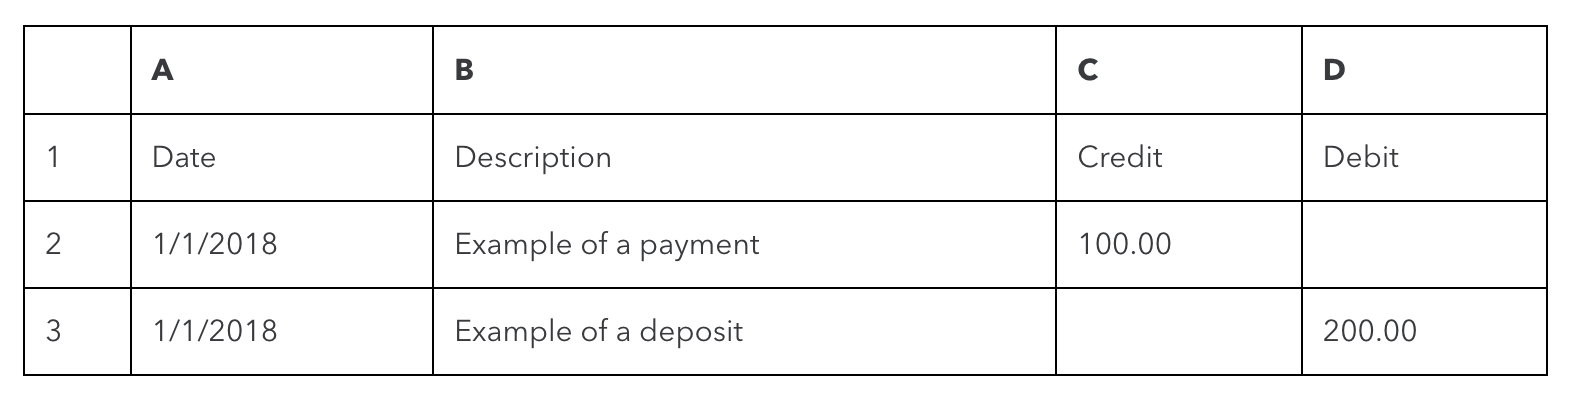
Image credit via QuickBooks
When you import transactions into QuickBooks Desktop from Excel or with a CSV file, there aren’t limitations on the number of rows you can use. However, you still need to format the spreadsheet with three or four columns as pictured above.
We recommend that you reference QuickBooks’ guidelines on spreadsheet formatting before starting your import.
Can you import bulk transactions into QuickBooks?
Yes, you can import bulk transactions into QuickBooks by following these step-by-step instructions:
- Navigate to the “Accountant” menu and select “Batch Enter Transactions.”
- Select the “Transaction Type” you want to import and “Account.”
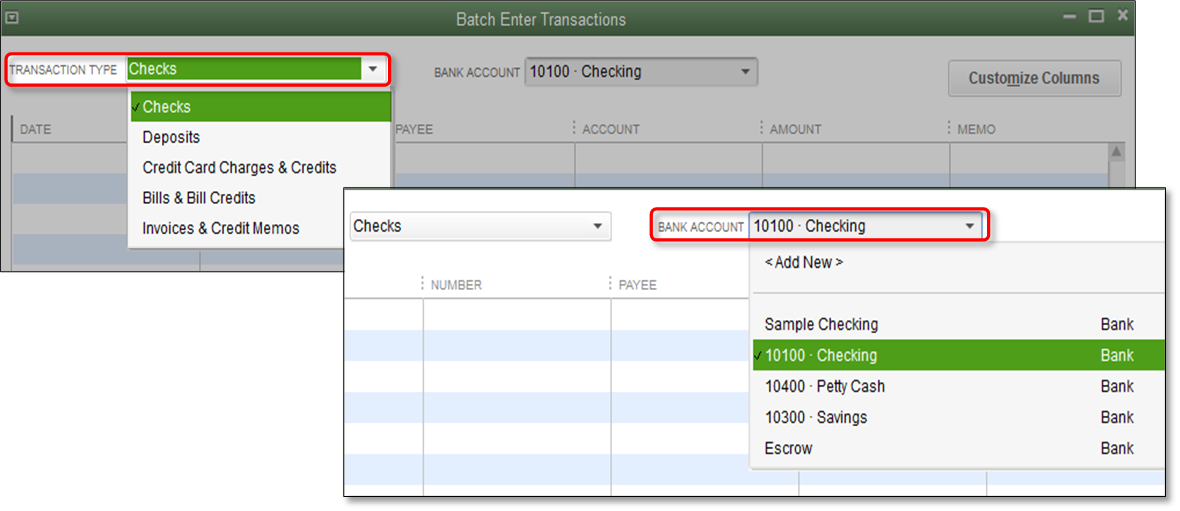
Image credit via QuickBooks
- Ensure that the columns in the spreadsheet you import from match the order of the columns in the “Batch Enter Transactions” window.
- Select the information in your spreadsheet, right-click, and select “Copy.”
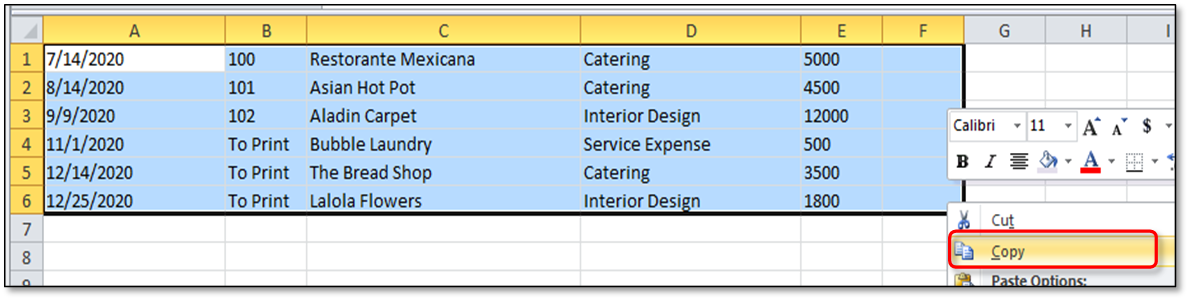
Image credit via QuickBooks
- In the “Batch Enter Transactions” window, move your cursor to the first date field, right-click, and select “Paste.”
If you have information that turns red, it means they aren’t listed in the company file. Select the red cell and choose “Quick Add” or “Set Up” to add it.
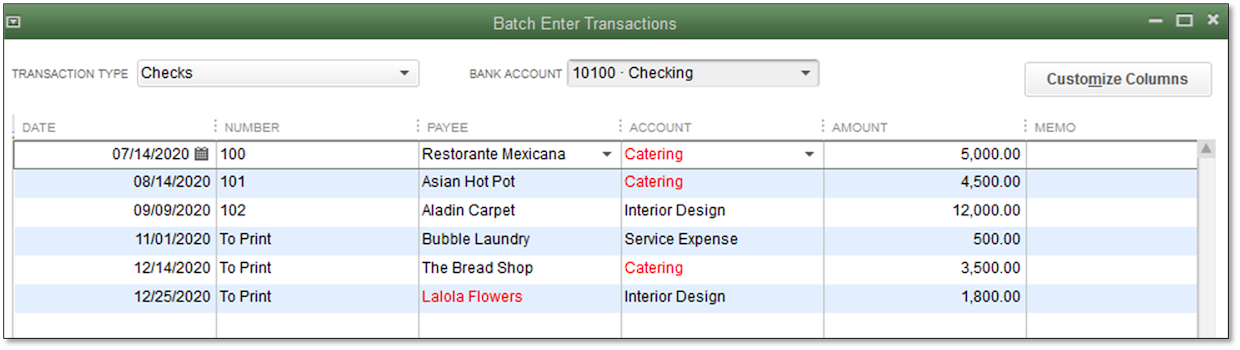
Image credit via QuickBooks
What to consider after importing transactions into QuickBooks Desktop
After importing transactions, follow the simple three-step process below to make sure your data is reflected accurately in your QuickBooks account.
Mapping the data
After importing your data, QuickBooks opens a mapping interface where you can assign columns to their corresponding field. This ensures that you assign each column to the correct category.
To map your data:
- Enter a mapping name and choose the “Import type” for your account. Choose the mapping name that is most appropriate for the category.
- Match the information in QuickBooks with the columns in your imported spreadsheet.
- Select “Save” to complete your import.
Verifying the import
Through our practical knowledge, we recommend checking the data in your QuickBooks Desktop account after you complete an import. This lets you catch any mistakes right away.
Step up your QuickBooks game with Method
If you’re not using the Accountant version of QuickBooks, you won’t be able to import transactions into QuickBooks Desktop from Excel or a CSV file as a standard feature. Enter Method.
Method is a powerful third-party application that enhances your QuickBooks account. It gives you powerful automation tools and the ability to customize workflows. In a nutshell, Method simplifies accounting processes to keep your financial records organized and running smoothly.
You can use Method’s patented, two-way sync with QuickBooks to update your customer and transaction data in real time. Better yet, Method is compatible with all versions of QuickBooks, so you don’t need to own the Accountant version to import transactions.
In addition to syncing your transaction data, Method offers key benefits such as:
- Workflow automation to improve efficiency.
- Powerful customer management tools.
- The ability to view detailed financial reports.
- Features to collect payments with online banking.
If you’re ready to add advanced features to your QuickBooks account — including transaction and customer data syncing — it’s time to integrate with Method.
FAQs
What is the QuickBooks Desktop stop-sell initiative?
After September 30th, 2024, Intuit will no longer sell QuickBooks Desktop (except Enterprise versions) to new U.S. subscribers.
If you currently use QuickBooks Desktop, this will have no impact on your experience. You will continue to receive:
- Security updates.
- Product updates.
- Support from Intuit.
Method’s integration with QuickBooks Desktop will also remain unaffected.
My import process failed. What should I do?
If your import process fails, check your import file to make sure it’s in the correct format. Remember to format your spreadsheet with three to four column headers, and check that the type of transactions is compatible.
If you receive an error log during import, it is often the result of incompatible formats, data types, or unsupported special characters in CSV format files (such as semicolons).
I made a mistake in the import process. Can I revert or undo my import?
Unfortunately, there isn’t a way to undo an import with the simple click of a button. However, it’s a straightforward process if you’re using the Accountant version of QuickBooks Desktop to batch delete or void transactions from the import.
To batch delete or void transactions:
- Navigate to the “File” menu and click “Switch to single-user mode.” Note: If you see the option to “Switch to multi-user mode,” don’t click it.
- Go to the “Accountant” menu and choose “Batch Delete/Void Transactions.”
- Select all the transactions you want to delete or void from the “Available Transactions” list.
- When you’re finished, click “Review & Delete” to delete them, or if you want to void the transactions, click “Review & Void.”
- If you’re deleting the transactions, select “Back Up & Delete” — and if you’re voiding them, “Back Up & Void.” If you want to skip the backup, then choose “Delete only” or “Void only.”
- Click “Yes” to confirm you want to delete or void the transactions.
Don’t let the limits of QuickBooks hold you back. See how Method can help.
Image credit: Mikhail Nilov via Pexels