
When it comes to financial management, times can get tough. The good news is that QuickBooks recognizes this and offers a straightforward solution: partial payments on invoices.
Picture a scenario where customers can make payments in chunks to ease their financial burden. That’s what happens when you allow partial payment on invoices in QuickBooks.
In this blog, you’ll dive into the QuickBooks partial payment invoice functionality and get insights into its benefits and practical applications. By the end, you’ll know the best approach to manage your invoices and maintain financial stability.
Let’s get started!
Managing partial payments in QuickBooks: A quick start guide
When you manage customer payments in QuickBooks, it’s often helpful to allow payments in smaller, “partial” portions rather than in full upfront. QuickBooks makes this possible with its partial payments feature and progress invoicing, which lets you break down payments to keep cash flow steady.
You can effectively manage partial payments in QuickBooks Online by following these key steps:
1. Recording a partial payment
- Log into your QuickBooks Online account.
- Click the “+” icon and select “Receive Payment”
- In the “Customer” dropdown, select the customer’s name to display their open invoices.
- In the “Outstanding Transactions” section, check the box next to the relevant invoice.
- Now, in the “Payment” column, you enter the partial payment amount received.
- Choose the appropriate “Payment Method” (e.g., credit cards, bank transfer).
- You can now select the “Deposit to” account where the payment will be recorded.
- Finally, you click “Save and Close” to record the payment.
- You can click the pencil icon to adjust any additional payment details if required.
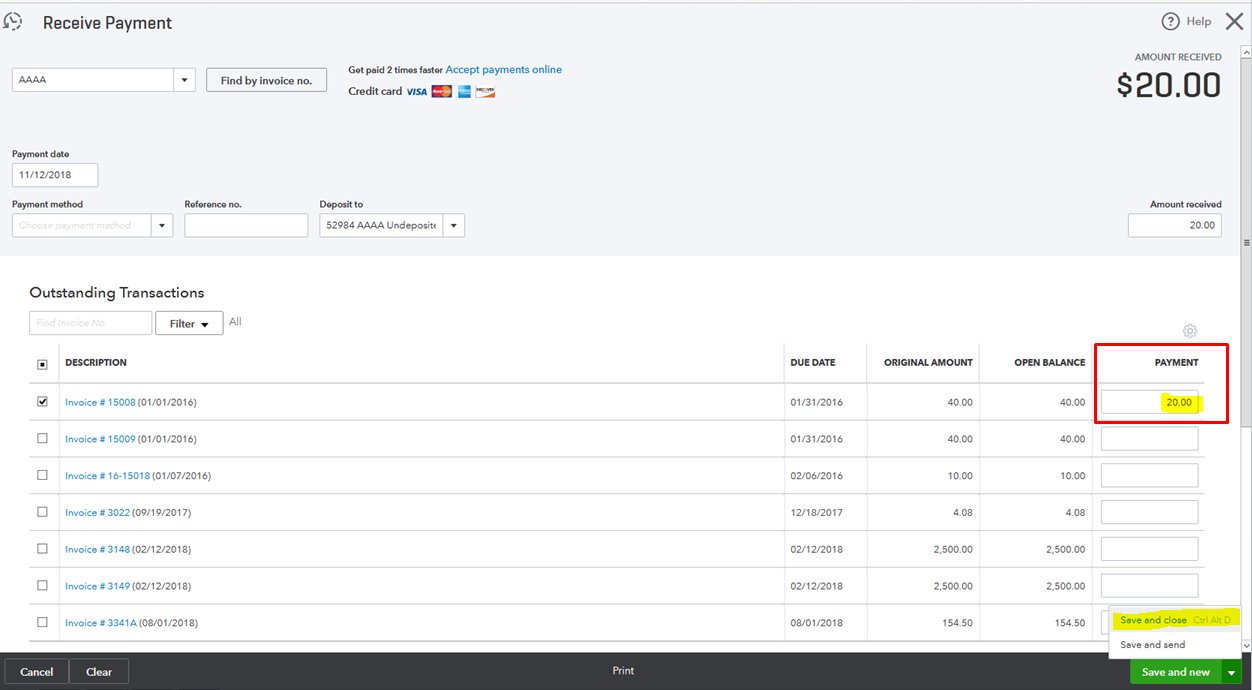
Image credit: Intuit
2. Sending a payment reminder
- First, you should navigate to the “Sales” tab in the left-hand menu.
- Then, click on “Customers”.
- Select the customer to which you need to send the reminder from the list.
- Click the dropdown arrow in the “Action” column next to the invoice.
- Now you can choose to “Send Reminder”.
- Review your email content, and click “Send” to dispatch the reminder to your customer.
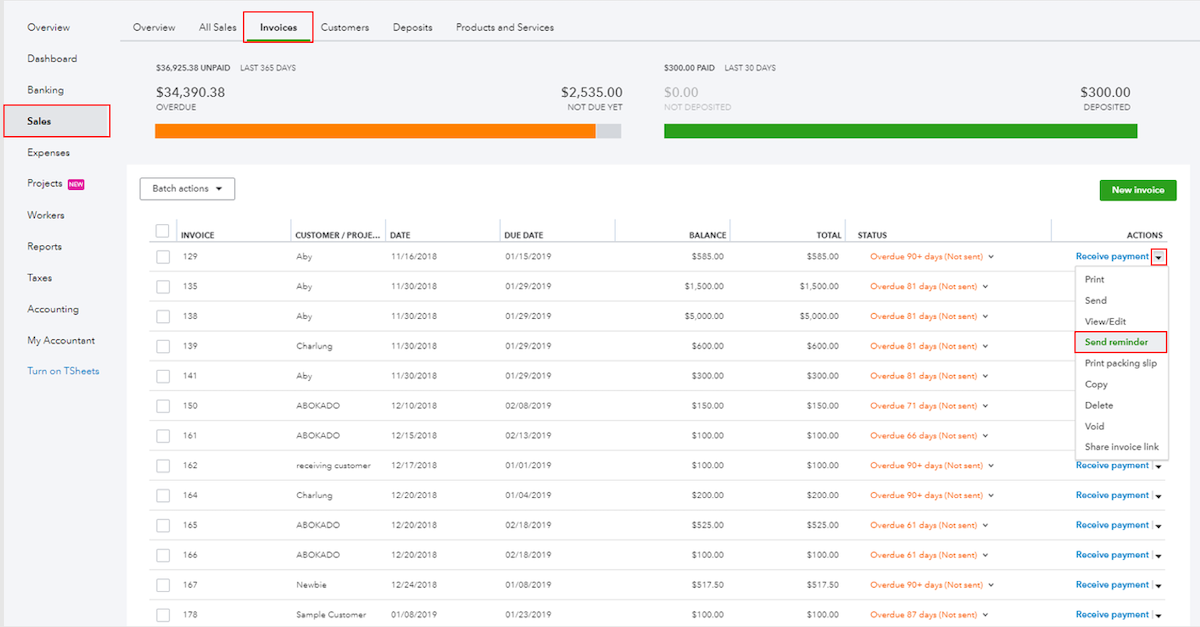
Image credit: Intuit
Understanding partial payments in QuickBooks
In order to understand how to allow partial payment on invoices, QuickBooks users need to have a good understanding of what a partial payment is.
A partial payment is a transaction that lets your customers pay their total invoice amount in fractions. This option is important to have in scenarios where a full immediate payment for an invoice is challenging for your client. Businesses in various industries allow partial payment on invoices in QuickBooks, offering a sensible solution to managing finances and tracking progress on outstanding balances.
Businesses in various industries allow partial payment on invoices in QuickBooks, as it offers a sensible solution to managing finances.
For example, in the events industry, cash flow can be variable, with income tied to specific events. Making partial payments helps you balance your expenses against the fluctuating income and avoid cash flow issues.
Benefits of allowing partial payments
The partial payment functionality in QuickBooks is a valuable feature that strengthens customer relationships with payment flexibility.
When you allow customers to pay with an initial payment or a custom payment schedule, it reduces the upfront financial pressure. It’s a popular payment option and encourages more regular payments.
Offering partial invoices also has several key financial advantages:
Increase sales
When you give your customers the choice to make installment payments, provide estimates that fit their budget, or pay a partial payment upfront, you make your products and services more accessible.
This approach often leads to larger purchases and increased sales receipts as your customers will feel more comfortable making purchases without requiring immediate, full invoice payment.
Drive customer loyalty
Having the option to allow partial invoices for affordable price options strengthens the loyalty of your customers. A flexible payment method builds trust, and positions your business as one that prioritizes the needs of your customers first.
Loyal customers are likely to return and also make future purchases, providing a more steady and reliable stream of revenue to your business.
Attract new customers
Partial payment options allow your business to attract new customers who may not have even considered your products and services due to a tight budget.
When you advertise flexible payment schedules, you’re opening the door for customers who much prefer (or rely on) installment payment plans.
Common setbacks with partial payments
While partial payments do offer some flexibility, there are some potential drawbacks you need to be aware of:
Higher fees
Some payment processors may charge you higher fees for installment transactions or merchant services fees for needing to process multiple payments. In any case of overpayment, a credit memo can be issued to adjust the amount to keep your records accurate.
Integration issues
Your business may experience challenges integrating partial payment options across systems if still using QuickBooks Desktop or other platforms that might have difficulty syncing with online payments.
“Hidden” consumer costs
Depending on the payment agreement schedule, you or your customers may face hidden costs such as interest or fees. Maintain transparency by ensuring you provide a clear description of terms and payment processes so that your customers are aware of any extra costs.
How to manage partial payments
Understanding how to allow partial payment on invoices in QuickBooks is key to maintaining a healthy cash flow. This is especially important for accounts payable and accounts receivable, where partial payments are often a reality.
To effectively manage partial payments in your accounts receivable, it’s essential to have a clear system in place. This includes:
- Setting clear payment terms: Define and communicate the payment terms for partial payments, including any interest or fees for late payments. You should also include the expected time frame for the complete payment.
- Recording partial payments: Ensure each payment is accurately recorded against the outstanding invoice. This includes selecting the correct Payment Item to categorize each transaction, helping maintain clear financial records.
- Regular follow-ups: Communicate with customers consistently about their balance payments and send regular reminders for the pending amount.
On the flip side, in your accounts payable, making partial payments helps you manage cash flow more effectively. By paying off portions of an outstanding balance, you maintain good relationships with your suppliers while you balance your business’ liquidity.
Here are some key steps to manage it effectively:
- Negotiating terms with suppliers: Communicate with your suppliers to agree on partial payment terms that work for both parties. This includes negotiating payment schedules or discounts for early payments.
- Prioritizing payments: Determine which invoices should be paid first based on factors like due date, importance of the supplier, or potential discounts for early payment.
- Accurate record-keeping: Maintain detailed records of each QuickBooks partial payment invoice made to ensure clarity in financial statements and aid in future financial planning, and prevent double entry errors by linking payments directly to invoices.
An initial partial payment also serves as a confirmation for the vendor to start working on your order, ensuring that your banner is ready on time for the event. Partial payments provide flexibility. You can allocate funds to different aspects of the event without compromising on quality or vendor relationships.
When you allow partial payment on QuickBooks, it builds trust among your vendors. This leads to better service and possibly favorable terms in the future.
How to pay vendors in QuickBooks Online
To pay vendors in QuickBooks Online, follow these steps:
- Access the vendor’s invoice by navigating to your Bill pay online widget.
- Select “Make a payment” and enter the partial payment amount or the amount you wish to pay initially.
- Choose how you want to pay, whether it’s a bank transfer or credit.
- Review and confirm your payment details by double-checking your amount and payment information.
- Submit the payment.
- Record the partial payment. QuickBooks Online automatically records this against the invoice.
- Keep an eye on the outstanding balance.
- For any remaining payments, repeat these steps for the rest of the payments.

Best practices for precise invoice and payment management
To ensure accuracy in handling invoices in QuickBooks, consider implementing these best practices.
First, use QuickBooks’ customization options to:
- Personalize your invoices.
- Reflect your brand identity.
- Maintain consistency.
- Promote professionalism.
As a result, you enhance brand awareness and client relationships. QuickBooks offers customization options for:
- Adding logos.
- Contact details.
- Personalized messages.
- Sales forms.
Next, implementing efficient follow-up practices is crucial. Have clear channels for sending payment reminders — and consider automating this using QuickBooks’ features.
Proactive measures also include tracking payment patterns and addressing concerns promptly. Establish escalation procedures for delinquent accounts, like sending collection letters or involving collection agencies.
You can also integrate QuickBooks with accounts receivable management tools to sync data automatically and reduce manual entry errors.
Better yet, automate matching payments with related invoices to improve accuracy and minimize missed or duplicate payments.
How QuickBooks users can strengthen their sales process
Method is a powerful tool for QuickBooks users. It offers a suite of features to simplify and automate every stage of your sales and payment processes, including:
- A powerful, two-way sync with QuickBooks to keep customer information and financials up to date.
- The ability to automate invoicing and payment collection directly from your CRM to save time, reduce errors, and enjoy a consistent cash flow.
- Efficient customer management that tracks all customer interactions and sales activities to provide a clear overview from lead generation to final payment.
- Provides valuable key metrics to analyze sales performance and payment trends.
How to allow partial payments on QuickBooks Online invoice FAQs
What are payment plans or installment plans?
Payment plans, also known as installment plans, let customers pay for a product or service over time. They’re a form of customer financing that lets customers make purchases with partial payments over time, if they can’t afford the full amount upfront.
Depending on the contract, these plans may allow for flexible payment amounts or require specific amounts on set due dates. This makes them a versatile payment option for customer payments.
Is a payment plan a loan?
No, a payment plan is not a loan. While it’s similar in that it provides financing options for a product or service, loans are typically issued by financial institutions like banks and credit unions.
Payment plans allow customers more flexibility, including the option to stop customer payments if the product is defective. Companies may repossess the product if a customer cancels without a valid reason, similar to the payment terms of a loan.
Why should a business accept partial payments?
A business should accept partial payments through installment plans, as they offer these benefits:
- Increased sales.
- Improved customer loyalty.
- Higher order values.
- Attracting new customers.
- Stable cash flow.
Extend your potential with QuickBooks.
Start your free trial with Method.
Image credit: Bnenin via Adobe Stock