
To customize invoices in QuickBooks Online, go to Settings > Custom form styles, choosing or creating an invoice style, then editing the design, content, customer-facing fields, payment options, and email message. Knowing how to customize invoices in QuickBooks Online will set you apart from your competitors and make your customers feel valued.
This guide walks through the exact steps to customize your invoice template, add your logo, edit fields, adjust layout, set defaults, and understand where QuickBooks Online’s invoice customization limits begin.
- QuickBooks Online lets you customize customer-facing invoices, estimates, and sales receipts, but it doesn’t fully change the internal transaction screen your team sees inside QuickBooks.
- You can add or edit your logo, choose colors and fonts, adjust visible fields, add payment terms, and personalize the invoice email message.
- Custom fields can show details such as purchase order numbers, job names, sales reps, or project managers, but plan limits vary.
- Always preview the invoice as a PDF and send invoices on a trial basis before making the template the default.
- Method CRM helps when invoice customization needs to connect with estimates, approvals, customer portals, e-signatures, reminders, and QuickBooks sync.
How do you customize invoices in QuickBooks Online?
To customize invoices in QuickBooks Online, go to Settings, select Custom form styles, then create a new invoice style or edit an existing one. From there, you can update the design, content, fields, and email settings before previewing and saving the template.
The basic workflow is:
- Go to Settings.
- Select Custom form styles.
- Choose New style > Invoice, or edit an existing invoice style.
- Update the design, logo, content, fields, and email message.
- Preview, save, and set the style as default if needed.
Intuit’s current documentation tutorial confirms that invoice customization affects what customers see on invoices, estimates, and receipts. It doesn’t fully change how those forms look inside QuickBooks Online.
Before You Start:
Confirm you have the right QuickBooks permissions, prepare your logo file, decide whether to edit the default template or create a new one, and list the information customers need to see. This can include purchase order numbers, terms for online payments, service dates, job names, warranty notes, or project details.
Now, let’s go step-by-step through customizing invoices in QuickBooks Online.
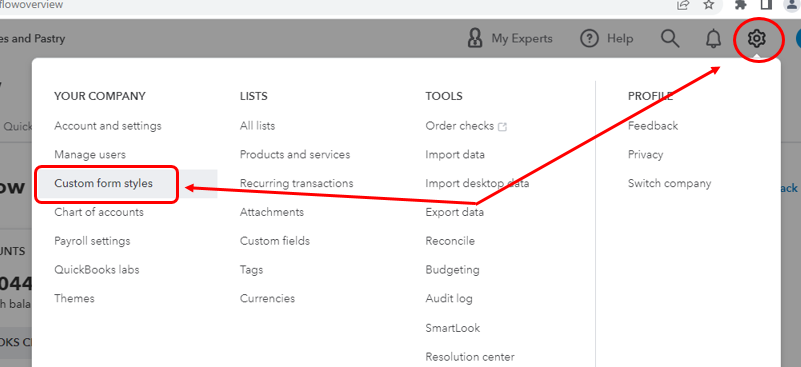
Step 1: Open Custom form styles to create or edit your invoice template
Go to Settings gear icon > Custom form styles > New style > Invoice.
You can also edit an existing invoice template instead of starting from scratch. This is useful if your current invoice is close to what you need, but it needs updated branding, clearer payment terms, or new customer-facing fields.
A better approach is to create or duplicate a template first, especially if you’re testing changes. Avoid editing your live default invoice style until you have previewed the new version and confirmed it works for real invoices.
Common Mistake #1: Don’t make major changes to your default invoice template without testing it first. Create a new style, preview it, send a test invoice internally, then make it the default once approved.
Step 2: Add or update your logo on the invoice
A logo helps customers recognize your invoice quickly, especially when invoices are sent by email or downloaded as PDFs.
To add a logo, go to Settings > Custom form styles, choose New style or edit an existing form, open the Design tab, and select the logo editing option. Intuit’s logo documentation says users can add a logo, adjust its placement, choose its size, hide it, or remove it from a form style.
Use a clean, high-resolution logo with simple text. A detailed logo may look fine in your editing screen, but become blurry, oversized, or hard to read once the invoice is saved as a PDF.
Preview both the PDF and email version before using the template with customers.
Common Mistake #2: A logo can look right on screen but appear too large or blurry in the PDF. Always preview before saving the template as your default.
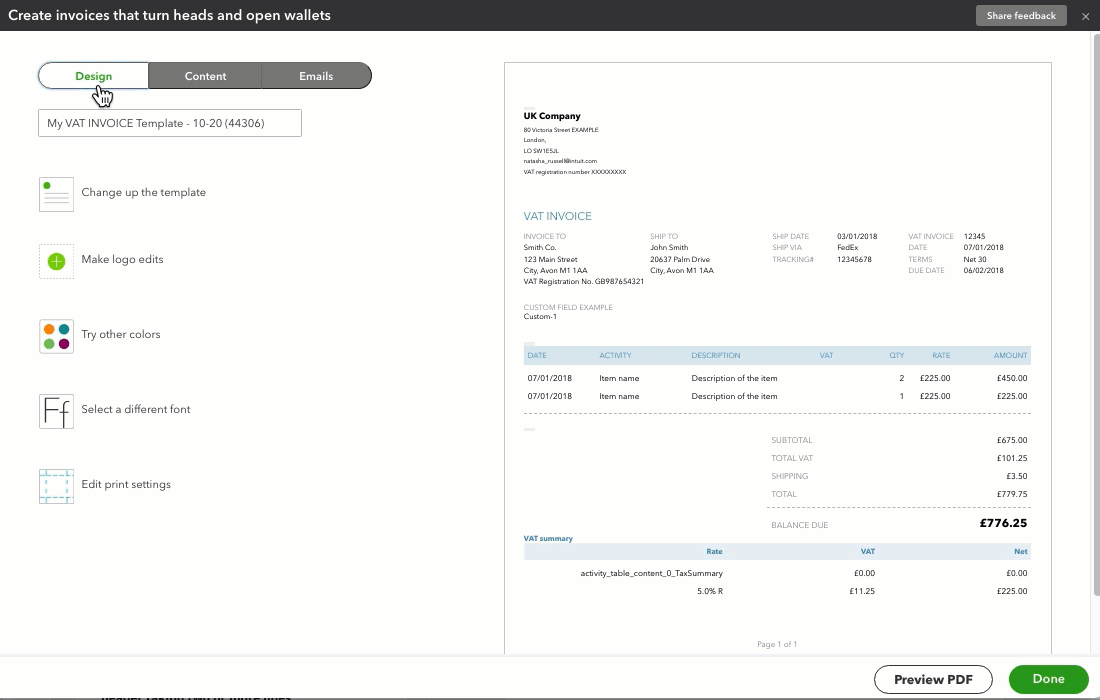
Step 3: Edit your invoice design, colors, and font
QuickBooks Online lets you adjust the basic look of your invoice so it matches your brand.
You can usually customize:
| Invoice Design Area | What You Can Change |
| Template style | Overall invoice layout |
| Accent color | Brand color or close match |
| Font | Font style and size |
| Logo placement | Left, center, or right placement |
| Appearance | Customer-facing invoice presentation |
Intuit’s global help documentation also references color scheme, font style, and print settings as part of the invoice customization workflow.
A clean design is usually the way to go. Customers should be able to scan the invoice number, due date, total, payment terms, and line items without searching.
Step 4: Customize the invoice content your customers see
The content section controls the customer-facing details on the invoice.
Here, you can adjust company information, labels, product and service columns, descriptions, quantities, rates, amounts, payment terms, footer messages, and customer notes.
| Invoice Element | What to Customize | Why It Matters |
| Logo and business name | Brand identity | Helps customers recognize the invoice quickly |
| Payment terms | Due date and payment expectations | Reduces payment confusion |
| Product/service columns | Labels, widths, visible fields | Makes line items easier to understand |
| Footer | Policies, thank-you note, service reminders | Adds context without cluttering the invoice |
| Custom fields | PO number, job name, project manager | Supports customer-specific billing needs |
Common Mistake #3: Don’t hide information customers need to approve or pay the invoice. Payment terms, due date, item descriptions, tax, discounts, and the total amount due should remain easy to find.
QuickBooks form customization changes the customer-facing form. It doesn’t fully redesign the internal QuickBooks Online transaction view.
Pro Tip: Standardize your invoice terms and field layout across every customer-facing template. Consistent invoice formatting reduces payment disputes, speeds up approvals, and makes reconciliation significantly easier at month-end.
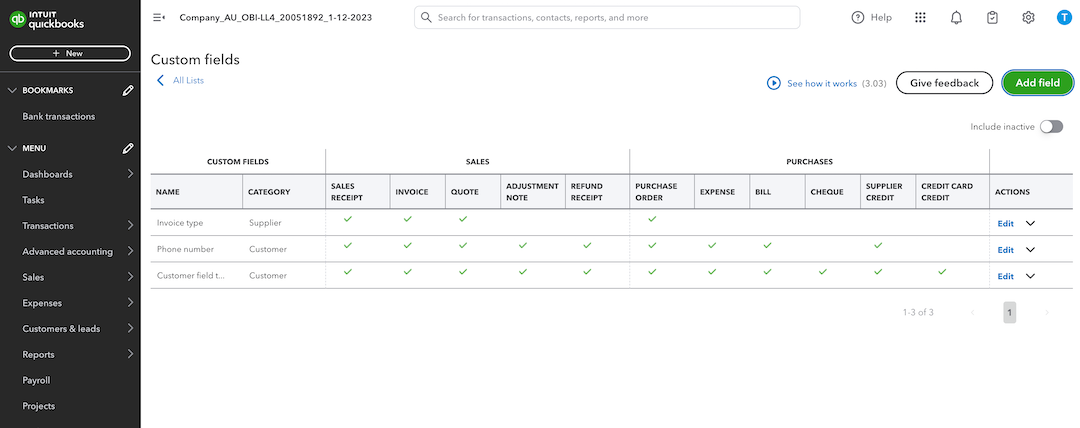
Step 5: Add Custom Fields to QuickBooks Online Invoices
Custom fields let you add details that don’t fit neatly into the standard invoice fields.
These can include purchase order numbers, sales reps, customer types, vendor IDs, project managers, job names, service locations, or industry-specific details.
To add custom fields to an invoice in QuickBooks Online, go to Settings > Custom fields, create the field, assign it to invoices, and turn on the option to print or display it on the form.
Common Mistake #4: Creating a custom field does not automatically mean customers will see it. Make sure the field is assigned to invoices and enabled for display on the form.
Step 6: Customize the invoice email message customers receive
The invoice email matters because it’s often the first thing the customer sees.
Customize the subject line, greeting, default message, payment instructions, contact information, and any notes about the attached PDF.
Here’s an example of the kind of template you might use:
Subject: Invoice #[Invoice Number] from [Company Name]
Hi [Customer Name],
Thanks for working with us. Your invoice is attached and available for review. Payment is due by [Due Date].
Please contact us at [Email/Phone] if you have questions about the invoice details.
Thank you,
[Company Name]
Keep the message short and direct. Customers should know what the invoice is for, when payment is due, and how to ask questions.
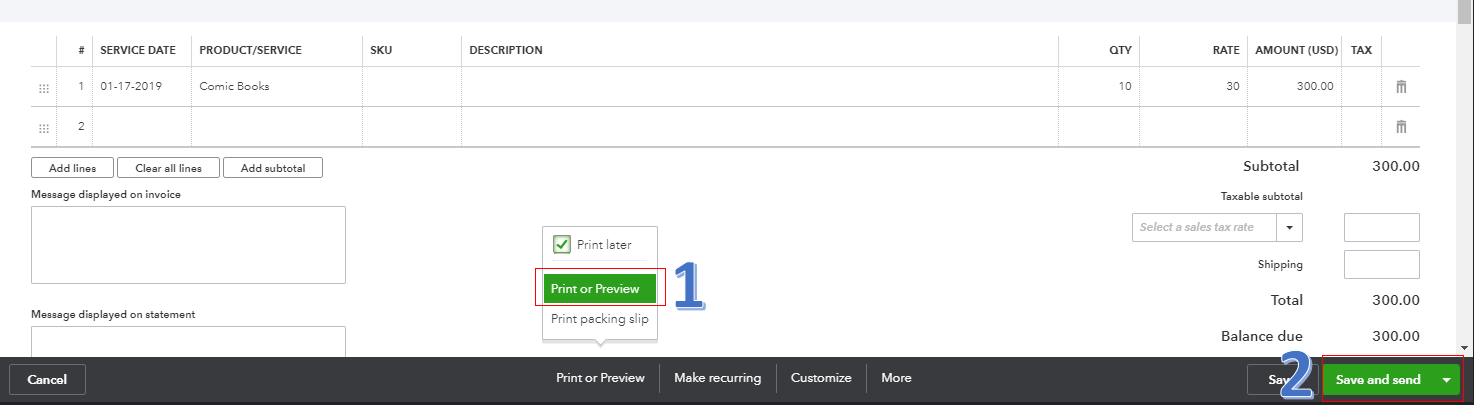
Step 7: Preview, save, and set your invoice template as the default
Previewing matters because customers see the invoice as a PDF or email, not as the editing screen.
Before saving the template as your default, check:
| Test Item | What to Confirm |
| PDF preview | Layout, logo, line items, and totals display correctly |
| Email test | Subject line and message are clear |
| Mobile view | Invoice is readable on a phone |
| Payment links | Links open and work properly |
| Complex invoice | Taxes, discounts, and multiple line items display correctly |
Test any invoice with a real-world example. A template can look clean with one line item but become messy when it includes multiple products, discounts, taxes, payment terms, and custom fields.
What can and can’t you customize on a QuickBooks Online invoice?
QuickBooks Online covers many standard invoice customization needs, but it has limits.
| Customization Need | Can You Use QuickBooks Online? | Notes |
| Add a company logo | Yes | Available through Custom form styles |
| Change colors and fonts | Yes | Good for basic branding |
| Edit customer-facing labels | Yes | Useful for clearer invoice wording |
| Add standard custom fields | Yes, depending on plan | Advanced custom fields may require QuickBooks Online Advanced |
| Add PO numbers or job details | Yes, with custom fields | Must be enabled for invoice display |
| Change the internal transaction screen | No | Customization mainly affects customer-facing forms |
| Create highly dynamic invoice layouts | Limited | Often needs a connected workflow tool |
| Add workflow-specific data automatically | Limited | Better handled through CRM or workflow automation |
How should you customize invoices for different business types?
Service businesses should emphasize payment terms, service dates, and project details
Service invoices should make the work performed, due date, and payment terms easy to understand. Include service dates, job names, technician notes, service addresses, and any approval details customers need.
Manufacturing and distribution businesses should emphasize PO numbers, order details, and shipping information
Manufacturing, wholesale, and distribution invoices often need to connect back to purchase orders, order status, shipping details, and customer-specific billing rules.
In Method’s internal analysis of 465 prospect calls, 82% of prospects from these industries cited order management pain. That pain often appears as missing PO numbers, duplicate entry, unclear order details, or disconnected invoice information.
| Need | QuickBooks Online | Method CRM + QuickBooks |
| Basic logo/colors/fonts | Yes | Yes |
| Customer-facing invoice fields | Yes, limited by plan | Yes, can pull from CRM/workflow data |
| Estimate-to-invoice workflow | Basic | Stronger with approvals, portals, sync |
| Customer portal invoice access | Limited/native payment flows | Stronger portal workflow |
| E-signatures | Limited/not native for full workflow | Supported through Method workflows |
| Industry-specific invoice data | Limited | Stronger through custom fields/screens/templates |
Contractors should emphasize estimates, change orders, deposits, and progress billing context
Contractors often need invoices to reflect earlier estimates, approved change orders, deposits, job phases, and progress billing. Clear invoice details reduce back-and-forth between the field, office, and customer.
Recurring service businesses should emphasize billing frequency and automated reminders
Recurring service businesses should make billing frequency, service periods, due dates, and automatic payment options clear. This helps customers understand what they are paying for and when the next invoice will arrive.
Pro Tip: If customers frequently delay payment approvals, add PO numbers, project names, or service dates directly onto the invoice. The easier it is for accounts payable teams to match your invoice to internal records, the faster you typically get paid.
When is QuickBooks Online invoice customization not enough?
QuickBooks Online works well for accounting-ready invoices. It becomes limiting when the invoice needs to reflect the full customer workflow before and after accounting.
That includes lead details, estimate approvals, job information, customer-specific billing rules, e-signatures, payment follow-ups, and customer portal access.
Dan DeLong, specialized technology advisor (Founder of Danwidth, LLC, Chief Empowerment Officer @ School of Bookkeeping, Host of QuickBooks Power Hour), says QuickBooks Online is useful for standard invoice customization, but it becomes limiting when businesses need more control over invoice layout, custom fields, and workflow-specific details. Users can toggle certain fields on and off, but they cannot always control column width, column order, field placement, or highly specific invoice details.
“That’s one of the main reasons I love Method. When you introduce an outside application, you don’t want to limit the cool features you can use inside QuickBooks. With Method, you aren’t,” he added. “As long as there’s an equal transaction, field, or type, it will show up, and you’re just augmenting QuickBooks with Method.”
How Method CRM helps you customize invoice workflows beyond QuickBooks Online
As a no-code platform, Method CRM empowers small businesses using QuickBooks with technology that does exactly what you need.
This is especially true when it comes to knowing how to customize invoices in QuickBooks Online.
Simply drag and drop the elements you want to include in your invoice with Method’s web report designer. This could be anything, from a thank you message that automatically includes a customer’s first purchase date, to social media icons that link to your company’s accounts or videos.
Here’s an example of a customized invoice you can create with Method CRM
With Method CRM, you:
- Ensure your invoice is styled to match your company branding and that its appearance is consistent across everything from sales forms to estimates.
- Personalize every invoice to display information that’s modified according to sales, customer, and bookkeeping and accounting data.
- Improve your customers’ experience with branded invoice information that’s transformed to showcase a variety of information, like warranty expiration date or an upcoming appointment.
- Can easily adapt when handling special invoice situations, such as mobile invoice customization.
Printing custom invoices works the same for you and your customers. And exporting custom invoices saves time when you need to apply the same format for different customers.
While you might now know how to customize invoices in Intuit QuickBooks Online, you can really set your business apart from the competition with the powerful customization tools from Method.
Learn more about Method CRM’s capabilities with this video.
Common QuickBooks Online invoice customization problems and how to fix them
Why can’t I find custom form styles in QuickBooks Online?
This can happen because of user permissions, plan differences, interface changes, or regional QuickBooks variations. Check your permissions first, then confirm whether your QuickBooks version supports the feature you are trying to use.
Why is my logo blurry on my QuickBooks invoice?
A blurry logo usually comes from a low-resolution file, incorrect dimensions, too much small text, or PDF scaling. Use a clean image file and preview the PDF before saving.
Why is my custom field not showing on the invoice?
The field may have been created but not assigned to invoices. It may also be hidden from the customer-facing form. Check that the field is assigned to invoices and enabled for print or display.
Why did my invoice template change not appear on old invoices?
Template updates usually affect future forms or forms using that specific style. Older invoices may not automatically update in the way you expect.
Why does my invoice look different in QuickBooks than in the PDF?
QuickBooks customization options affect the customer-facing form. The internal transaction screen inside QBO may still look different from the invoice PDF customers receive.
QuickBooks Online invoice customization checklist
There are 10 critical things to check before you use your invoice template with real customers:
- Is your logo clear and correctly positioned?
- Are your business name, address, email, and phone number accurate?
- Are the invoice number and due date easy to find?
- Are the payment terms visible?
- Are line item descriptions clear?
- Do taxes, discounts, and totals display correctly?
- Do custom fields appear only when useful?
- Does the email message include clear payment or review instructions?
- Does the PDF preview work on desktop and mobile?
- Have you sent a test invoice internally before customer use?
FAQs about customizing invoices in QuickBooks Online
Can you customize invoices in QuickBooks Online?
Yes. QuickBooks Online lets you customize customer-facing invoices through Custom form styles. You can edit the logo, design, colors, fonts, fields, payment details, and email message.
How do I add a logo to a QuickBooks Online invoice?
Go to Settings > Custom form styles, create or edit an invoice style, open the Design tab, and use the logo editing option to upload, place, resize, hide, or remove your logo.
Can I add a PO number to a QuickBooks Online invoice?
Yes. You can add a PO number using a custom field, then assign that field to invoices and turn on the display or print option.
Can I create multiple invoice templates in QuickBooks Online?
Yes. QuickBooks Online allows multiple form styles, so you can create different invoice templates for different needs, such as services, projects, deposits, or recurring billing.
Why can’t I customize certain invoice fields in QuickBooks Online?
Some fields are controlled by QuickBooks Online’s built-in invoice structure. Customization is mainly for the customer-facing invoice, not the internal transaction screen.
Can Method CRM customize QuickBooks invoice workflows?
Yes. Method CRM helps businesses extend invoice workflows beyond QuickBooks Online by connecting estimates, approvals, customer records, portals, e-signatures, reminders, and QuickBooks sync.