
As a small business owner, managing finances can make you feel like you’re drowning. Fortunately, QuickBooks templates are here to be your life preserver.
QuickBooks provides a user-friendly financial management solution through its various document templates. Perhaps the most helpful example is the QuickBooks invoice template.
While the built-in invoice templates QuickBooks offers are impressive, they are nonetheless standardized and impersonal. Creating an invoice template that stands out and effectively communicates your brand is crucial to getting paid on time.
Our research indicates that customers already expect a personalized experience when buying from any business. So, a well-designed invoice improves your cash flow and leaves a lasting impression on your customers.
In this post, we’ll guide you through everything that goes into creating the best QuickBooks templates for your invoicing.
What to include on your QuickBooks invoice
When creating a QuickBooks invoice, you need certain elements to ensure clarity, professionalism, and legal compliance.
Drawing from our experience, the most important things to include in your QuickBooks template are:
- Your business name, address, and contact information. You can also add branding, like your company logo.
- Your customer’s details, including name, address, and contact information.
- Total amount due, including any taxes and fees.
- A unique invoice number for tracking and reference.
- The date the invoice was created and when it is due, as well as any penalties or late fees that apply.
- A detailed description of the goods or services sold, including price and quantity.
- Payment instructions with payment methods, billing address, and any other relevant details.
- Any terms and conditions that apply to the sale, such as warranties or refund policies.
The clearer and more informative your QuickBooks invoice template is, the more you prevent delays and disputes from your customers.
How to edit QuickBooks templates for your invoicing
In QuickBooks Desktop
To edit templates in QuickBooks Desktop, take the following steps:
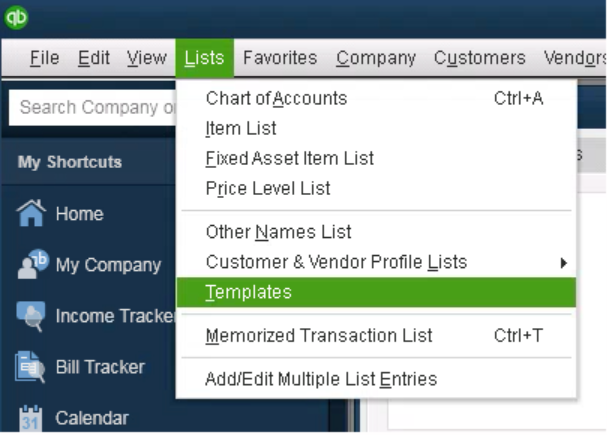
- In the “Lists” menu, click “Templates”.
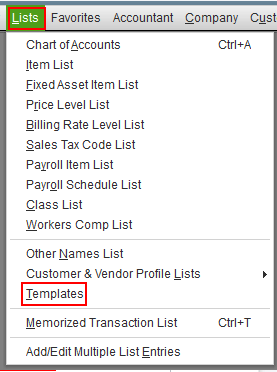
- Select the type of template you want to edit.
- In the “Formatting” tab, click “Manage Templates”.
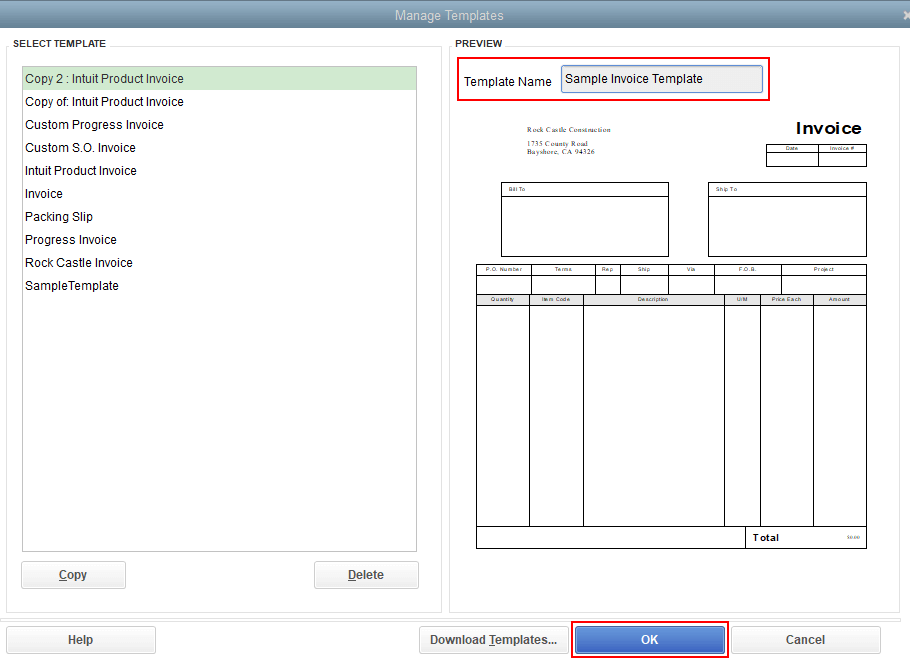
- Select the template you want to edit, then click “OK”. Here you can add your logo, change fonts and colors, and edit information.
- For more structural changes, click “Additional Customization”. You can also select “Layout Designer” to move or resize the elements on your template.
- You can preview your template, then click “OK” when you’re done.
In QuickBooks Online
To edit invoice templates in QuickBooks Online, watch the above tutorial or follow these steps:
- Click the gear icon, then select “Custom Form Styles”.

- Find your template in your list of custom forms, and click “View/Edit” under the “Actions” drop-down menu.
- Your editing options are separated into three sections: “Design”, “Content”, and “Emails”.
- Implement your changes in each tab (most of them will be in “Content”), then click “Done”.
How to change your company name on QuickBooks invoice templates
Your company name on depends on your general account settings. The process is slightly different for QuickBooks Desktop and Online.
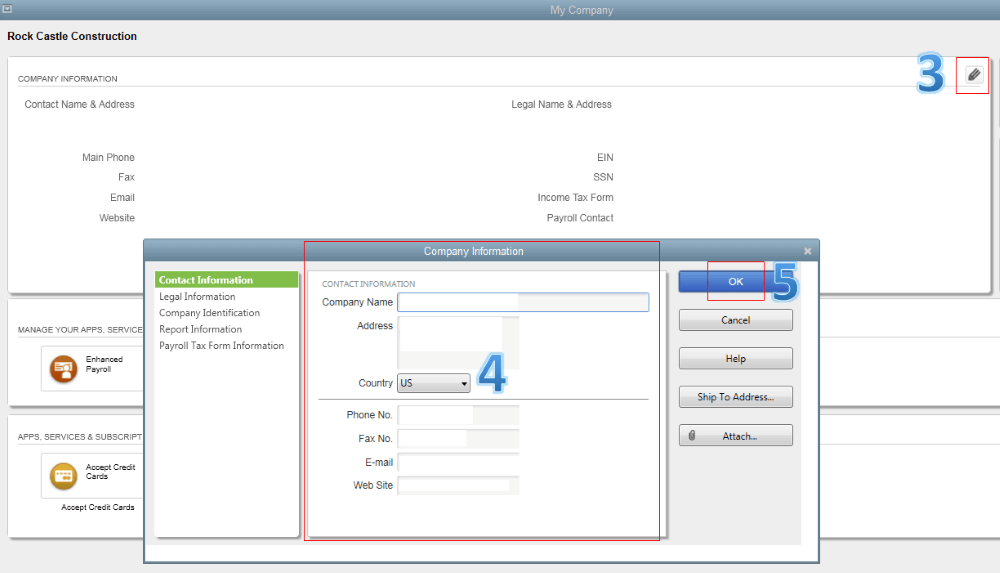
In QuickBooks Desktop
- In the “Company” tab, select “My Company”.
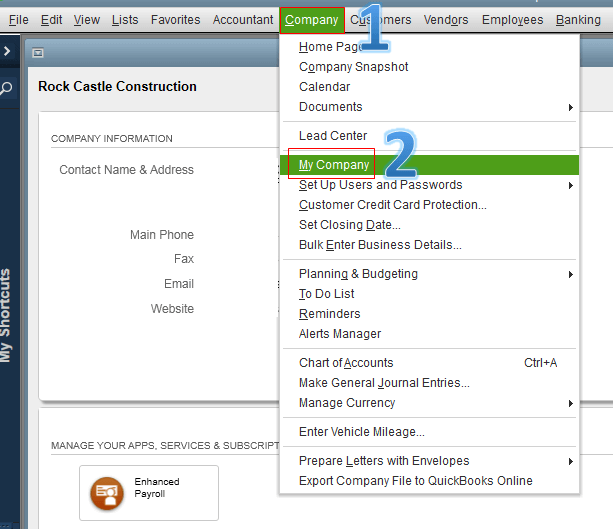
- Click the pencil icon (edit) in the upper right corner.
- In the “Company Information” section, make your changes.
- Click “OK”.
In QuickBooks Online
- Click the gear icon, then select “Accounts and Settings”.
- Select “Company”, then the pencil icon (edit) in the upper right corner.

- Enter the new name in the “Company name” field.
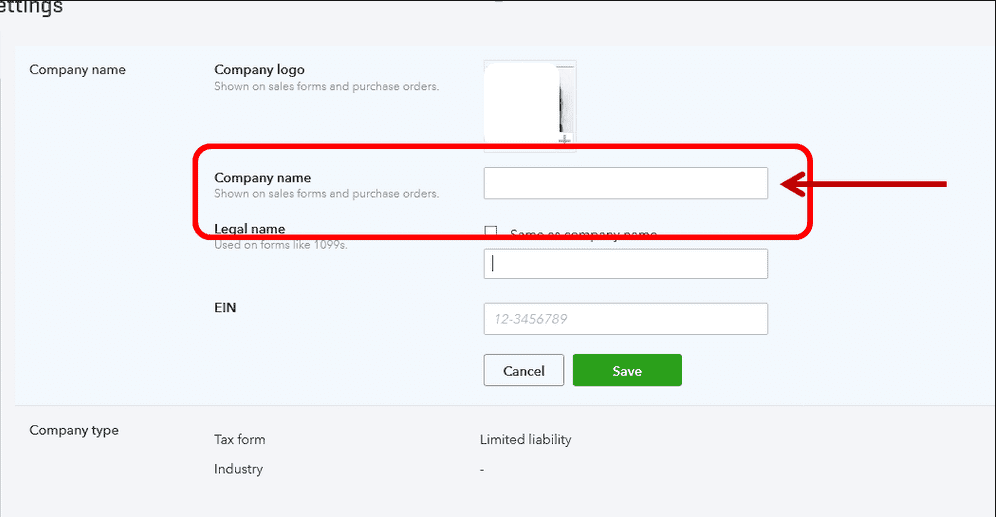
- Click “Save”, then “Done”.
Note that these changes happen automatically for all your QuickBooks templates.
How to change the invoice number sequence on your QuickBooks templates
Here are the steps to change the invoice number sequence of your QuickBooks templates.
In QuickBooks Desktop
QuickBooks Desktop numbers your invoices sequentially, but you can manually change each number. Keep in mind you can’t use letters when it comes to invoice numbers in QuickBooks Desktop.
The next invoice you create will count up from that last change. Here are the instructions to change them:
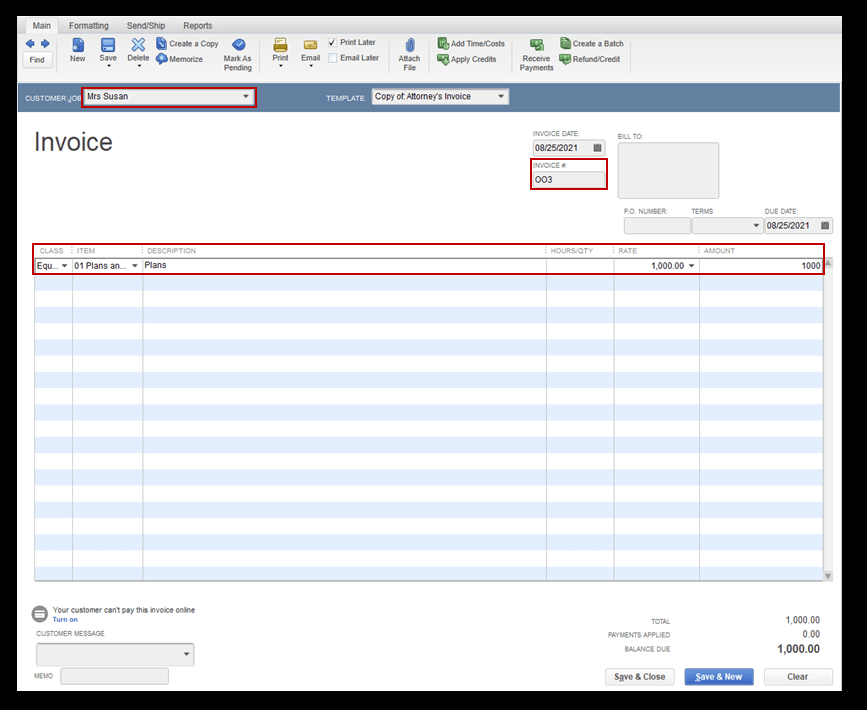
- In the “Customers” menu, select “Create Invoices”.
- Choose your customer whose invoice you want to renumber.
- Under the “Invoice #” field, enter the number you want to use.
- Click “Save and Close”.
In QuickBooks Online
You can use QuickBooks Online’s “Custom transaction numbers” feature to set your own numbering preferences. Here’s how:
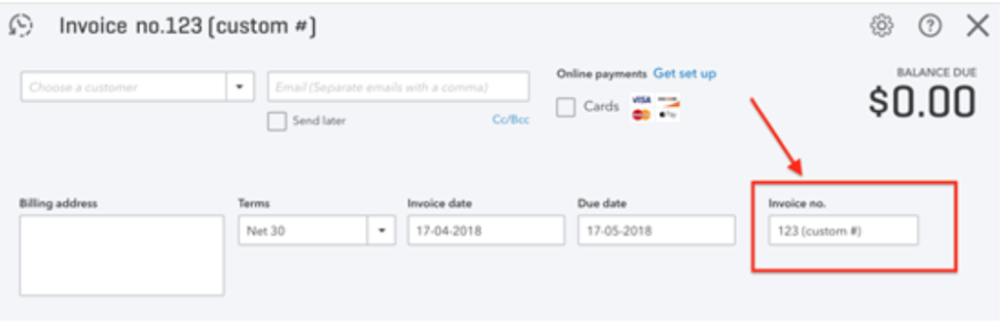
- In “Get paid & pay”, select “Invoices”.
- Click your starting invoice, then select “Edit invoice”.
- In the “Invoice no.” field, enter your custom number or letter sequence — your other invoices will follow sequentially.
- Click “Save and close”.
QuickBooks invoice templates: What to personalize
Based on our observations, the built-in QuickBooks invoice templates are a great starting point for you to send professional and effective invoices.
That said, it’s important to personalize your invoice template to:
- Reflect your brand.
- Ensure clarity for your customers.
- Increase your chances of getting paid.
Here are a few things to consider when personalizing your QuickBooks invoice template.
Your logo and branding
Including your company logo and branding elements on your invoice template to reinforce your business identity and make your invoice stand out.
Make sure to upload a high-resolution version of your logo to ensure that it appears crisp and clear on your invoice.
You can also customize the color scheme of your invoice to match your branding.
Add the unique fields you need
Every business has unique invoicing needs, so it’s important to add any additional fields that suit yours.
For example, if you need to include a purchase order number on your invoice, you can add custom fields to your QuickBooks invoice template for it.
You can also display or hide certain fields on your invoice depending on your needs.
A message to your customers
Based on our firsthand experience, adding a personalized message to your customers on your invoice builds a stronger relationship with them and encourages repeat business.
You can use this space to:
- Add any unaddressed details.
- Thank them for their business.
- Provide them with information about upcoming promotions or events.
Keep in mind, this message should be short and to the point so you don’t clutter up the invoice.
How to import invoice templates into QuickBooks
In QuickBooks Desktop
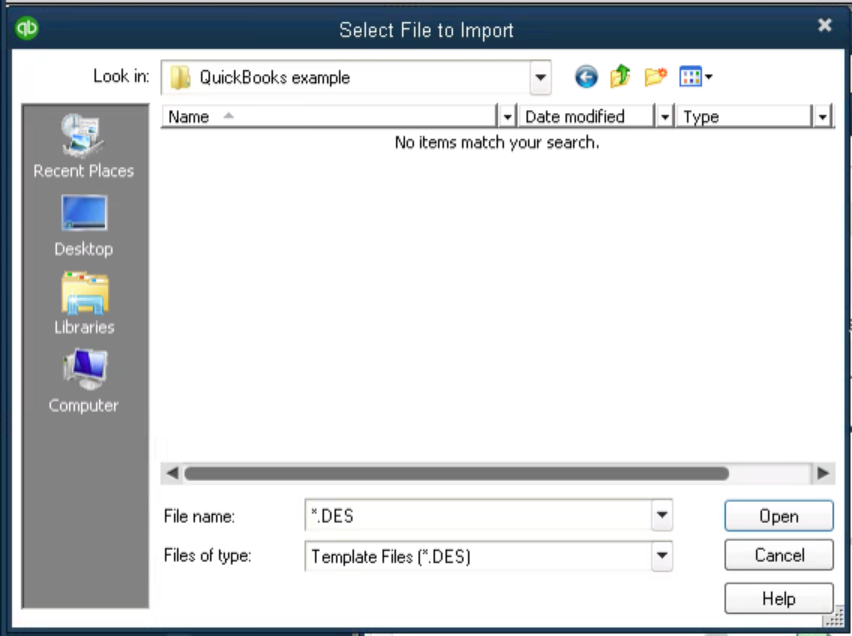
- In the “Lists” tab, select “Templates”.
- In the “Templates” drop-down menu, select “Import”.
- Find the .DES file you want to import and click “Open”.
In QuickBooks Online
Unfortunately, our findings show that you can only import invoice templates into QuickBooks Online if your account is older than 29/06/2021. If you meet this criteria, here’s how to do it:
- In the gear icon, select “Custom Form Styles”.
- Under the “New style” drop-down menu, select “Import style”.
- Select the proper form type.
- Select the “Save and upload your file” field, then open your .DOCX template.
- Click “Next.”
Enhance your QuickBooks invoice templates with Method
Method is the best business automation platform for growing businesses that use QuickBooks Online or Desktop. Here’s why. Method:
- Integrates seamlessly with QuickBooks Desktop and Online.
- Allows you to create fully customizable invoice templates that are tailored to your business.
With Method’s invoice capabilities, you can add custom fields and automate several steps in your invoicing process, saving you time and reducing errors.
Method also includes a range of pre-built invoice templates to which you can easily add your branding and messaging. To download your free invoice template, click here.
Plus, with Method’s mobile app, you can create and send invoices on-the-go, making it easy to get paid faster.
You belong in the driver’s seat. Let Method be your engine. Start your free trial today.
QuickBooks invoice templates FAQs
How can I send invoices?
Once you have your invoice open in QuickBooks, you can either:
- Select “Review and send” to email the invoice to your customer. After a final check, select “Send invoice” to deliver it instantly.
- Select “Print and download” to print a physical copy that you can send in person.
You can also send your customer a link to their invoice via text message by clicking “Share link”.
How do I change my QuickBooks invoice template?
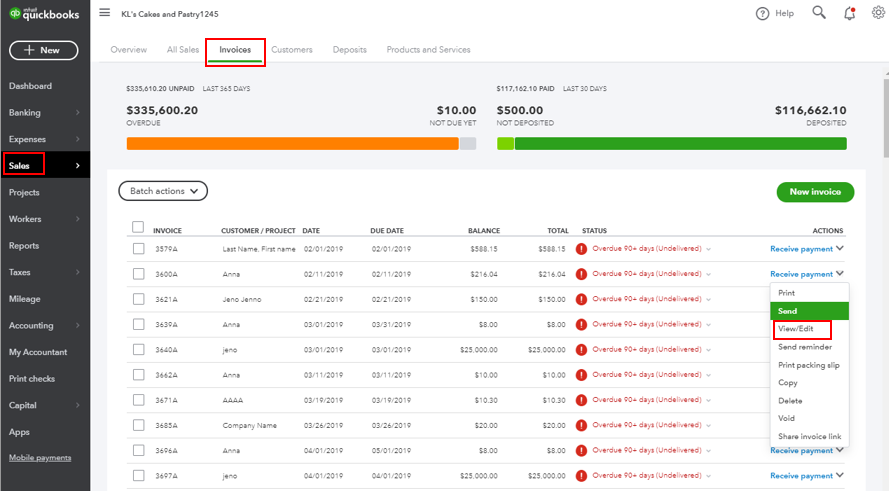
To change your QuickBooks invoice template, open your invoice in the “Sales” tab. Then:
- Select “View/Edit” on your chosen invoice.
- Click “Manage” (gear icon) to add and remove fields, change colors, and turn on payments.
- For additional customization options, select “Invoice settings” in the side panel and view each drop-down menu.
You can toggle the on and off switches to customize easier and preview changes as you make them.
What can I include on QuickBooks invoice templates?
There are several elements you can include on QuickBooks invoice templates. Make sure to add the:
- Date the invoice was sent and its due date.
- Business details of the seller and buyer.
- Quantity sold and amount due.
- Invoice number.
- Description of goods and services sold.
- Terms and conditions.
Beyond that, you can include elements of your branding like your company logo to stick out from the pack and ensure you get paid on time.
Can you include a custom message on a QuickBooks invoice template?
You can’t include a custom message on a QuickBooks invoice template specifically, but you can set a custom message for all your invoices. Here’s how:
- Click the gear icon (your settings), then select “Account and Settings”.
- Select “Sales”.
- In the Messages section, click the pencil icon (edit).
- From the “Sales form” drop-down, select “Invoices”.
- Type your default invoice message.
- Click “Save”, then “Done”.
See how you can automate your invoices with Method.
Image credit: Andrey Popov via Adobe Stock