
It’s no secret that QuickBooks Online is an excellent tool for handling your business’ finances. Among its standout features is effective payment management.
Whether you’re a seasoned QuickBooks user or just starting out, you may wonder how to receive payments in QuickBooks Online.
In this blog, discover how to receive payments in QuickBooks Online, including:
- Payment options.
- Common mistakes.
- Best practices.
Let’s get started!
Is your business eligible to receive payments via QuickBooks?
Before you learn how to receive payments in QuickBooks Online, you need to address if your business if your business is viewed as eligible by Intuit QuickBooks.
The answer is yes! QuickBooks supports a wide range of businesses and offers payment solutions tailored to your needs.
QuickBooks lets you receive:
- Cash.
- Checks.
- Online invoices.
- Mobile payments.
- ACH bank transfers.
- Credit cards.
Steps: How to receive payments in QuickBooks Online
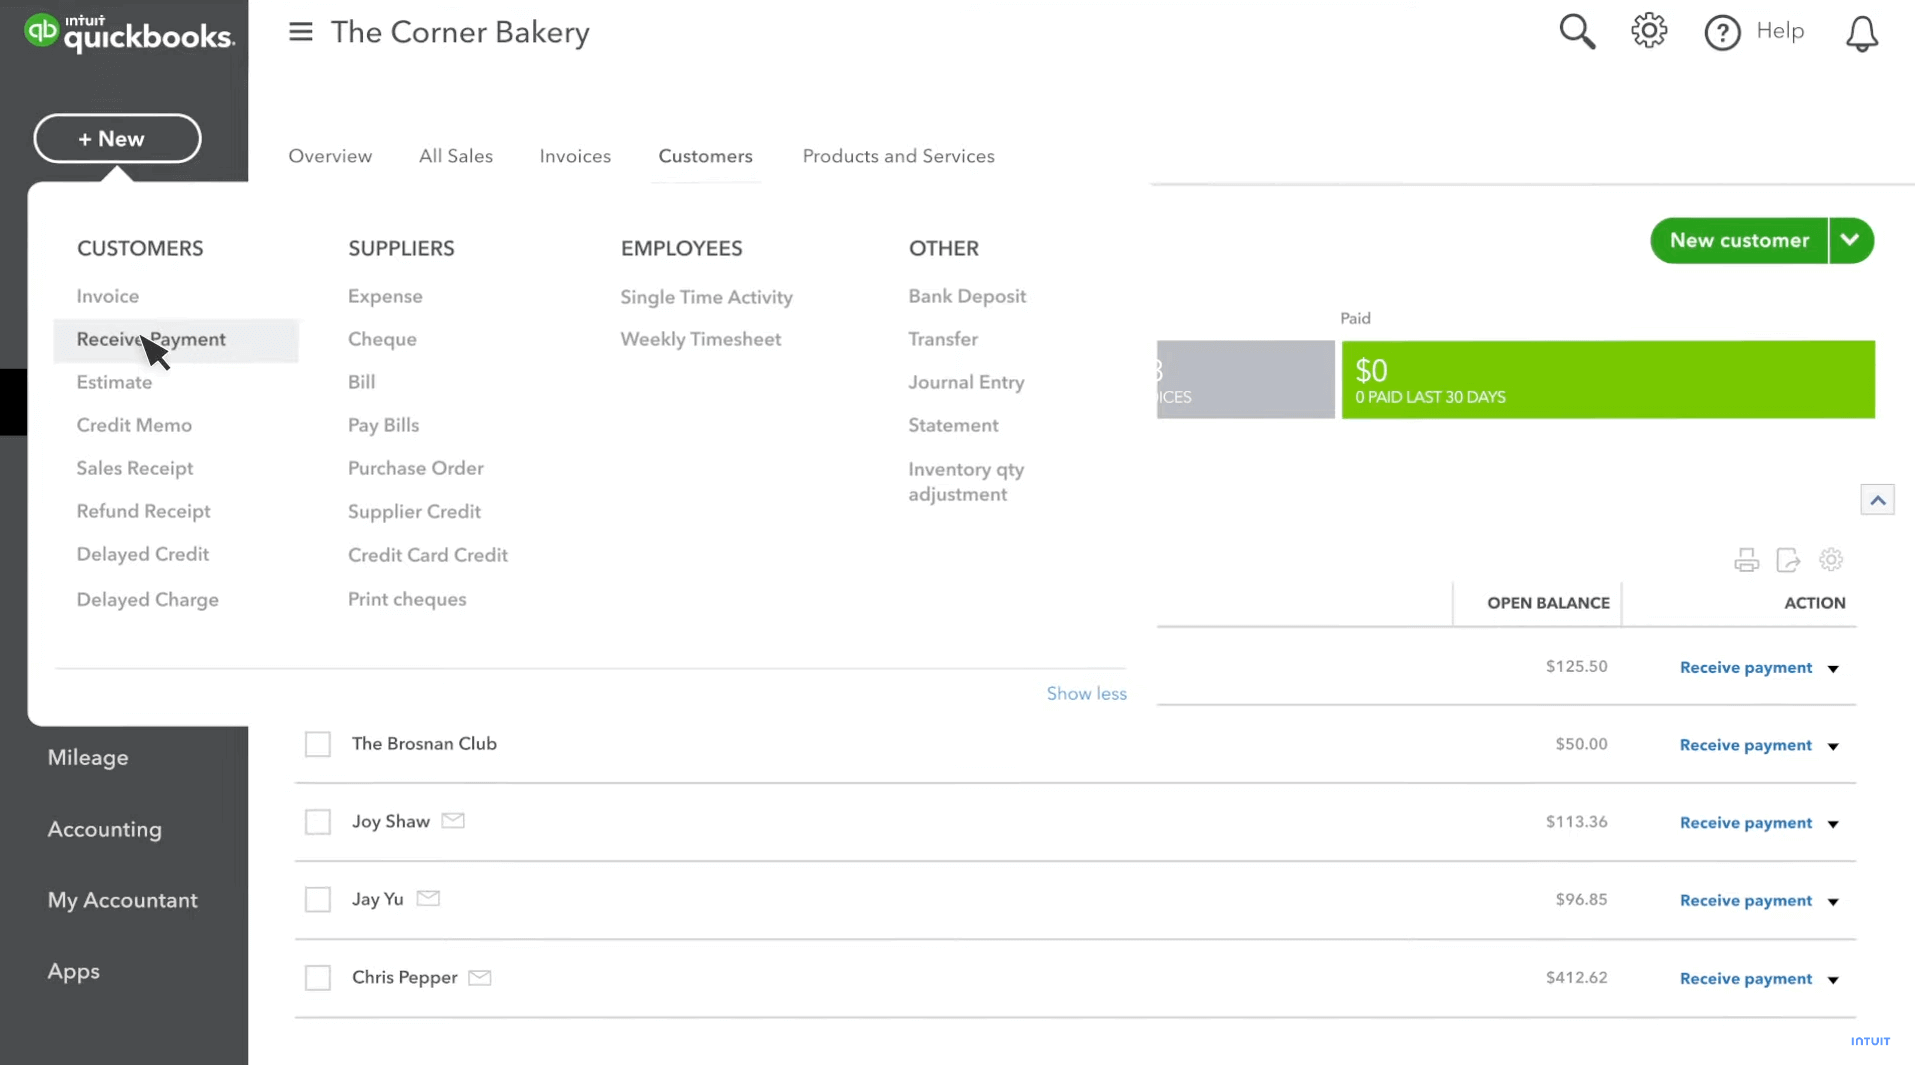
Image credit: QuickBooks
Perhaps the most important part of running a business, receiving payments is an essential process that keeps your finances current and healthy. Here’s a guide to show you how to receive payments in QuickBooks Online:
Set up payment options
Before receiving and processing any payments, sign up for QuickBooks Payments and set up your preferences:
- Navigate to “Settings” on the QuickBooks Online page and select “Account and Settings.”
- Once the section is selected, click on the “Payments” tab.
- Select “Learn more.”
- Click on “Set up Payments” to sign up.
Note: Only the primary administrator of your QuickBooks account can apply for Payments.
- Fill in the “About your business,” “About yourself,” and “Your deposit account” sections to ensure accurate entry of your bank account details.
- Once complete, select the “Review and finish” button, then “Get set up.”
Create invoices
Once your Payments account is confirmed and configured, your next step is to create personalized invoices. Unlike sales receipts, which offer quick sales snapshots, invoices serve as detailed transaction records.
Creating invoices with QuickBooks Online helps customers understand payment details and ensures smooth payment processing.
Here’s how to make them:
- Go to “+ New” and select “Invoices.”
- Select “Add customer” and choose from the customer dropdown. Select “Add new” if you need to add a new customer.
- Once your customer is navigated to, fill in the “Invoice date,” “Due date,” and “Terms” fields.
- Select “Add product or service” and choose from the drop-down menu. You can also select “Add new” to add new invoices for products and services.
- Enter the price you’re charging.
- After the price is adjusted, you’ll see “Ways to pay.” If you want to change these payment options, select “Payment options” in the right sidebar. Toggle any of these options on or off with the corresponding checkbox.
- Once it is updated, manage discounts, fees, and taxes in the “Discount and fees” section.
- After everything is checked for accuracy, click the “Save” button.
Accept online payments
Once the invoice is saved, it’s time to ensure your payment is received in QuickBooks:
- Go to “Settings” and select “Account and Settings.”
- Once that is clicked, select the “Payments” tab and ensure the online payment option is enabled.
- After the online payment option is applied, select your preferred gateway.
- Once the gateway is entered, follow the on-screen instructions to link your account.
Note: QuickBooks Online integrates with several payment gateways like PayPal, Stripe, and Square.
Knowing how to receive payments in QuickBooks Online helps you:
- Increase convenience.
- Decrease manual work.
- Improve customer experience.
- Get paid more reliably and on time.
How long does it take to receive payments in QuickBooks Online?
Now that you know how to receive payments in QuickBooks Online, you’re probably curious about processing times. Here’s the scoop:
Funds typically deposit within five days after your first payment, with potential delays during merchant account setup. Once established, your credit card payment is deposited within two business days. Electronic transfers, however, may take three to four days to process.
Familiarizing yourself with these timelines enhances your financial planning and improves cash flow.
Recording invoice payments
Getting familiar with how to receive payments in QuickBooks Online is just the first step. After receiving a customer’s payment, you need to record it in QuickBooks to mark the invoice as paid. Failing to do so leaves the invoice balance unpaid when you go to reports.
Luckily, learning to record payments is straightforward:
- Go to “+ New” and select “Receive Payment.”
- Select the customer name from the “Customer” column.
- Pick the payment method (e.g., cash, check, credit card, electronic transfer) from the Payment method dropdown.
- In the “Deposit to” drop-down list, choose the desired account deposited to.
Tip: If you need to group the payment with others, select “Undeposited Funds” from the drop-down list. This simplifies the deposit process and lets you track your undeposited funds account usage.
- In the Outstanding Transactions section, check the Transaction ID of the invoice you’re recording the payment amount for.
- When your desired invoice is accessed, enter the “Reference no.” You can also enter any notes or memos here.
- Once complete, hit “Save and close” at the bottom.
And that’s it! Your invoice payment is recorded.
Payment options in QuickBooks Online
To fully grasp how to receive payment in QuickBooks Online, it’s important to understand the payment types it supports. With QuickBooks Payments, you can accept:
- Credit cards.
- Debit cards.
- ACH bank transfers.
Note that payment status and options vary based on your:
- Business type.
- Customers.
- Specific circumstances.
Let’s break down some possibilities:
Delayed payments in QuickBooks Online
Sometimes, payments in QuickBooks Online take a bit longer than expected.
This could be due to a variety of reasons, such as:
- Batch deposit delays.
- Transactions involving refunds or returns.
- Bank holds.
- Account reviews.
- Bank rejections.
Understanding these factors helps you anticipate, prevent, and deal with delayed payments.
Instant payments in QuickBooks Online
QuickBooks is designed to get you paid faster, especially with its Instant Deposit feature. Instant Deposit lets you transfer up to $25,000 per day. You can use this feature up to five times each day, and your limit resets every day.
Funds typically appear in your bank account within a few minutes, although it could take up to half an hour. Keep in mind that all transactions are reviewed for risk, and there may be third-party delays.
Partial payments in QuickBooks Online
Sometimes, customers pay you in portion for a product or service. This is referred to as a partial payment. Customers may make partial payments for various reasons, like installment plans or contractual agreements.
QuickBooks Online records these payments efficiently, letting you:
- Track staggered payments.
- View outstanding balances.
- Predict income flows better.
Partial payment tracking is ideal for business owners who deal with staggered deliveries or extensive project timelines.
Payments through QuickBooks mobile app
Now, let’s talk mobility. Imagine you’re at a job site and need to accept a payment — that’s where the QuickBooks mobile app comes in.
With this app, you can accept payments from customers using your mobile device. To do this, you’ll need to connect your card reader to the QuickBooks GoPayment app.
Once connected, you can accept bank card payments via tap or insert, as well as digital wallet payments like Apple Pay and Google Pay.
Benefits of using QuickBooks for receiving customer payments
Learning how to receive payments in QuickBooks Online simplifies your financial management. Using QuickBooks for customer payments offers many benefits:
- Convenient payment methods: QuickBooks simplifies accounts receivable management with convenient features like transaction entry and invoice automation.
- All-in-one solution: The software provides a unified platform for invoicing, payment processing, and increased efficiency.
- Time-saving: QuickBooks simplifies invoice creation with pre-filled customer information, customizable templates, and item lists.
- Accuracy: The platform reduces errors by performing automatic calculations on predefined settings, which ensures matching transactions and invoices.
- Improved tracking and organization: QuickBooks automatically tracks and orders invoices for easy payment monitoring and account reconciliation.
- Enhanced reporting: QuickBooks ensures all received payment information is reported for better financial oversight. Simply select run for the report you need and choose the reporting category.
Common issues when receiving payments in Quickbooks
As you navigate how to receive payments in QuickBooks Online, it’s important to be aware of common mistakes. Keep an eye out for these issues when receiving payments in QuickBooks:
- Misapplied payments: Payments that aren’t linked to the correct invoice make it challenging to track outstanding invoices, which leads to inaccurate balances.
- Overlooking undeposited funds: In QuickBooks Online, “Undeposited funds” temporarily stores payments until you combine them for a bank deposit. If moved incorrectly, you may have double entries.
- Direct entry of payments as deposits: Entering payments into deposits instead of the “Receive payment” tool can cause paid invoices to appear as open, causing statement inaccuracies.
If you face challenges receiving payments, the QuickBooks community is an excellent starting point. You can use the platform to:
- Share experiences.
- Reply to fellow users.
- Access answers from QuickBooks experts.
Best practices to avoid invoice and payment errors
Now that you’re familiar with some issues when receiving payments in QuickBooks, let’s explore best practices to help you avoid them:
Accurate customer and vendor information
To ensure your information is processed correctly, review the:
- Invoice number(s).
- Payment reference number.
- Payment receipt confirmation.
- Payment date and date of entry.
- Deposit slip number (if applicable).
- User ID (of person processing the payment).
If incorrect, update and make the necessary adjustments (if any).
Use invoice templates
Leverage custom invoice templates to ensure your invoice is reviewed for consistency and accuracy.
Review invoices
Always check numbers before sending them to customers. Make sure your item is matched to the order quantity, price, and tax.
Regular reconciliation
Regularly reconcile accounts and review your reconciliation status to identify discrepancies. When your account is reconciled, it helps keep your accounts in good shape.
Problems that may occur when payments are not recorded correctly in QuickBooks
Paid invoices continue to be open
When you don’t apply payments to the correct invoice, the invoice remains open. This triggers unnecessary collection efforts and damages customer relationships.
To avoid such errors, consider hiring an accountant who can ensure accurate entries and prevent duplicates.
Overstated accounts receivable balances
If you don’t accurately apply payments, your accounts receivable balance will not reflect the true amount of money that your customers owe you. This leads to discrepancies in your financial statements and unforeseen losses.
Exceeded sales (income)
Recording payments incorrectly as deposits or sales receipts inflates your income figures. This is because the income was already accounted for when you issued the invoice. Such errors distort your financial performance analysis and can give you a false sense of financial stability.
Get paid sooner with Method + QuickBooks Online
Method is the #1 lead-to-cash automation tool for QuickBooks users. With its two-way sync with your accounting software, you can receive payments faster and keep your finances up to date.
Put an end to the constant battle of manual data entry — Method automates everything from invoicing to updating accounts, all in real time. Whether it’s recurring billing or one-time transactions, Method ensures stress-free payment processing. Start your free trial here.
QuickBooks Online receive payment: Frequently asked questions
Why is receiving payments in QuickBooks Online important?
Knowing how to receive payment in QuickBooks Online is vital as it:
- Simplifies income tracking.
- Lowers the chance of errors.
- Saves you precious time.
By mastering how to receive payments in QuickBooks Online, you can secure:
- Accurate financial records.
- Consistently positive cash flow.
- All the information you need to make informed decisions.
Can I record partial payments in QuickBooks?
Yes, you can record partial payments in QuickBooks. This is helpful for businesses that receive payments in installments or have clients with outstanding balances.
Recording partial payments ensures precise tracking of your income and balances, which keeps your financial records spot on.
What happens If a customer’s payment fails?
If a customer’s payment fails in QuickBooks Online, you need to address the failed transaction. This may involve:
- Reattempting the charge.
- Contacting the customer for a different payment method.
- Updating the invoice status to reflect the failed payment.
Is It possible to receive international payments through QuickBooks Online?
Yes, it is possible to receive international payments through QuickBooks Online. This lets businesses cater to a global customer base and accept payments in different currencies.
Can I customize the payment receipts sent to customers?
Yes, you can customize payment receipts to include your:
- Branding.
- Business information.
- Other details.
See how Method simplifies your payment processing today.
Photo credit: Andrea Piacquadio via Pexels