
You rely on your vendors to provide your business with essential goods and services. So, you need to make sure they get paid on time to maintain strong business relationships with them.
Learning how to pay vendors in QuickBooks Online accomplishes this quickly and easily. From understanding how the software handles payments to exploring different payment options, keep reading to learn how to manage your payables effectively.
How does QuickBooks Online handle vendor payments?
Before going over how to pay vendors in QuickBooks Online, let’s discuss why you’d want to.
You can manage and track payments through your QuickBooks Online account using QuickBooks Bill Pay. It’s an online payment portal that lets you send checks and automated clearing house (ACH) payments, which are bank transfers that place direct deposits in your vendor’s bank account.
The best part is that your vendors don’t have to set up anything on their own end. With this convenient solution, you can pay your vendors directly through QuickBooks Desktop or Online, and have your accounts payable and accounts receivable updated automatically.
Payment options and fees associated with payments
The basic version of QuickBooks Bill Pay does not include an additional subscription fee. However, you are limited to five ACH payments per month.
The QuickBooks Bill Pay Premium plan costs $15 a month and includes 40 ACH payments in a month.
Finally, the Elite plan costs $90 a month and includes an unlimited number of ACH payments. You should choose your plan around the number of vendors you do business with.
In addition to these subscription fees, each ACH payment costs $0.50 per transaction for the Basic and Premium plans, and $1.50 per transaction for checks for every plan.
Let’s take a closer look at how to pay vendors in QuickBooks Online using Bill Pay.
How to pay a vendor in QuickBooks Online
How to pay a bill
You can enter and pay bills entirely in QuickBooks Online. It only requires a few simple steps:
- Navigate to “Bill pay online widget” from your QuickBooks dashboard.
- Click the “Make a payment” tab.
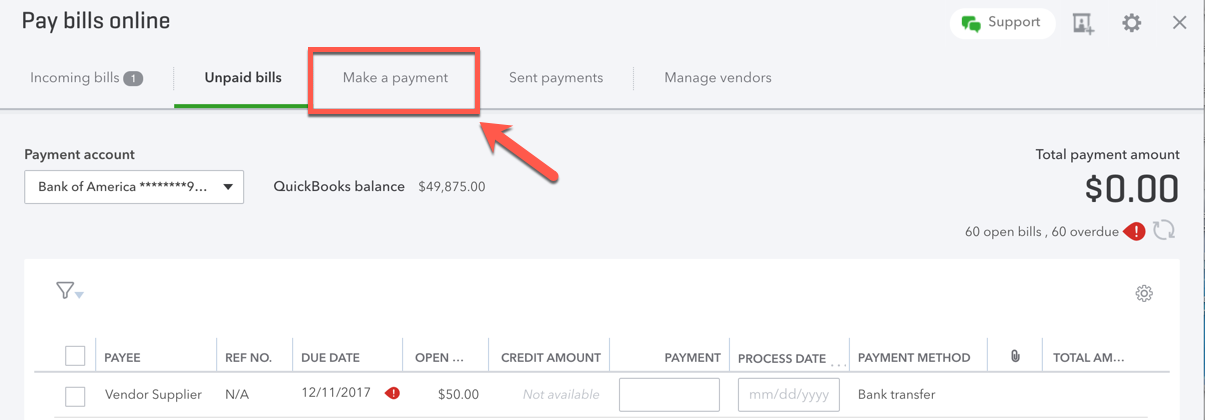
- Enter the payment information for your vendor.
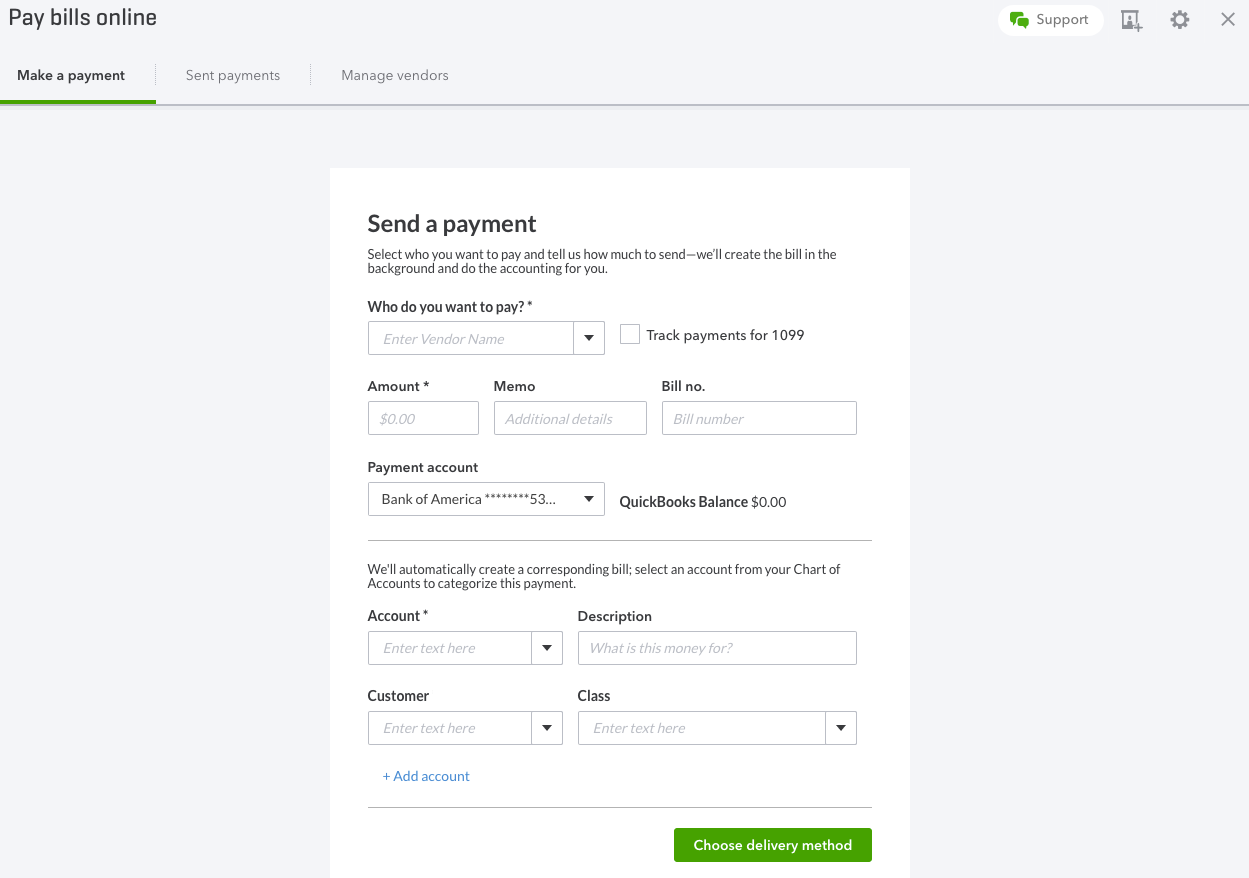
Image credit: QuickBooks
- At the bottom, click “Choose delivery method.”
- Click “Bank transfer” or “Check.” If you haven’t already set up your vendor for a bank transfer, you’ll also need to enter the bank account details. If you are paying by check, you will need to select a process date and edit the vendor information if necessary.
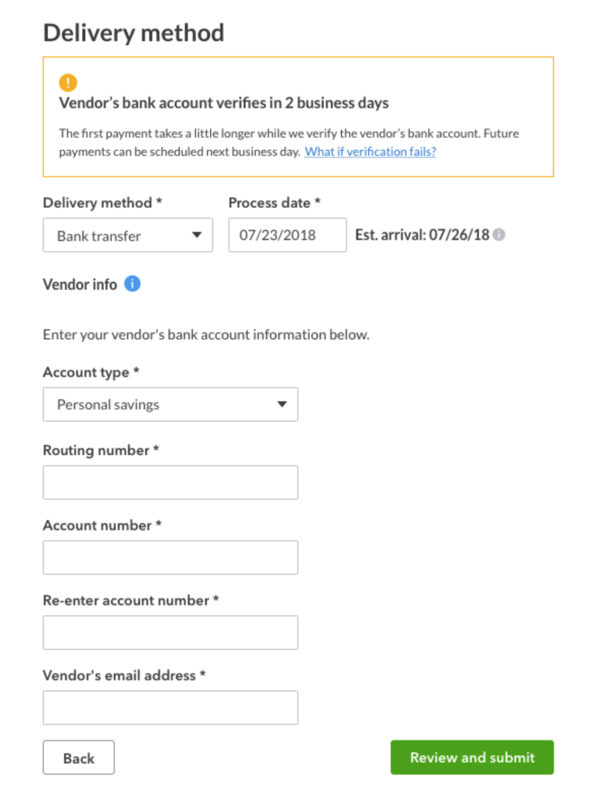
Image credit: QuickBooks
- Click “Review and submit” and then “Submit payment” to finish.
How to enter bills and bill payments
Follow these detailed steps to create an unpaid bill from your vendor and then complete the payment:
- From the menu on the left side of the screen, select “Get paid & pay” and then “Bills.” Depending on your version of QuickBooks, the interface might instead show “Expenses” and then “Bills.”
- At the top right of the screen, click “Add bill” and choose from the options in the drop-down menu.
- For a new bill, you can upload an invoice from your computer by choosing “Upload from computer,” and QuickBooks will automatically fill in the information it scans from the document. You can edit this information as necessary.
- Alternatively, you can select “Create bill” to enter this information manually.
- Once your vendor information has been entered, click “Save and close” at the bottom right corner of the screen.
This is the first step to knowing how to pay vendors in QuickBooks Online.
How to record partial payments towards bills
If you want to pay parts of your invoice with different payment methods, or you want to set up payment installments, then partial payments make sense for you.
To record a partial payment towards an invoice, simply follow the same steps as above and enter the payment amount you wish to make towards the bill.
Then, schedule the payment for your preferred date. Here’s how to pay vendors in QuickBooks Online using scheduled payments:
- Select “Expenses,” then “Bills.”
- Click “Schedule Payment” on the related bill.
- Select “Edit,” then enter the partial amount.
You can repeat these simple steps as many times as you need for each portion of the bill — with whatever method of payment you want.
How to view bills and bill payments in QuickBooks Online
Now that you know how to pay vendors in QuickBooks Online, you’ll need to know how to access those payment details and adjust any incorrect or outdated information.
You can view all of your bills by following these simple steps:
- Select “Get paid & pay” or “Expenses,” depending on your version of QuickBooks.
Image credit: QuickBooks
- Select “Bills.”
- You’ll see three tabs labeled “For review,” “Unpaid,” and “Paid.” Select one of the tabs to view the bills in that category and select further actions for it.
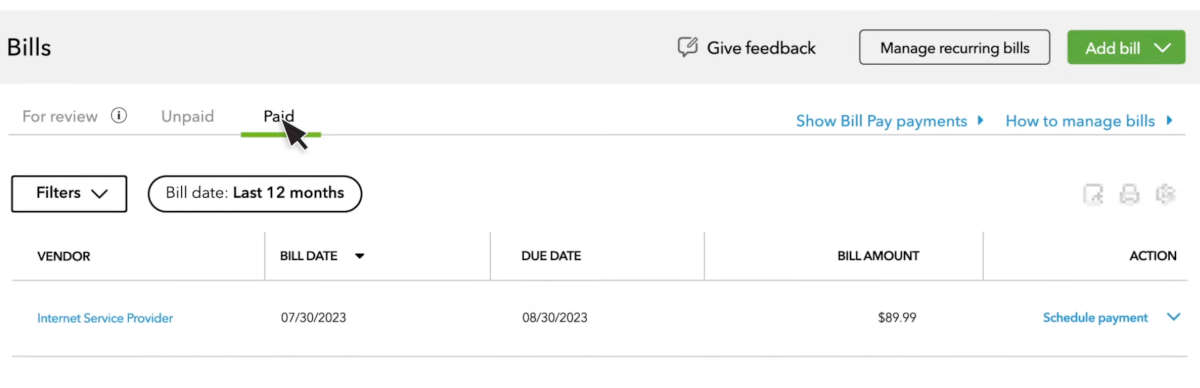
Image credit: QuickBooks
How to view and edit vendor’s payment information
You can update vendor information at any time. To view and edit a vendor:
- From the main menu on the left side of the screen, select “Get paid & pay” and then “Vendors.” Depending on your version of QuickBooks, it might instead show up as “Expenses” and then “Vendors.”
- Find the vendor you want to edit in your vendor list and select them.
- Make any adjustments to the vendor’s information and save your changes.
How to find your unpaid bills in QuickBooks Online
Bills that you haven’t yet paid are listed separately in your QuickBooks Online account. To check payment details for those unpaid bills:
- Select “Get paid & pay” or “Expenses,” depending on your version of QuickBooks.
- Select “Bills.”
- Click the tab labeled “Unpaid.”
How to pay vendors via ACH in QuickBooks Online
You can pay your vendors from the same place where you view your unpaid bills.
- Select “Get paid & pay” or “Expenses” depending on your version of QuickBooks. Then select “Bills.”
- Click the “Unpaid” tab near the top of the screen to view the bills that have not yet been paid.
- To the right of the unpaid bill you want to pay, click “Schedule payment.”
- Choose the bank account you want to withdraw from on the right side of the screen. If you haven’t yet set up your bank account details, you can do that from this page.
- Enter the payment method, payment amount, withdrawal date, and vendor information into the form. When you’re finished, click “Next.”
- You will have a chance to review your payment info. If you’re ready to make the payment, click “Schedule payment” to finalize it.
- Match your payment from the bank by selecting “Transactions” from the main menu on the left. Select “Confirm,” and you’re done!
ACH transactions and checks are your two options for making an electronic payment. QuickBooks Bill Pay won’t accept credit cards. If you’re interested in making credit card payments on your bills, then your vendor needs to set up their own payment system.
Benefits of QuickBooks ACH vendor payments
Being able to pay outstanding bills with ACH payments means you can complete your financial transactions in the same place that you view the rest of your business expenses. This helps you organize your workflows and keep your records up to date.
Knowing how to pay vendors in QuickBooks Online keeps your business on top, as it’s fast, convenient, and secure.
How to pay vendors in QuickBooks Online FAQs
Can I edit or cancel an online payment after sending it?
Yes, it’s possible to edit or cancel your online payment after you send it as long as you do it before 12:00 a.m. on the withdrawal date. You can find this date in the automated confirmation sent to your email address when you scheduled the bill payment.
After this time, the bill will be processed by the bank and you won’t be able to change it.
To cancel or edit a payment after scheduling it:
- Select “Get paid & pay” or “Expenses,” depending on your version of QuickBooks. Then select “Bills.”
- Click “Show Bill Pay payments.”
- Find the bill you want to edit or cancel from the list and click “View details.”
- Click “Cancel this payment.”
How can I view the status of a payment I have sent?
The payment status of your full payment history is viewable at any time from the “Bill Pay payments” page. On this page, choose between the following tabs:
- The “Bills” tab to view all paid and unpaid bills.
- The “Unpaid” tab to view only unpaid bills.
- The “Paid” tab to view only paid bills.
Wrap up: How to pay vendor bills in QuickBooks Online
QuickBooks Bill Pay is a safe, secure, and efficient way to pay vendors. Understanding how to pay vendors in QuickBooks Online lets you keep your financial records in the same place, so you don’t need to juggle multiple logins to track your finances.
If you’re looking for a better way to collect payment from customers, including adding e-signature capture to your own invoices, consider extending the power of your QuickBooks account using Method.
This software platform integrates seamlessly with your QuickBooks account to give you powerful customer relationship tools and two-way, instant information sync. Gain more options for online payment gateways using Method.
See for yourself how Method can improve your business with a free demo!
Image credit: Andrea Piacquadio via Pexels