


Converting estimates to invoices is crucial for small businesses and freelancers to simplify their financial management and ensure timely payments.
Learning how to convert an estimate into an invoice in QuickBooks Online is one of the best ways to accomplish this. The good news is that it doesn’t require an accountant or multiple team members.
Keep reading to learn:
- The seven steps outlining how to convert an estimate into an invoice in QuickBooks.
- Best estimate and invoicing practices.
- The difference between quotes and estimates.
By the end, you’ll transform your billing processes for a better bottom line. Let’s get started!
What is a QuickBooks estimate?
An estimate serves as a preliminary quote or proposal that outlines the anticipated costs for products or services. By converting an approved estimate into an invoice, businesses can formally request payment from their customers. This facilitates efficient billing and revenue collection.
QuickBooks is a powerful accounting software that simplifies financial management for businesses of all sizes. It offers a comprehensive suite of tools to:
- Track expenses.
- Manage invoices.
- Generate reports.
- Maintain accurate financial records.
Everything about QuickBooks is designed to simplify your accounting workflows. One significant advantage is the ability to convert estimates into invoices with just a few clicks — confirm the details, generate the invoice, and apply any final adjustments before sending it off to the customer.
By leveraging QuickBooks’ estimate-to-invoice conversion feature, you can seamlessly transition from the proposal stage to the billing process.
7 steps to convert an estimate to an invoice in QuickBooks
Converting estimates to invoices accurately is essential for maintaining organized financial records and ensuring timely payments. Following these steps helps you:
- Streamline the process.
- Minimize errors.
- Save valuable time.
Step 1: Sign in to QuickBooks Online
- Open your web browser and navigate to the QuickBooks Online website.
- Enter your email address and password in the designated fields.
- Click the “Sign In” button to access your QuickBooks account.
When setting your username and password, use strong and unique login credentials to ensure the security of your financial data. Also, make sure you enable two-factor authentication for an additional layer of protection.
Step 2: Choose the Get Paid tab
Locate the “Get Paid” tab in the QuickBooks Online dashboard. This tab is dedicated to managing transactions, including invoices and estimates.
The “Get Paid” tab serves as a centralized hub for all your billing and payment-related activities, making it easier to track and manage your financial transactions.
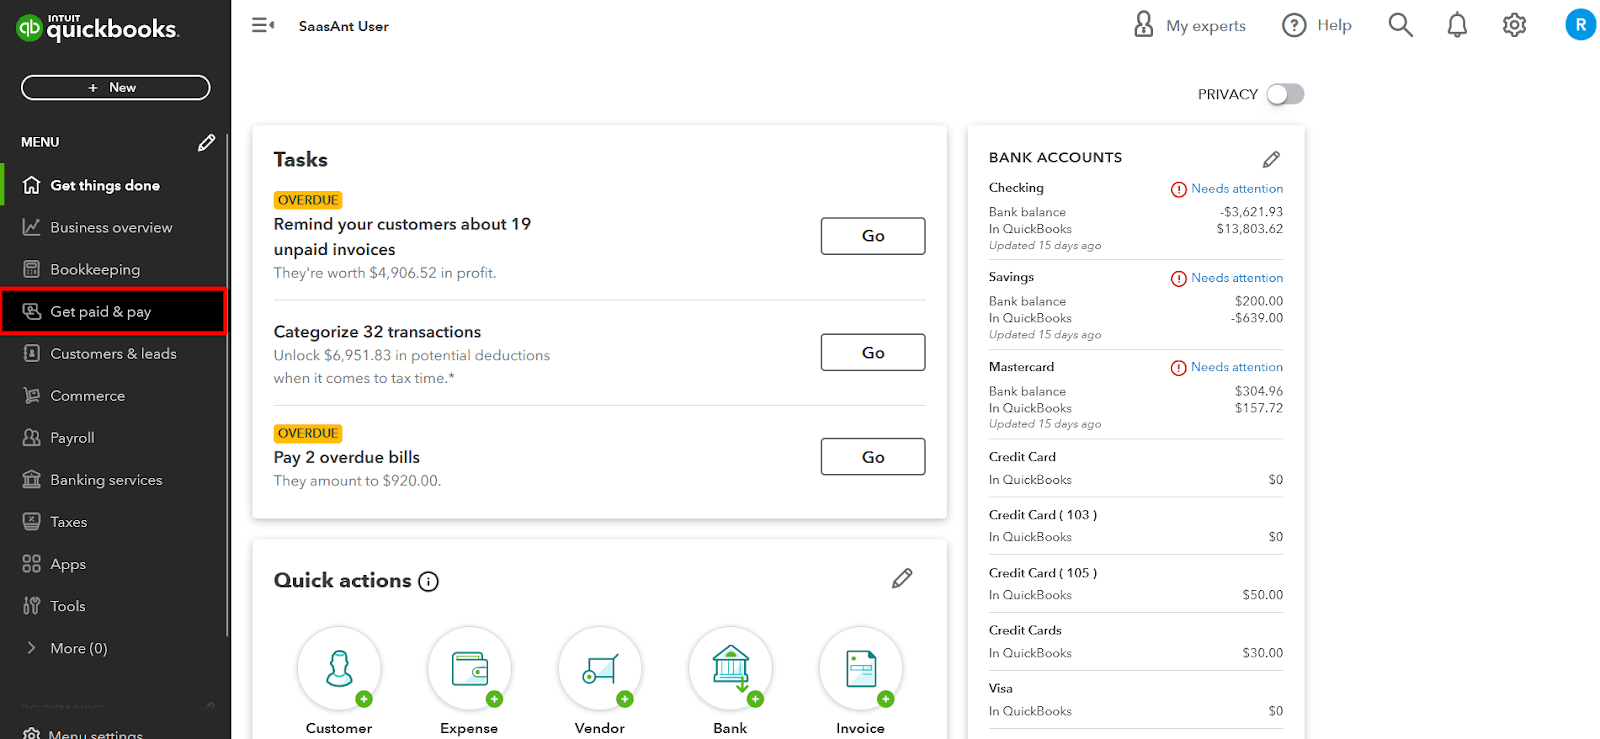
Image credit: SaasAnt
Step 3: Choose the estimate option
- In the “Get Paid” tab, locate the “Estimates” section or option.
- Click on the “Estimates” option to access the list of existing estimates.
- Select the estimate to be converted based on the customer name or ID.
- Open the desired estimate.
The estimate option in QuickBooks plays a crucial role in financial management by allowing businesses to create and manage preliminary quotes or proposals for their products or services.
Step 4: Check the estimate status
- Access the estimate from the transaction list.
- Review the estimate’s status to ensure it is marked as “Accepted” or “Approved” by the customer.
- If the status is not “Accepted” or “Approved,” you may need to follow up with the customer before proceeding with the conversion.
Checking the estimate status is essential to avoid converting an estimate that has not been approved by the customer, which could lead to billing disputes or delays in payment. Ensure that the estimate accurately reflects the agreed-upon products or services, quantities, and pricing before converting it to an invoice.
Step 5: Change the estimate status
- Locate the option to change the estimate status.
- Select the appropriate status, such as “Accepted” or “Approved,” to indicate that the customer has approved the estimate.
- Note the conversion date for your records.
- Save the changes to the estimate status.
By updating the status to “Accepted” or “Approved,” you are documenting the customer’s approval and preparing the estimate for conversion into an invoice.
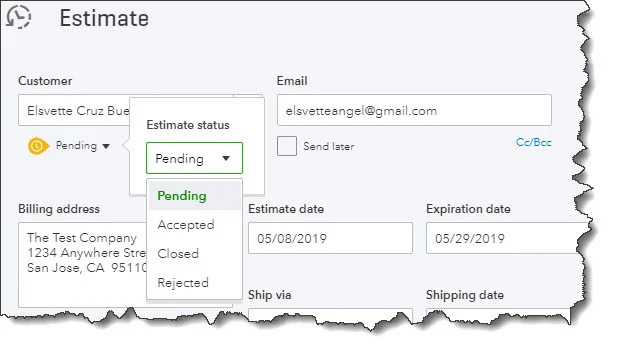
Image credit: Tarabyte Solutions
Step 6: Convert an estimate into an invoice
To generate an invoice from an estimate:
- Once the estimate status is “Accepted” or “Approved,” locate the option to convert the estimate into an invoice.
- Click the “Convert to invoice” to initiate the conversion process.
- Review the details of the invoice carefully, ensuring that all information, such as item descriptions, quantities, and pricing, is accurate.
- Double-check the invoice details to avoid any discrepancies or errors that could lead to billing disputes or payment delays.
- Verify that the customer’s contact information, billing address, and any additional notes or comments are correct. Your invoice ID or number does not need to match your estimate ID or number.
- Save the newly created invoice and mark the estimate as closed or invoiced if it doesn’t change automatically.
Similarly, you can easily track invoice status (e.g., pending, sent, paid). This ensures you have a clear view of your business’ cash flow at all times.
Step 7: Edit the invoice
- After converting the estimate to an invoice, you can customize the invoice template as needed.
- Locate the option to edit the invoice, typically found in the invoice details or action menu. Here, you can adjust quantities or services on the invoice.
- Update any necessary information on the invoice and choose the appropriate invoice details, such as updating:
- Billing and shipping address.
- Quantity of items or services.
- Tax rate or amount.
- Total invoice amount.
- Pricing, including unit price or rate and discount amount if applicable.
- Due date.
- Payment terms.
- Attached files or documents.
- Invoice notes or comments.
- Review the invoice for accuracy and confirm the conversion details. Once you finalize the conversion process and save your changes, will apply any necessary adjustments to the invoice
Editing the invoice after conversion may be necessary to accommodate any last-minute changes or updates requested by the customer. Ensure that any modifications to the invoice are accurately reflected in your final subtotal amount, financial records, and reports.
From there, you’re ready to send the invoice to the customer. The email template used for sending the invoice is totally customizable. Once it’s paid, record the transaction in your books and leverage reporting features to ensure your processes are optimal.
QuickBooks estimates vs. quotes
An estimate in QuickBooks is a preliminary proposal that outlines the anticipated costs for products or services. It serves as a starting point for negotiations and allows customers to review and approve the proposed pricing before committing to a purchase.
A quote, on the other hand, is a more formal and binding offer that typically includes a fixed price and specific terms and conditions. Quotes are often used when the scope of work or products is well-defined, and the customer is ready to make a purchasing decision.
Here are a few key differences between the two:
- Estimates are typically used in the early stages of the sales process, while quotes are presented closer to the final decision-making stage.
- Estimates are more flexible and can be easily modified based on customer feedback or changes in requirements, whereas quotes are generally considered final offers.
- Estimates may include estimated costs or ranges, while quotes typically provide a fixed price for the products or services.
- Estimates are often used for larger or more complex projects, where the scope and requirements may evolve during the negotiation process, while quotes are better suited for straightforward transactions with clearly defined deliverables.
Key takeaways
Converting estimates to invoices in QuickBooks is a crucial step for small businesses and freelancers to streamline their billing and payment processes.
Following the step-by-step guide outlined in this article helps ensure accuracy and efficiency. Learning how to convert an estimate to an invoice in QuickBooks makes the conversion process instantaneous.
To truly optimize your experience, QuickBooks integrates a variety of features that let you customize and adjust the invoicing process according to your preferences. From the action column within your invoice window, you can:
- Adjust payment terms.
- Apply discounts.
- Finalize details.
That way, you ensure that everything aligns perfectly with your business needs.
Whether you are working from the desktop version or QuickBooks Online, the user interface ensures that you can easily navigate through various options like managing taxes efficiently. Features like progress invoicing and the ability to adjust for taxes are just a click away, accessible through dropdown menus that make navigation straightforward.
QuickBooks also makes it simple to access, customize, and manage all aspects of financial operations, from bookkeeping to generating detailed customer reports.
If you’ve reached the limits of QuickBooks or want to strengthen your invoicing process further, consider Method. The platform transforms workflows for QuickBooks users to:
- Automate routine tasks.
- Manage customer relationships.
- Synchronize sales and accounting data in real time.
- Add custom fields (e.g., project name, sales rep).
With Method, you can also generate comprehensive reports and customize your content, providing detailed results that help track business progress. You also get access to help center articles and instructional videos that help new users get up to speed. Each update includes new functionalities that further enhance your ability to manage your operations efficiently.
How to convert an estimate to an invoice in QuickBooks: Frequently asked questions (FAQs)
Can I delete an estimate in QuickBooks?
Yes, you can delete an estimate in QuickBooks if it is no longer needed or if it was created by mistake.
However, it’s important to note that deleting an estimate is a permanent action, and the estimate will be removed from your records. If you need to keep a record of the estimate for future reference, it’s recommended to mark it as “Closed” or “Rejected” instead of deleting it.
Is it possible to add multiple estimates to the invoice?
Yes, it is possible to add multiple estimates to a single invoice in QuickBooks. This feature can be useful when you have provided multiple estimates or proposals to a customer for different products or services, and they have approved all of them. To add multiple estimates to an invoice, you can follow these steps:
- Create a new invoice or open an existing one.
- Locate the option to add an estimate to the invoice, typically found in the invoice details or action menu.
- Select the estimates you want to include on the invoice.
- QuickBooks will automatically populate the invoice with the details from the selected estimates.
- Review the invoice to ensure all information is accurate and make any necessary adjustments.
- Save the invoice and proceed with sending it to the customer.
Can I convert a quote into an invoice in QuickBooks Online?
Yes, you can convert a quote into an invoice in QuickBooks Online. Here’s how.
- Sign in to your QuickBooks Online account.
- Navigate to the “Get Paid” tab and select “Quotes.”
- Locate the quote you want to convert and open it.
- Click the “Create Invoice” button.
- Review the invoice details and make any necessary changes.
- Save the invoice and send it to the customer.
Convert estimates to invoices in seconds with Method. Try it for free.

