
Branding is crucial in any business, and how you present your invoices can significantly impact your brand perception.
A logo on your invoices reinforces your brand identity and lends an air of professionalism to your documents. QuickBooks offers robust customization options for invoices, including the ability to add your logo easily. This capability not only enhances your branding but also improves the overall look of your sales forms.
Keep reading this article to learn how to add logo to QuickBooks invoice templates in eight easy steps!
Importance of adding a logo to the QuickBooks invoice
There are many reasons why uploading your logo to your invoices is a good idea. For example, it:
- Enhances brand recognition and strengthens brand identity.
- Conveys professionalism, increasing credibility with customers.
- Potentially decreases payment times due to increased trust and recognition.
How to add logos to QuickBooks invoice: A step-by-step guide
The process of adding a logo to QuickBooks Online is straightforward and accessible, even for those new to QuickBooks settings. Watch our video to learn how to add a logo to QuickBooks invoices, or check out the step-by-step instructions below.
Step 1: Design your logo
- Consider using professional design software or hiring a designer if you do not already have a logo.
- Ensure your logo is high resolution and saved in a supported format. The file must be saved as a .gif, .bmp, .png, .jpg, .jpe, or .jpeg.
- Try not to have too much text in your logo, as it may appear quite small in some areas. Images are also universal when it comes to customer perception. English or French copy, for example, may isolate those who speak a different language.
- Other constraints QuickBooks imposes on your logo format include:
- A file size of 10 MB or less.
- A color depth (or bit depth) of 24 bits or fewer.
- A color space in standard RGB.
- Even dimensions (square-shaped logos), meaning no rectangular logos are permitted.
Step 2: Log in to QuickBooks Online
- Access your QuickBooks Online account by navigating to the login page.
- Ensure you have the necessary permissions to edit invoice templates.
Step 3: Advance to Custom Form Styles
- Navigate through QuickBooks Online to the “Custom Form Styles” section accessed through ‘Settings’ or the gear icon.
- Understand that an invoice template design made through a custom form style is crucial for maintaining marketing consistency across all customer communications.
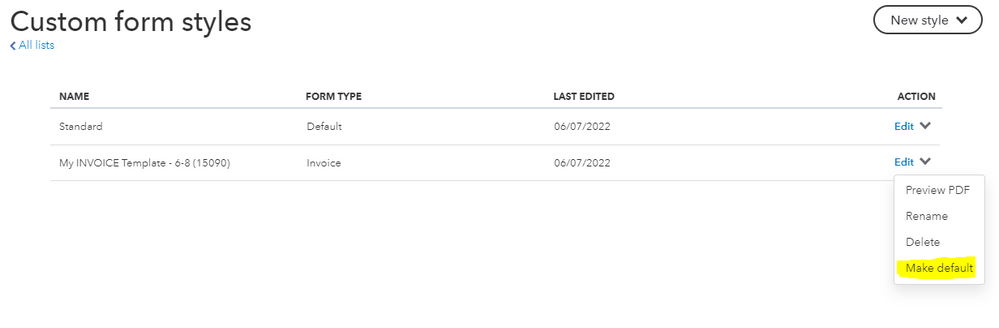
Image credit: QuickBooks
Note: If you use any of the Desktop-only QuickBooks versions, go to the “Lists” menu and select “Templates.” From the selected template, select the “Formatting” tab, then “Manage Templates.” In your chosen template, use the basic customization window to add your logo. Just click the “Use logo” checkbox, or the “Select Logo” option if your logo has not yet been uploaded. Make sure your adjustments are saved to apply changes.
Image credit: QuickBooks
Step 4: Choose the desired invoice template
- Explore various templates to find one that aligns with your brand’s style and message.
- Use the preview feature to see how different invoice customization templates will display your logo (i.e., header vs. footer, which row or column(s), etc.).
Step 5: Customize the selected invoice template
- Enter customization mode for your chosen invoice template. This is navigated via ‘Design’ tab. There is also a content tab and emails tab to further customize aspects like name, address, and additional fields.
- Apart from adding a logo, you can modify fonts, fields, and colors to better suit your brand’s identity.
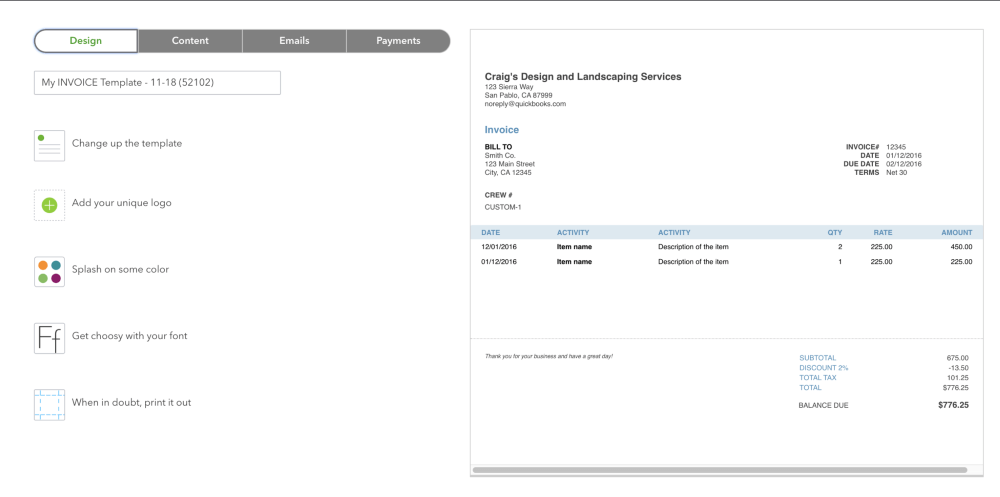
Image credit: Gentle Frog
Step 6: Upload the logo
- Search for and select the upload feature to add your logo to the invoice template.
- Here, you can have your logo uploaded from storage or your site.
- Check that your image meets QuickBooks’ image specifications. It will be confirmed upon successful addition.
Step 7: Make adjustments to logo placement and size
- Ensure a logo size and placement adjusted to best fit your document formatting.
- Preview different placements to ensure the logo appears optimal when you apply it in various templates.
Step 8: Preview and save your changes
- You’ll want your invoice template to be previewed before finalizing to see how the final version with the logo appears.
- Save your changes and they will be applied to new invoices from there on out.
- Make sure you review and confirm upon successful addition.
Key takeaways
Overall, learning how to add logo to QuickBooks invoice templates is a great way to drive reliability and trust. Remember that:
- Adding a logo to your QuickBooks invoices strengthens your brand identity and professionalism.
- QuickBooks Online provides a flexible and user-friendly interface for customizing invoices, making it easy to include a logo.
- Properly designed and positioned logos can significantly impact how quickly customers process payments.
If you need additional support, don’t hesitate to engage with the QuickBooks community. There are plenty of tutorial and support resources with comments, suggestions, and answers to common problems — and you can freely reply to them for additional information.
How to add logo to QuickBooks invoice: Frequently asked questions
Can I import my own custom template?
QuickBooks currently allows some flexibility in importing custom invoice templates, but with limitations. It’s best to use the built-in customization features to adjust existing templates according to your needs.
What format is the logo in QuickBooks?
The supported image formats for logos in QuickBooks include JPEG, PNG, and GIF. Ensuring your logo is in one of these formats will facilitate smoother uploads.
Can I use QuickBooks logo?
Using the QuickBooks logo on your estimates, invoices, sales receipts, and other related documents is restricted due to legal and compliance considerations. It is important to use only your own branding to avoid infringement issues.
Go beyond adding your logo.
See how QuickBooks software integration with Method opens up the floor for endless customization.