As a small business owner, you’ve worn many hats to get where you are today. But there’s one thing that still might have you scratching your head — sales tax.
Paying sales tax gets tricky, especially because you need to be completely accurate in order to:
- Comply with tax laws.
- Avoid fines.
- Make sound financial decisions.
Luckily, QuickBooks Online simplifies this process. Because the accounting software is designed with small business owners in mind, learning how to record sales tax payments in QuickBooks Online is straightforward.
Keep reading to discover:
- How to record sales tax payment in QuickBooks Online.
- Why you should set up automatic sales tax.
- The power of sales tax reports in QuickBooks.
Let’s get started!
Different types of sales tax payments in QuickBooks
Sales tax is an additional cost added to the price of goods and services that’s passed on to a governing body.
But not all sales taxes are created equal. Here are the key types of sales tax payments in QuickBooks:
- State sales tax: This is the largest portion of your overall sales tax. It gets paid to the state where your business operates.
- County sales tax: On top of state sales tax, some counties have their own add-on tax. This varies from county to county.
- City sales tax: This is the tax charged by your city or local government. Like county taxes, city sales tax depends on the area.
- Liability sales tax: Think of this as the total sales tax you collect from customers, including state, county, and city taxes.
- Special sales tax category: You can apply sales taxes unique to your business or industry with sales tax categories in QuickBooks.
Along with tracking payment fees, QuickBooks handles your sales tax payments automatically to ensure:
- Legal compliance.
- Operational efficiency.
- Financial accuracy.
How to automatically set up sales tax in QuickBooks
When learning how to record sales tax payments in QuickBooks Online, a great feature to explore is automatic sales tax.
Imagine being free from the burden of manual tax calculations. QuickBooks makes this dream a reality by automatically calculating your sales tax based on:
- What you sell.
- Where you sell.
- Where your products ship.
That’s the beauty of knowing how to record sales tax payments in QuickBooks Online with automation!
Here’s how to set up automatic sales tax:
- Go to “Taxes” in the left-side menu, then the “Sales Tax” setup screen.
- Choose “Use automatic sales tax” or “Get Started.”
- Verify your business address and click “Next.”
- Match your tax rates with the state tax agency by using either:
- “Match one rate at a time.”
- “Match multiple rates at once.”
- Click “Next.”
- Enter your filing frequency and click “Save” when finished.
Automatic sales tax simplifies the process of collecting, reporting, and paying your sales tax in QuickBooks.
No more calculations and risk of errors. QuickBooks ensures you account for every cent of your sales tax.
Setting up sales tax items in QuickBooks
When learning how to record sales tax payment in QuickBooks Online, it’s important to remember that some of your items may have different tax rates.
Let’s say you’re a manufacturer who produces goods and ships them to various regions. In this scenario, your products’ tax rates may differ based on the state or region where you’re selling them.
Fortunately, QuickBooks lets you assign tax categories to specific items. This helps you calculate the correct sales tax rate to add to each product you’re selling.
To apply sales tax to an item on an invoice or sales receipt:
- Create a new invoice or sales receipt.
- Add an item using the “Add products or service” drop-down menu.
- Click the checkbox under the “Tax” column for any taxable product or service.
- Make sure the correct sales tax rate is selected in the tax rate field.
How to record sales tax payments in QuickBooks Online
With automated sales tax in place, you can dive into learning how to record sales tax payments in QuickBooks Online. Here are some detailed instructions:
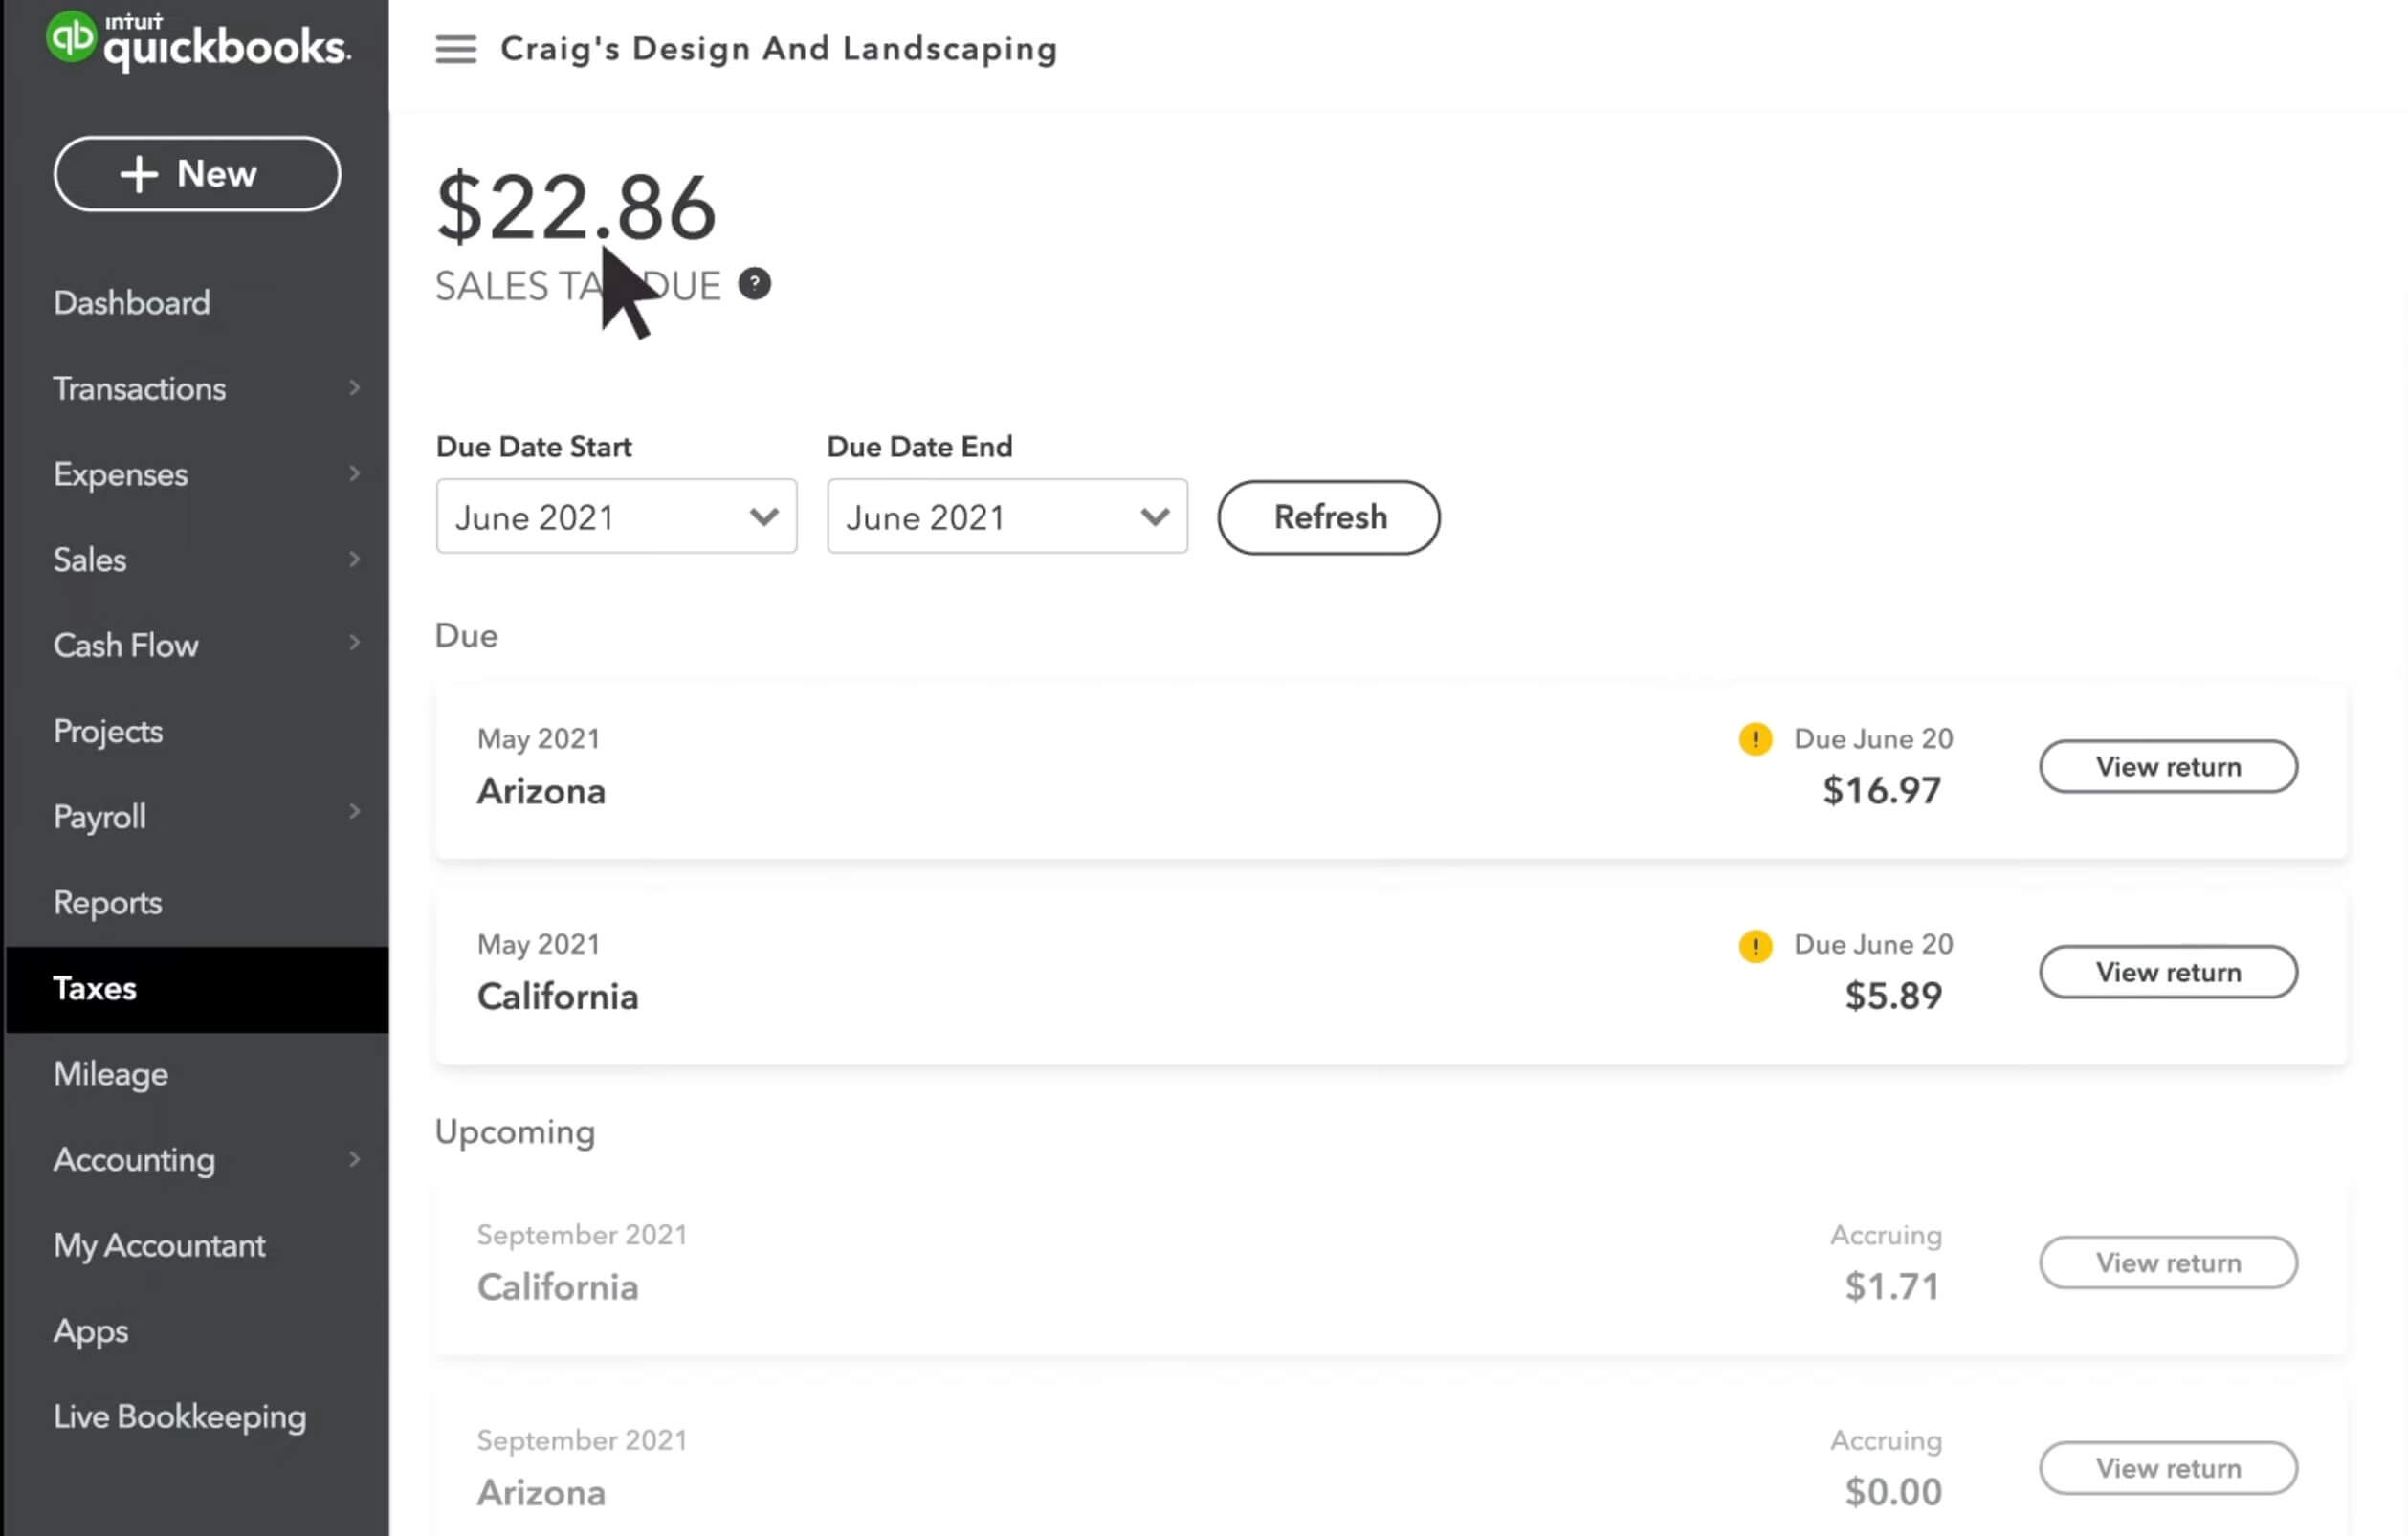
Image credit: QuickBooks
The first step in outlining how to record sales tax payment in QuickBooks Online is to review what you owe:
- Go to “Taxes,” then “Sales tax.”
- Check the amount due for the month, then click “View Tax Return.” For older returns, use the “Tax Period Date” dropdown menu.
- Review and adjust if necessary, using the “+ Add an adjustment” button. This is helpful if you have credits, discounts, penalties, or a correction.
- Note down your:
- Gross sales.
- Non-taxable and taxable sales.
- Tax due.
- Adjustments.
Once you’ve confirmed that all your information is accurate, you can proceed with filing your return with the right tax agency. You have two options:
- E-file on your tax agency’s website.
- File by mail.
Here are some steps to guide you through the online process:
- Visit your tax agency’s website to file your return online. Sign up for your state’s e-filing service if you haven’t already.
- Complete the sales tax return form using the gross sales, non-taxable sales, and tax due amounts from the previous step for reference.
- Finish your sales tax return filing.
Note: QuickBooks does not file returns, but you can update your sales tax information by manually entering your payment after filing.
Now that you’ve finished filing, it’s time to record your sales tax payment in QuickBooks.
Here’s how to do it manually and zero out your sales tax payable:
- Go to “Taxes,” then choose “Sales tax.”
- Find the recent return and click “View Tax Return.” For older returns, use the “Tax Period Date” dropdown menu to select a specific period.
- Select a filing method, then click “Record payment.”
- Enter payment details like the tax amount, payment date, and your bank account.
- Click “Record payment.”
- Select “Back to sales tax center.”
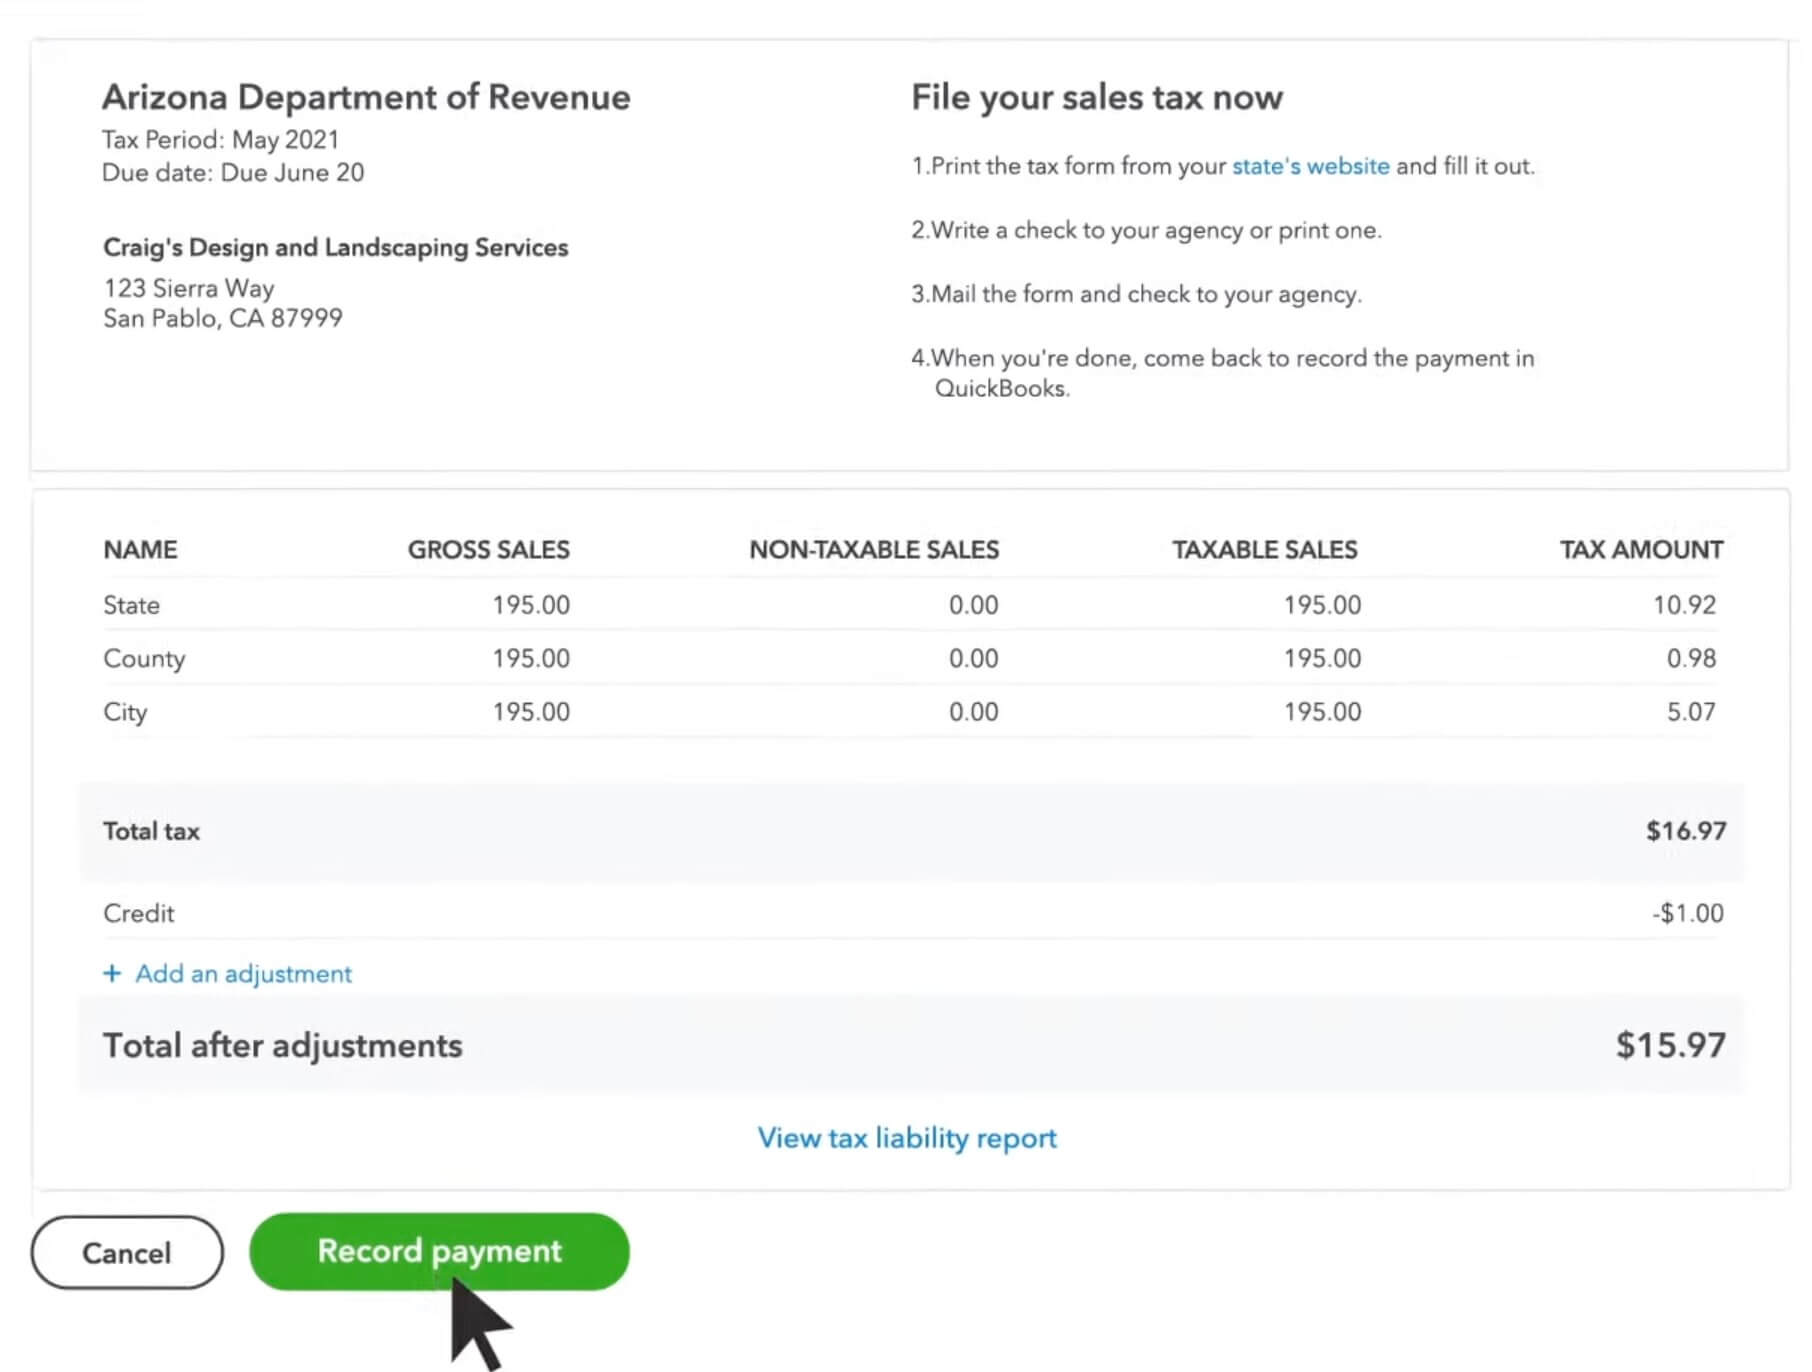
Image credit: QuickBooks
The final step in recording your sales tax payment is to check your filing status. If you filed online, go to your tax agency’s website to see if it’s been processed. If you mailed it, call your tax agency to get a return update.
Editing and deleting tax payments in QuickBooks
Even when you know how to record sales tax payment in QuickBooks Online, common errors are still possible. Rest assured, QuickBooks has your back.
If you need to edit a sales tax payment, follow these simple steps:
- Go to Taxes and select the “Returns” tab.
- Choose “Tax Adjustment” to open the “Journal Entry” window.
- Enter the sales tax adjustment and provide a reason for it. You can use a positive or negative amount.
- Select an appropriate account to track the adjustment link. In case of rounding errors, use an income account for negative errors and an expense account for positive ones.
- For credits or discounts, choose an income account like “Other Income.”
- For fines, penalties, or interest, select an expense account.
Apart from editing, you may need to delete a tax payment altogether. To do so:
- Go to “Taxes,” then select “Sales tax.”
- Choose the payment you want to delete from the “Recent Sales Tax Payments” list.
- Select “Delete Payment” and confirm by clicking “Yes.”
Making these corrections ensures your financial records remain accurate, which is a non-negotiable for any business.
How to generate a sales tax report in QuickBooks Online
Learning how to record sales tax payment in QuickBooks Online is more than just a task. It’s a way to gain insights into your business’ financial well-being.
One of the best ways to use your sales tax data in QuickBooks is to explore the reporting feature. To generate a sales tax report in QuickBooks Online:
- Visit the “Sales Tax” screen, where you’ll find sections for each sales tax agency, showing the amount owed and the period covered.
- Scroll down to view agencies listed at the bottom of the screen. You’ll see due dates, status, and the “Amount” you owe in the column.
- On the right side, click the “Reports” drop-down menu to access tax-related reports, like the sales tax liability report. This report provides details on your tax obligations, including tax types, amounts, and due dates to ensure you stay on top of your payments.
Sales tax reporting is helpful for planning your next moves. Reports show you how your business is doing financially to simplify decision-making and drive business growth.
Enhance QuickBooks with Method
Method is the #1 lead-to-cash automation tool for QuickBooks and Xero users.
Thanks to its two-way, real-time sync with QuickBooks, Method ensures a smooth and hassle-free experience. From credit card processing to bill payments, Method simplifies your workflow by consolidating all your data into one place.
What’s more is that the software provides greater control over your sales tax management, resulting in precise financial planning and reporting. With Method, you can focus on growing your business, not your stress.
See how Method makes your sales tax process less taxing.
Image credit: RDNE Stock project via Pexels