For many, receiving a refund is a positive thing. However, the process of tracking and organizing multiple vendor refunds can quickly become a source of frustration.
Even in the warmest relationships, refunds happen. Maybe a shipment arrived late, or there were too many pencils and not enough pens—regardless, you get your money back from vendors from time to time. Once that refund arrives in your account, QuickBooks Online will be ready for action.
This guide has all the steps outlining how to record a vendor refund in QuickBooks Online. Let’s get started!
What are vendor refunds in QuickBooks Online?
QuickBooks Online views a vendor refund as any event where a vendor returns money back to your business.
A refund returned by a vendor may occur due to various reasons. Maybe they charged you excessively, provided reimbursement for an unwanted item, or repaid a credit that remained unused on your end.
Unlike refunds for customers—where funds flow out from your account—in the case of vendor refunds, the cash flow comes from them and into your account.
Recording these in QuickBooks is key to keeping your bank accounts, vendor balances, and financial statements accurate—otherwise, you can see how things could get messy.
Grow your business without leaving QuickBooks Online.
Steps to record vendor refunds in QuickBooks Online
There are three main steps to recording vendor refunds in QuickBooks Online. Each one makes sure your financial data stays neat and accurate, so managing the cash flow becomes easier, and you avoid having to perform an unreconciliation.
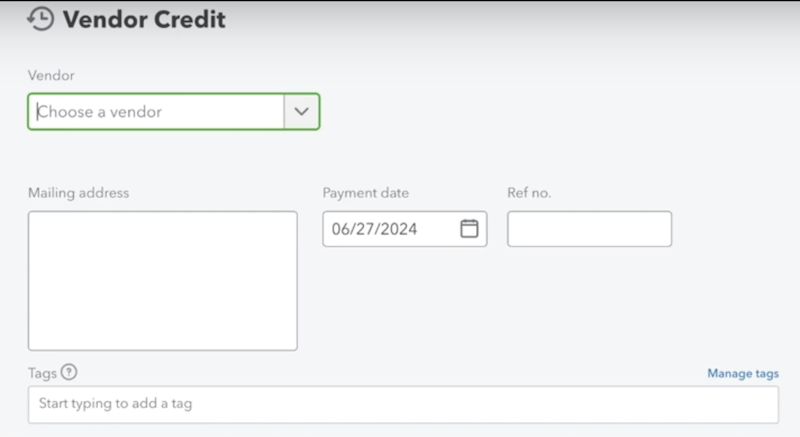
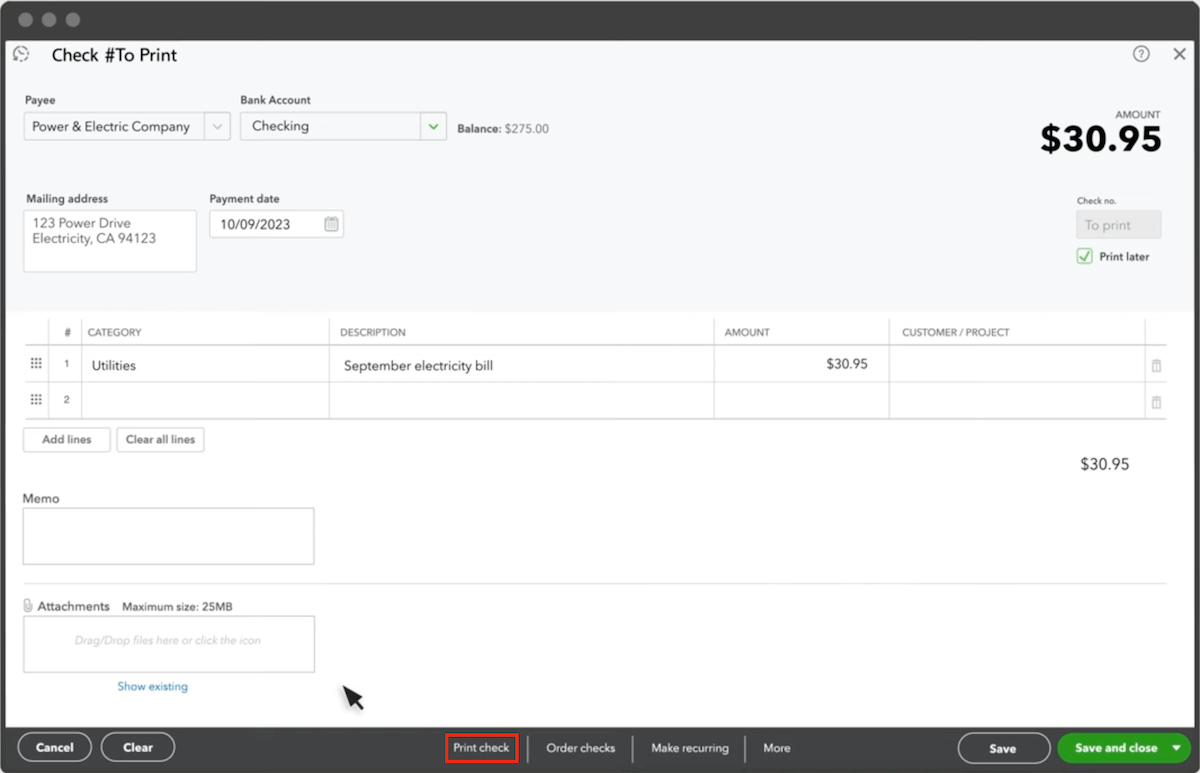
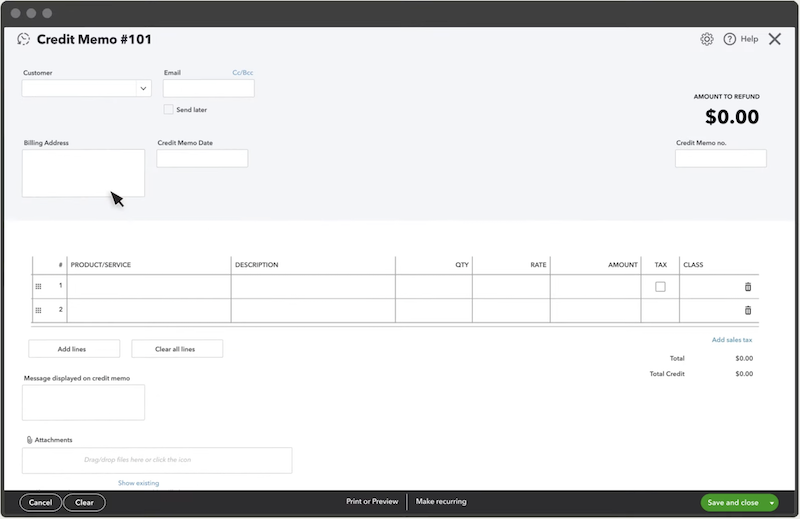
Step 1: Record the refund as a vendor credit
When a vendor refunds you, the first thing you’ll need to do is record it in QuickBooks as a vendor credit. QuickBooks will use this to track the amount owed to you by the vendor.
It’s especially important if this refund is going to be applied to any bills in the future.
Purpose of recording a vendor credit:
It ensures the refund is properly tracked, so nothing gets missed.
It keeps a clear record for reconciling your accounts later on.
It creates an audit trail just in case you need it come tax time.
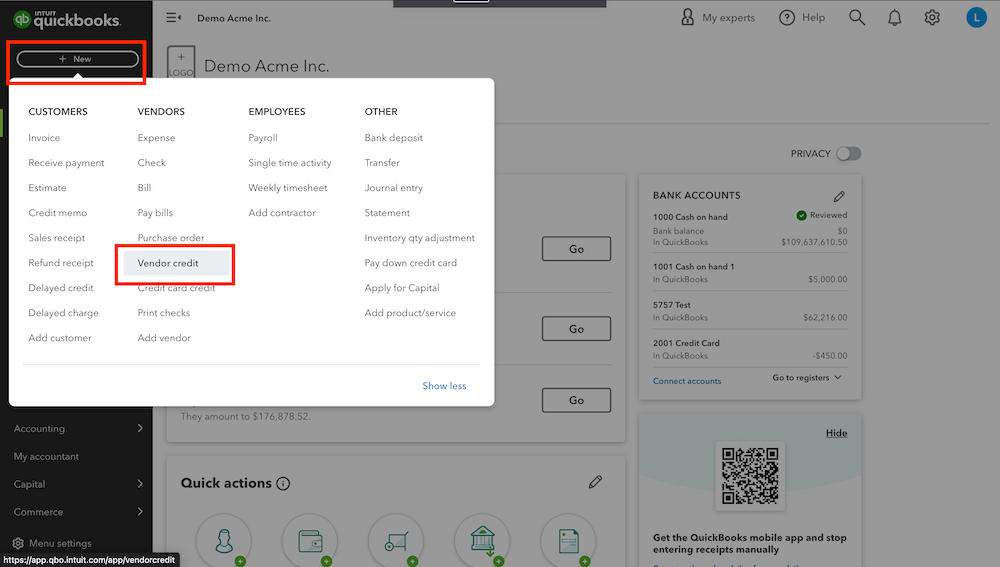
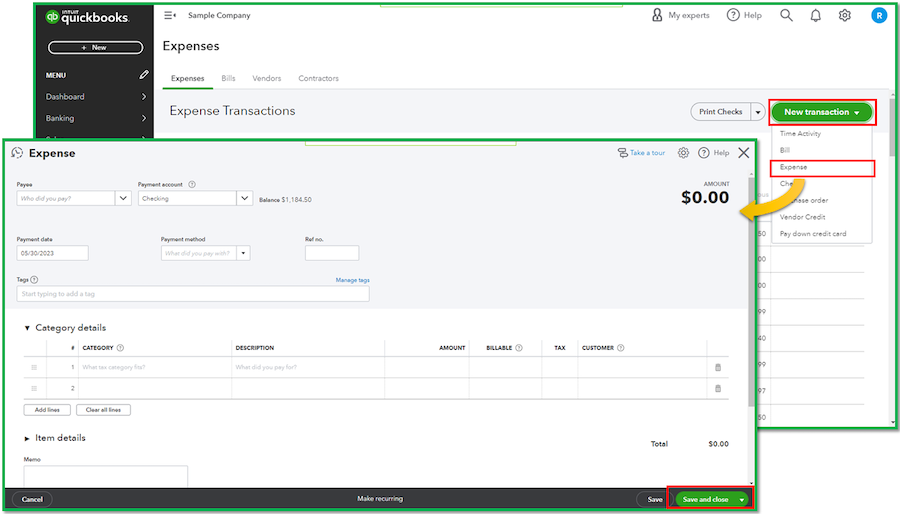
Navigate to vendor credit
Log in to QuickBooks Online.
From the + New button on the left-hand menu, select “Vendor Credit”.
Click “Save and Close” to finish. Or, if you have more vendor credits to log, click “Save and New” to keep going.
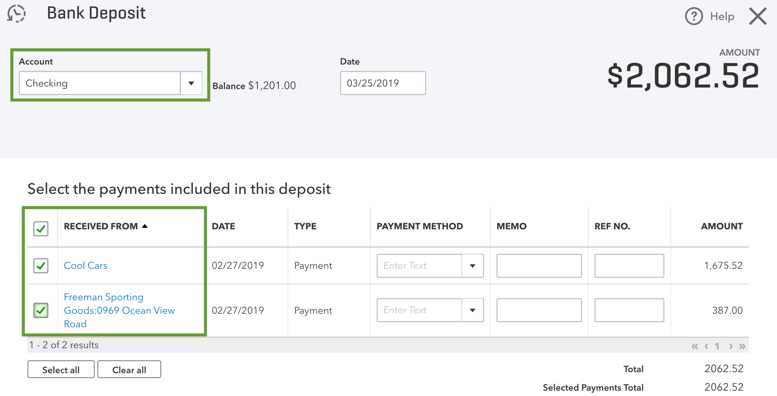
Step 2: Record the refund deposit
It doesn’t matter how the money was returned to your business (check, direct deposit, cash, or even a tangible item)—you need to record it strictly as a deposit in your bank account.
Recording the deposit is important because it:
Accurately shows the cash flowing into your account.
Ensures there are no mismatches in your bank reconciliation.
Helps QuickBooks recognize the deposit as an incoming transaction.
Navigate to “Bank Deposit”
Log in to QuickBooks Online.
From the + New button on the left-hand menu, select “Bank Deposit”.
Enter deposit details
The Bank Deposit screen will open, where you can enter the following details:
Bank account: Pick the account where the refund was deposited.
Date: Enter the date the refund was deposited into your bank.
Received from: Select the vendor who gave you the refund.
Payment method: Choose how the refund was received (check, cash, etc.).
Account: Select the right account for the refund, typically the expense account tied to the original purchase.
Amount: Add the refund amount.
Memo (optional): If you want, include a short description for later reference.
Save the deposit by clicking “Save and Close,” or select “Save and New” if you have some more deposits to add.
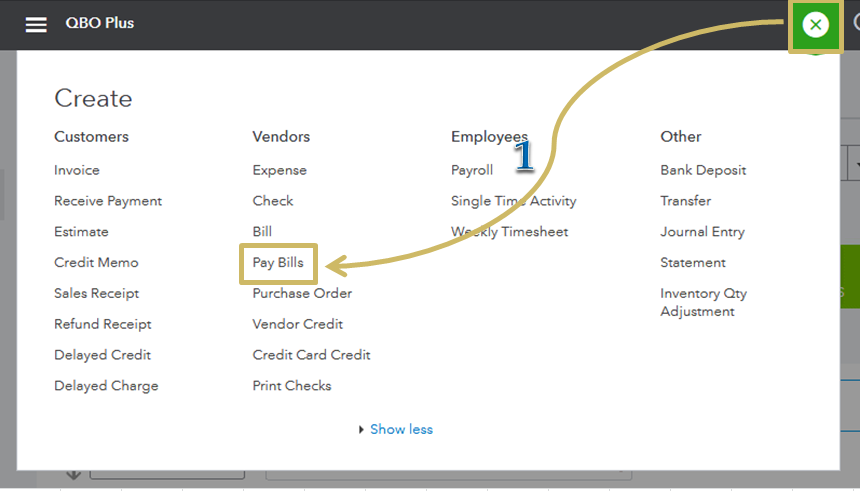
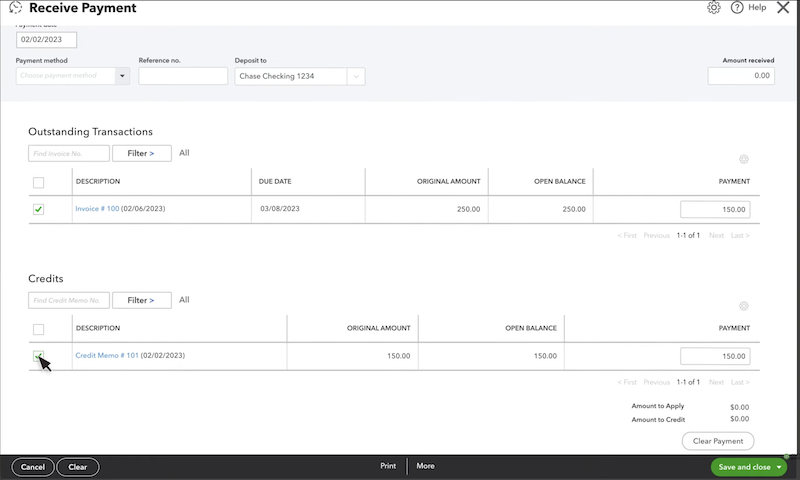
Step 3: Link the vendor credit to the deposit
Now, you’ll need to link the vendor credit you recorded in Step 1 to the deposit you recorded in Step 2. This lets QuickBooks connect the dots and accurately reflect the refund in both your Accounts Payable and any subsequent financial reporting.
Linking the credit matters because it:
Prevents any duplicate transactions from showing up in your financial statements.
Keeps your Accounts Payable and bank balance in sync.
Makes reconciling accounts and handling audits way less complicated.
Navigate to “Pay Bills”
Log in to QuickBooks Online.
Select “Expenses” From the left-hand menu and then click “Pay Bills”.
Can you track vendor refunds separately in QuickBooks Online?
Yes, QuickBooks Online allows you to track vendor refunds completely separately. You can do this by using the Vendor Credit and Bank Deposit features, where you can create two distinct records. These will show up in your vendor reports, transaction logs, and balance sheet.
Keeping these refunds separate makes reconciliation far easier and provides a clear audit trail for tracking refunds from vendors.
What if I made a mistake while recording a vendor refund?
Everyone makes mistakes, but luckily, fixing them in QuickBooks Online is simple and easy. Here’s what you can do:
Open the “Expenses” tab from the left-hand menu.
Find the refund entry containing the mistake.
Click on the transaction to open it up.
Edit the incorrect details, like the vendor name, amount, or category.
Click “Save and Close” to update the transaction entry.
If the mistake is big, such as selecting the wrong vendor entirely, it’s usually better to delete the entry and start over from scratch. That way, you avoid any confused looks from your accounting team down the road.
Key takeaways
Recording vendor refunds properly is important. You need to do this to keep your bank account, accounts payable, and financial reports reliable and accurate.
Stick to the simple three-step process. Record the vendor credit, log the refund deposit, and link the credit to the deposit for a full reconciliation of your accounts.
QuickBooks Online makes it quite straightforward to handle your vendor refunds with handy tools like Pay Bills, Bank Deposit, and Vendor Credit.
Always remember to link vendor credits to deposits to avoid any duplicate entries in your financial reports.
Make use of the notes and memos features to create meaningful descriptions when recording any refunds.
Managing vendor refunds doesn’t have to be a headache. Neither does keeping your finances organized alongside your vendors, leads, and customers. Method CRM syncs directly with QuickBooks Online to centralize contact info and automate the nitty-gritty like payment tracking. The result? Spot-on financial records without the grunt work.
With Method, you get a crystal-clear view of your transactions—attach docs, customize workflows, and keep everything running like clockwork. It’s all about saving time, cutting out errors, and keeping a solid audit trail. To learn more about what Method makes possible, check out the video below:
How to record a vendor refund in QuickBooks Online FAQs
Can I record a partial refund from a vendor?
Yes, QuickBooks Online lets you handle partial refunds just as easily as a full one.
Just enter the partial refund amount when creating the Vendor Credit. Later, when you link the credit to a deposit, QuickBooks automatically matches the correct amount for you.
Can I attach documentation to the vendor refund transaction in QuickBooks Online?
Any receipts, invoices, or documents related to the vendor refund can and should be attached to the QuickBooks transaction for reference. You can easily do this while entering the Vendor Credit or Bank Deposit.
Look for the Attachments section and add your files there. This way, there will be plenty of reference material for anyone reviewing the transaction.
Can I record a refund from a vendor that I haven’t paid yet?
Absolutely. If you haven’t paid the bill yet but still received a refund, skip the Vendor Credit step and create a Bank Deposit for the refunded amount. QuickBooks records this as an incoming deposit in your bank account.
Is there a way to make tracking refunds easier?
If tracking refunds feels like a lot to juggle, you might want to try Method CRM. It integrates perfectly with QuickBooks to centralize vendor info and simplify payment tracking, making your accounting workflow a whole lot smoother.
As a QuickBooks Desktop user, keeping your financial records accurate and current is much easier when you import accountant changes. It helps keep everything synced up and your accounting team happy, whether you’re:
Fixing mistakes.
Making tax adjustments.
Updating reconciliations from past entries.
In this article, you’ll learn how to import accountant changes in QuickBooks Desktop to keep everything accurate and up to date. By the end, you’ll be prepared to handle these imports like a pro.
What are accountant changes in QuickBooks?
Accountant changes are basically those tweaks, adjustments, or fixes your accountant makes to your books. For QuickBooks Online, these changes are made by an “Accountant User” and do not require an import, as everything is hosted in the cloud.
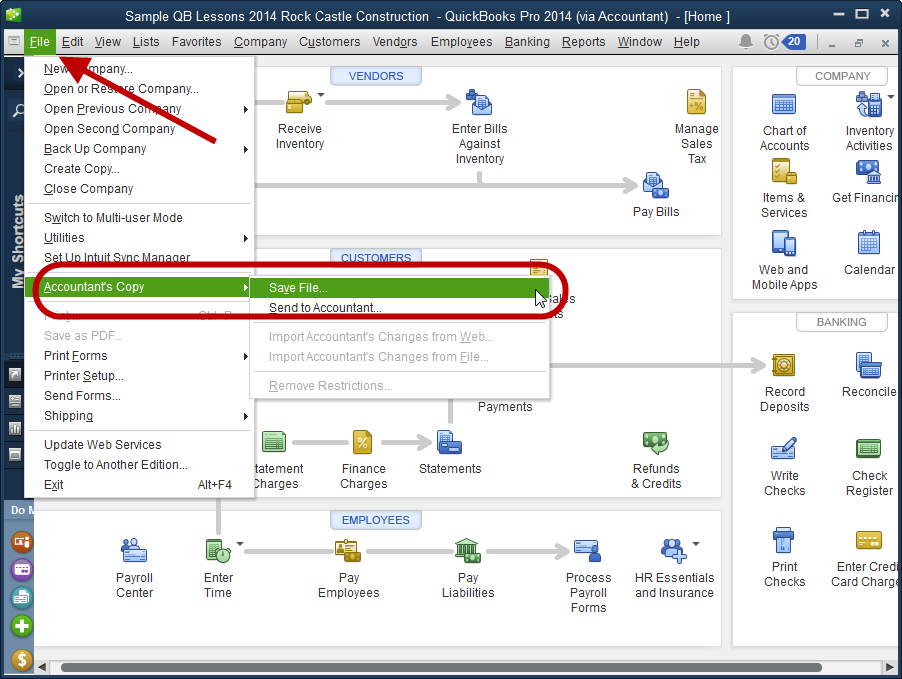
For Desktop, accountant changes typically require the “Accountant’s Copy” feature, which lets accountants make changes to your company file while you continue working on their own copy.
Of course, with two copies, there will be discrepancies. So, once your accountant completes their adjustments, you can import them to reflect the changes on your main QuickBooks file.
These edits usually come right after they have reviewed your financial records and noticed a few things that weren’t quite correct. They might include:
Reconciliations: Making sure your bank statements line up perfectly with your QuickBooks records.
Journal entries: Adjusting older transactions to fix mistakes or account for things like accruals.
Category changes: Reclassifying expenses or payments into the right buckets and categories for more accurate reporting.
These changes are key to keeping your financial records accurate, staying on the right side of the IRS, and ensuring that all your financial reports accurately reflect what’s happening financially in your business.
Sick of hunting for spreadsheets when updating your QuickBooks data?
5 steps to import accountant changes in QuickBooks Desktop
Importing accountant changes into QuickBooks Desktop is a straightforward enough process, but taking the time to do it carefully means your records will stay as accurate and audit-ready as your accountant intended. Here’s a step-by-step guide to handle it:
Step 1: Prepare for import
Before you start, you’ll need to prepare your company file. A little preparation goes a long way, and in the case of QuickBooks, it will save you a lot of issues down the road.
Key preparation steps:
Coordinate with your accountant: Make sure you’re on the same page about any changes being made and whether a second glance is required before the import.
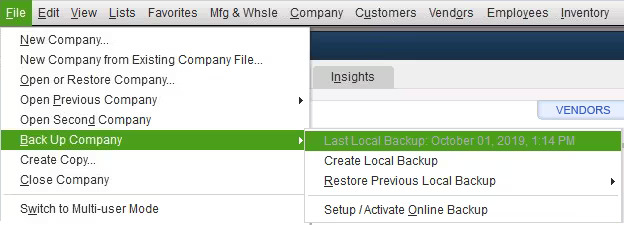
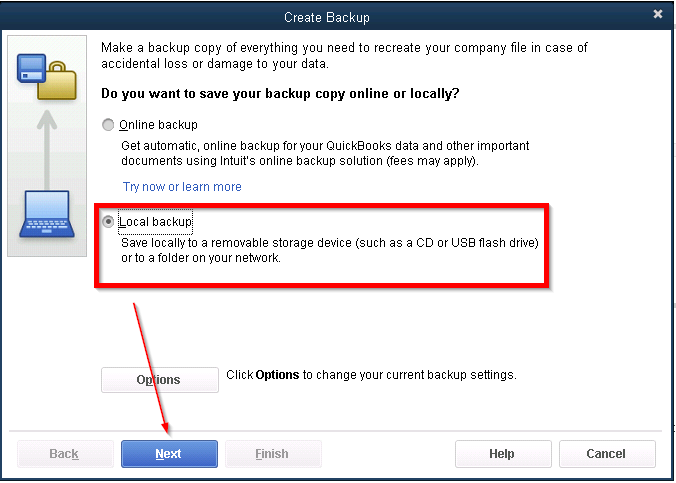
Back up your company file: Don’t skip this step. If something goes wrong during the import, backing up your company file will be a lifeline when restoring the data.
Here’s how to back up your company file in QuickBooks Desktop:
Open QuickBooks Desktop.
Go to the “File” menu.
Select “Back Up Company” and then click “Create Local Backup”.
Pick where you want to save the backup on your computer.
Once the backup is saved, you can move on to the next step.
Tip: It’s good practice to store the backup in several places. One instance on your computer is fine, but it’s smart to leverage additional media storage like a flash drive, as well as using your Network Attached Storage (NAS) or a cloud-based file storage tool. Ask your IT team for help if needed.
Step 2: Access the company file
Now is the time to pull up your company file so you can start the import. This ensures you’re working with the correct file.
Here’s how to access your company file:
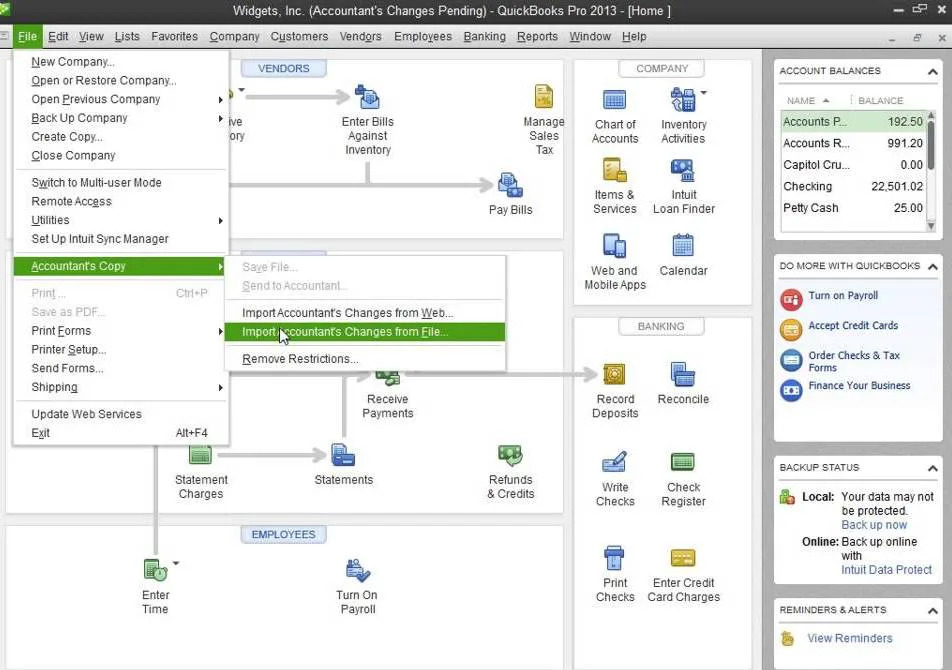
Go to the “File” menu at the top-left corner of the screen.
Select “Open or Restore Company” from the menu.
Find and open the file you want to work on. Double-check it to make sure you have selected the right one.
Step 3: Start the import process
Now, it’s time to import the changes your accountant made and sync them with your QuickBooks Desktop records.
To initiate the import process:
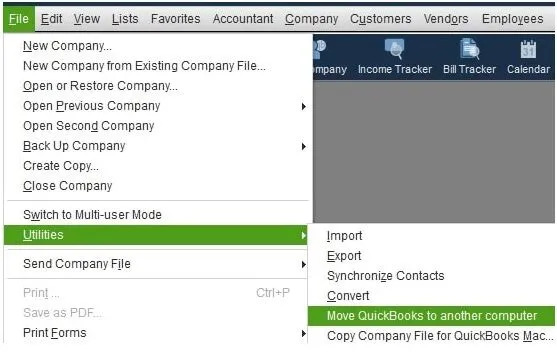
Click on the “File” menu at the top-left of the screen.
From the dropdown, select “Utilities”.
Click “Import” and then choose “Accountant Changes.”
You’ll be prompted to locate the .QBY file (the file your account will have sent with their changes).
Find the .QBY file on your computer (the one your account sent you).
Select the file and follow the instructions on the screen to start the import.
QuickBooks Desktop will check the file to make sure it’s compatible with your company file, and if everything checks out, the import will start.
This part might take a few minutes, depending on the size of the file, and how many changes your accountant made. Be patient while it’s being imported, as it’s common for the progress to stall from time to time.
Step 4: Review and accept changes
Once the import finishes, QuickBooks Desktop will show you a list of your accountant’s changes. This is your final chance to review everything and make sure you’re happy before it gets added to your records.
To review and accept accountant changes:
Check the summary: You’ll see a breakdown of the changes, such as adjustments to journal entries, reclassifications, or reconciliations.
Go through each change: If something doesn’t add up or looks off, don’t hesitate to contact your accountant to discuss it.
Approve or reject changes: After reviewing, decide whether or not to accept or reject each adjustment.
Taking a moment to review each and every change now will save you from dealing with adjustments and mistake-fixing later.
Step 5: Stay connected with your accountant
Your accountant plays a key role in keeping your finances in top shape, so it’s a good idea to maintain communication during the import process.
Here’s how to stay connected:
Ask questions: If something isn’t clear, don’t hesitate to contact your accountant before approving any changes.
Use QuickBook Notes: The Notes feature in QuickBooks Desktop lets you flag anything quickly that you want to discuss or clarify with your accountant.
Set a regular review schedule: If you’re importing changes every month or quarter, schedule a quick Zoom call or meeting ahead of time to go over everything together.
Once you’re on the same page as your accountant, accept the changes and integrate them into your QuickBooks file. Keeping communication open helps you address issues quickly, understand why adjustments were made, and, most importantly, ensure that all financial records stay accurate and compliant.
Online payments, automated leads, and customer management?
Tips for seamless collaboration when importing accountant changes
Working more closely with your accountant makes the process of importing changes into QuickBooks much less stressful. Here are a few ways to keep collaborating and stay in your accountant’s good books:
Establish clear communication
Decide together upfront how and when changes will happen. Will you review everything before it’s imported? Or will you take a look at it afterward? Setting clear expectations will save you both a lot of time and frustration.
Agree on a timeline
Setting schedules for when changes are to be made and imported into QuickBooks is the best way to avoid last-minute surprises and keep your day-to-day bookkeeping on track.
Use the “Notes” feature in QuickBooks
Both QuickBooks Online and Desktop have a Notes feature. Use it to leave comments and provide useful context for your accountant. These can be about specific transactions or areas that need a little extra attention. It’s one of the best ways to keep on the same page.
Regularly reconcile your accounts
Regular reconciliation in QuickBooks is one of the easier ways to keep records clean and make your accountant happy by reducing the adjustments that they need to make.
Here’s a quick step-by-step, but for a more detailed guide, we have a more in-depth article here.
Log in to QuickBooks and select “Reconcile” from the “Accounting” or “Tools” menu.
Pick the bank or credit card account you need to reconcile from the downtown menu.
Enter your statement details by inputting the ending balance and statement from your most recent bank or credit card statement.
If the balances don’t align, don’t panic. Fix any discrepancies by checking for errors like duplicate transactions, missing entries, or an accidental typo. Adjust these as needed to fix them.
Once the difference is $0, click on “Finish Now” to complete the process.
Schedule this process to occur monthly or quarterly, depending on your schedule and cash flow.
Why should you import accountant changes in QuickBooks?
While it may feel like another annoying admin tasks, importing changes made by your accountant is essential for your business, and here’s why:
Accurate financial records: When you import changes, your books are always updated with the latest adjustments, cutting down on any errors that can throw your books.
Audit readiness: If you’re ever faced with the unpleasant experience of an IRS audit, having accurate records with a clear audit trail will save you a lot of stress.
Compliance: Financial compliance is an accountant’s bread and butter. So when they make adjustments, and you import them into your QuickBooks, it means you can be confident everything financially is above board and in good standing.
Informed decision-making: Clean, up-to-date financial data gives you a much clearer picture of your business, helping you make smarter decisions for the future.
Get everything you need to run your business in one place.
Keep your financial data accurate and clean: Importing accountant changes means your records are current and ready for any surprises (like an audit).
Always back up your company file: Before importing changes, create a backup to protect your data in case anything goes wrong. Store multiple copies.
Communicate with your accountant: Clear communication and schedule imports to avoid any confusion.
Reconcile accounts regularly: Stay on top of reconciliation. It will minimize the need for constant adjustments and save time for both you and your accountant.
Ready to simplify your imports?
Looking for an easier way to manage your financial data? Try Method. It connects to your QuickBooks to help you track transactions and interactions, automate workflows, and generate customized reports without the repetition and hassle. Plus, your whole team can stay in the loop without making accidental changes or having direct access to your sensitive financial information.
The best part? Method gives you remote access to your QuickBooks Desktop data, meaning you can access information and make changes anytime, anywhere. No more being bound to the desktop computer at your office! To learn more about Method, check out the video below.
Extend the power of QuickBooks with your 14-day free trial of Method. No credit card required.
How to import accountant changes in QuickBooks FAQs
Can I undo accountant changes after importing them in QuickBooks?
Yes, but the only way to undo changes after an import is by restoring the backup of your company file. That’s why creating a backup before importing changes is absolutely essential.
Do I need to close my QuickBooks file while my accountant works on it?
No, it’s not necessary to close your file. Your accountant can work on a copy of the company file instead. Once they are finished making adjustments, they will send their copy in the form of a .QBY file, which you then import. This can all be done without ever closing QuickBooks.
How often should I import accountant changes in QuickBooks?
It depends on your business and your cash flow. For smaller businesses, quarterly imports are generally enough. But if you’re dealing with a lot of transactions or running a medium-sized business, monthly imports are ideal.
Any type of accounting done for a business requires strict organization and proactivity. While it’s a tedious task, keeping your books in order helps you stay on track for smarter decision-making and seamless tax prep at the end of the year.
With your expenses tracked, you’ll get a real-time look into your financial health at all times, and QuickBooks simplifies the process. Keep reading to learn how to categorize expenses in QuickBooks Online.
Step 1: Set up expense categories
Setting up expense categories in QuickBooks is the first step toward maintaining well-organized financial records. Follow these steps to create categories tailored to your business needs.
Navigate to the Chart of Accounts
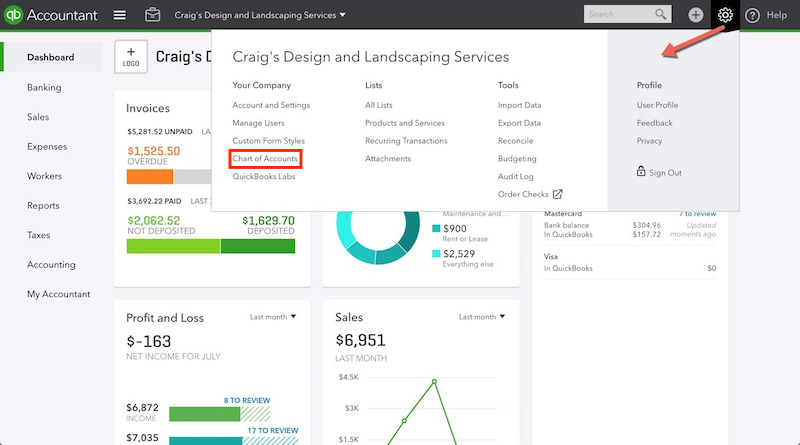
The Chart of Accounts is the backbone of your expense categorization, and is essentially the framework of your entire accounting system. To access it in QuickBooks Online:
Log in to QuickBooks Online.
Select “Settings” (or the gear icon) from the top-right menu.
Click “Chart of Accounts” under the “Your Company” section.
Review the existing list of accounts to avoid duplicates.
Consistent and accurate categorization makes bookkeeping simpler and more effective. Follow these tips to keep your finances in check:
Consistency in categorization
Create clear categorization rules and ensure your team follows them. For example, always categorize travel-related expenses under “Travel” rather than creating multiple overlapping categories.
Regularly review and update categories
Your expense tracking needs will evolve with your business. Set aside time every quarter to review and update categories, ensuring they align with your current operations.
Use detailed descriptions and notes
Add notes or descriptions to each transaction. For instance, a note like “Client lunch with ABC Corp” under “Meals & Entertainment” helps during audits and reviews.
What should I do if I miscategorize an expense?
If an expense is categorized incorrectly, correcting it in QuickBooks is simple:
Locate the transaction in the “Expenses” or “Banking” tab.
Click the transaction to open it.
Edit the category field, selecting the correct category.
Save the changes to update your records.
Online payments, automated leads, and customer management?
Importance of accurate expense categorization in QuickBooks
Accurate expense categorization gives your business the financial visibility it needs to run smoothly, plan strategically, and stay tax-compliant. It’s a simple procedure that provides several benefits that can make a lasting difference in your business’s financial health.
Clarity in financial reporting
Clear and organized expense categories make generating and analyzing financial reports, such as profit and loss (P&L) statements, easier. Without proper categorization, reports may be cluttered with vague or badly categorized entries, making it difficult to spot trends or areas for improvement.
Categorization also gives stakeholders—like investors or lenders—a transparent view of your company’s financial health.
Better decision-making
Data-driven decisions are only as good as the data behind them. Proper expense categorization helps keep your financial data reliable, current, and easy to interpret. When you can see how much is spent in specific areas, you can make better choices relating to resource allocation, hiring, and growth initiatives.
Tax compliance
By categorizing expenses correctly, you can quickly identify which expenditures are tax-deductible and which are not. For example, certain expenses like office supplies, marketing costs, and travel expenses may be deductible, but only if they’re properly categorized. If you lump everything under “Miscellaneous,” you could miss out on valuable deductions.
Key takeaways
Accurate categorization helps with transparent financial reporting, informed decision-making, and tax compliance.
Setting up expense categories in QuickBooks is straightforward—use the Chart of Accounts to organize your expenses effectively.
Regular reviews and consistent practices keep your records accurate and valuable.
Tired of wasting hours sorting through messy expense records? Integrate with Method CRM to keep your QuickBooks categories clean and your financial data accurate. Method CRM instantly syncs with QuickBooks, giving your entire team complete visibility into expense tracking—without the risk of miscategorized entries or duplicate transactions. Watch the video below to learn more.
Ready to stay audit-ready and always in control? Try Method free — no credit card required.
How to categorize expenses in QuickBooks FAQs
Can I create custom expense categories in QuickBooks?
Yes. You can create custom categories to help categorize each transaction to your business’s specific needs.
Can I merge similar expense categories in QuickBooks?
Yes, it’s possible to merge categories. Simply edit one category and merge it with another to avoid duplication and simplify reporting.
How often should I review and update my expense categories?
Review your expense categories at least once per quarter. This ensures your bookkeeping reflects any changes in your business operations or expenditures.
If you own a business and use QuickBooks, you can probably appreciate how easy ACH payments are. However, have you considered the fees that come with them? Understanding these fees is crucial for your business. It helps you manage cash flow and budget more effectively.
In this article, you’ll answer: how much does QuickBooks charge for ACH payments? This way, you can make smart choices about how to handle payments. Whether you’re a small business owner or a seasoned accountant, knowing the ins and outs of ACH payment fees can help you save money, reduce unnecessary charges, and simplify your financial operations.
What are ACH (automated clearing house) payments?
ACH stands for Automated Clearing House, a network that facilitates electronic bank payments. When you make an ACH payment, the money is withdrawn directly from your checking account and deposited into the recipient’s account. This process is usually faster and more secure than writing a check and is often less expensive than using a credit card.
ACH payments are so popular because they’re incredibly convenient. Many businesses use them to pay their employees, vendors, and suppliers. It’s also an excellent way for customers to make recurring payments, like monthly subscription services or utility bills.
ACH payments are also relatively inexpensive. Unlike credit card transactions, which often come with hefty processing fees, ACH payments typically have lower costs, making them attractive for businesses with high-volume transactions. In addition to being convenient and cost-effective, ACH payments are also highly secure. The ACH network has robust security measures to protect transactions and prevent fraud, giving businesses and individuals peace of mind when making electronic payments.
QuickBooks can’t do everything, so let Method CRM help!
QuickBooks charges a small fee for ACH (Automated Clearing House) transactions for a few reasons:
Operational costs: QuickBooks needs money to keep its systems running smoothly. This includes paying for secure servers, software updates, and staff to handle transactions.
Service enhancements: QuickBooks uses the money to improve ACH services. This could mean adding new security features or creating tools that simplify your accounting tasks.
Bank and network fees: QuickBooks pays banks and the ACH network to process these transactions. These costs usually fall on customers.
Compliance and regulatory costs: QuickBooks must comply with rules to prevent issues like money laundering. The fees help cover the costs of adhering to those regulations.
Customer support and education: QuickBooks aims to ensure users get the most out of their services by offering training and support.
Overall, QuickBooks’ fees for ACH transactions are usually in line with what other accounting services charge.
How does QuickBooks handle ACH payments?
QuickBooks handles ACH payments through a systematic process involving the following stages:
Initiation: A user starts an ACH payment in QuickBooks. They choose the payee, payment amount, and payment date.
Payment data collection: QuickBooks collects essential payment details. This includes the payee’s name, account number, and routing number.
Payment data verification: QuickBooks checks the payment info to ensure everything is correct.
File creation: QuickBooks creates an ACH file with all the payment details. This file is sent to the ACH network.
Network processing: The ACH network processes the ACH file. It checks the payment info and ensures it complies with ACH regulations.
Bank processing: The payee’s bank receives the ACH file and processes the payment, debiting the payee’s account.
Payment settlement: The payment is settled. Money moves from the payee’s account to the recipient’s account.
Payment confirmation: QuickBooks gets payment confirmation from the ACH network and updates the user’s account accordingly.
Payment reconciliation: QuickBooks matches the payment with the user’s account to ensure everything is accurate.
Completion: At this stage, the ACH payment process is complete. The user can check the payment status in QuickBooks.
QuickBooks charges a flat fee of $1 per transaction, with a maximum monthly payment of $10. This means that if you process multiple ACH transactions in a month, you’ll only pay a maximum of $10 in fees. Additionally, QuickBooks may also charge a small percentage-based fee for certain types of ACH transactions, such as payments to vendors or contractors.
However, this fee is typically waived for employee payments or other types of transactions. Note that these fees are subject to change, so it’s always a good idea to check the QuickBooks website or consult a QuickBooks representative for the most up-to-date pricing information.
Standard ACH payment fees
Here are the standard fees associated with ACH payments: $0.25-$1.50 per transaction (baseline rate), 0.5%- 1.5% of the transaction amount (percentage-based fee), $5-$30 per return or rejection (return fee), $10-$50 per month (monthly minimum fee), $0.10-$0.30 per transaction (micro-deposit verification fee), and $5-$20 per failed or rejected payment (NSF fee).
Note that these fees are subject to change and may vary depending on the payment processor, the type of transaction, and other factors.
Instant deposit fees
The instant deposit service for ACH payments through QuickBooks allows users to deposit funds into their bank account immediately rather than waiting for the standard ACH processing time. However, this expedited service comes with an additional fee. The instant deposit fee is typically a flat rate of 1% of the deposit amount, with a minimum fee of $0.25 and a maximum fee of $10.
This fee is in addition to the standard ACH payment processing fee. The additional cost factors contributing to the instant deposit fee include the expedited processing time, the increased security measures required for instant deposits, and the costs associated with facilitating immediate access to funds.
For more information on QuickBooks payment fees, check out our video below.
Factors influencing QuickBooks ACH payment fees
The fees for QuickBooks ACH payments can vary based on a few things. First, it matters what kind of transaction you’re doing. Are you paying employees, vendors, or contractors? The number of transactions you make matters, too. If you do a lot, you might pay more or even get discounts. How fast you want the payment to go also counts.
If you choose instant deposits, expect higher fees. The payment method you pick, like ACH debit or credit, can also change the costs. Lastly, your QuickBooks plan affects what you’ll pay. Some plans have better prices or extra features.
QuickBooks subscription plan
Here’s a breakdown of how different QuickBooks subscription plans influence the fees charged for ACH payments:
QuickBooks Online Simple Start: 1% per transaction (max $10) for ACH payments, with no monthly minimum fee.
QuickBooks Online Essentials: 1% per transaction (max $10) for ACH payments, with no monthly minimum fee. However, users can access additional features, such as multiple-user access and time tracking.
QuickBooks Online Plus: 1% per transaction (max $10) for ACH payments, with no monthly minimum fee. This plan also includes features like inventory management and budgeting.
QuickBooks Online Advanced: This plan charges 0.5% per transaction (max $5) for ACH payments and has no monthly minimum fee. It includes advanced features like customized reporting and workflows.
QuickBooks Payments: Offers discounted ACH payment rates (0.5% per transaction, max $5) for high-volume users, with a monthly minimum fee of $20.
QuickBooks Pro/Premier: 1% per transaction (max $10) for ACH payments, with a monthly minimum fee of $10.
Note that these fees and plans are subject to change. For the most up-to-date pricing information, check the QuickBooks website.
Volume of transactions
The number of transactions you make affects the ACH payment fees in QuickBooks. The more transactions you make, the lower the fees usually are. That’s because QuickBooks gives discounts for high volumes. For instance, if you handle more than 500 monthly transactions, you might get a reduced fee of 0.5% per transaction instead of the usual 1%. If you really go big and have over 5,000 transactions monthly, you might even get special pricing with lower fees.
These discounts can help businesses save money on ACH processing fees, making it more affordable to manage finances through QuickBooks.
Negotiated rates for high-volume users
If your business does a lot of transactions, you might get better rates for ACH payments with QuickBooks. QuickBooks has different pricing plans, often giving lower rates to those who bring in high volumes.
To negotiate first, check your current pricing and see how many transactions you do. Then, reach out to QuickBooks’ customer support or sales team. Explain what your business needs and ask for a custom quote. Ensure to share details about your transaction volume, average amount per transaction, and how often you make payments. This shows them you’re a high-volume user.
QuickBooks might give you a better rate, a flat fee, or a special plan just for you. Be ready to negotiate and also mention any better offers you might have from other payment companies to strengthen your case.
Online payments, automated leads, and customer management?
Using ACH payments with QuickBooks has several benefits that can help businesses improve their payment process, save money, and manage their finances better.
Lower transaction fees compared to credit card payments
When you look at ACH fees versus credit card fees, ACH is way cheaper. Credit card fees usually hit you with 2.5% to 3.5% of the sale amount. Plus, there’s an extra fee of $0.10 to $0.30. That can add up fast!
On the flip side, ACH fees through QuickBooks are much lower. You’re looking at only 0.5% to 1% of the sale and a flat fee of $0.25 to $1.00. Think about it. If you make a transaction of $1,000, credit card fees would be around $25 to $35. But for ACH, you’d pay only about $5 to $10. In short, using ACH can save businesses up to 75% on fees.
Improved cash flow and payment speed
ACH payments can really help businesses manage their money better. They speed up the process of getting paid. Instead of waiting for paper checks, businesses receive the money directly in their bank accounts, allowing them to access their funds much faster.
When businesses get paid quicker, they can reduce the time it takes to collect money from customers. This means more cash on hand for other needs. They can buy more inventory, pay their suppliers promptly, and invest in new ideas.
In short, using ACH payments makes it easier for companies to keep their cash flowing smoothly. It helps them work better and make smarter money choices.
Enhanced security and reduced risk of fraud
ACH payments have several security features to help prevent fraud. First, they use strong encryption, such as SSL/TLS, to keep sensitive payment information safe while transacting between banks and the ACH network.
In addition, ACH payments require clear permission from the payer. This can be a signed agreement or an electronic authorization, which prevents unauthorized transactions. The ACH network also checks account and routing numbers to ensure that payments go to the right place and that accounts are real.
There are also strict rules, like the Nacha Operating Rules. These rules guide how ACH transactions work and ensure secure payments. Together with QuickBooks’ own security, these features protect businesses and individuals from losing money to fraud.
Are there any hidden fees associated with ACH payments?
A lot of people worry about hidden fees with ACH transactions. The good news is that QuickBooks is upfront about its fees. When you use QuickBooks for ACH transfers, there’s a flat fee for each transaction. You can find this fee laid out in the QuickBooks pricing plan.
QuickBooks also tells you about any extra fees. This includes charges for returns, rejected payments, NSF fees, or instant deposits. You can see all these in QuickBooks’s terms of service right on the platform.
QuickBooks also provides detailed invoices and statements, making it easy for businesses to keep track of their ACH fees and avoid surprises. By being transparent about fees, QuickBooks helps businesses feel confident in their payment choices.
Key takeaways
Understanding the fees associated with ACH payments in QuickBooks can help you make informed decisions about your business’ payment processing needs. Bear the following in mind:
ACH fees can add up: QuickBooks charges a flat fee per ACH transaction, ranging from $0.25 to $1.00, depending on your subscription plan. If you’re processing a high volume of transactions, you can incur significant fees.
Bulk discounts are available: QuickBooks offers tiered pricing for ACH payments, with lower rates for higher transaction volumes. You may be eligible for discounted rates if your business processes many ACH transactions per month.
Negotiating fees is possible: You can negotiate ACH fees with QuickBooks, especially if your business has a high transaction volume or is willing to commit to a minimum transaction volume or term length.
Financial impact: Understanding ACH fees in QuickBooks can significantly impact your business finances as you can save hundreds or even thousands of dollars per year.
If you’re already using popular payment gateways like Stripe, Authorize.Net, or PayPal, Method CRM works directly with these platforms. You also gain access to self-serve customer portals for 24/7 invoice payments, automated administrative workflows, personalized templates, and more—all while ensuring every payment and customer detail is synced with QuickBooks.
What’s even better is that Method’s customer portals are fully customizable, which means you can design the experience to align perfectly with your branding and business processes.
It’s not just about offering more payment options—it’s about creating a polished experience that makes your business stand out. Check out the video below to learn more about what Method makes possible.
Ready to give it a try? Start your free trial today—no credit card or contract required.
How much does QuickBooks charge for ACH payments FAQs
How long does it take to process an ACH payment in QuickBooks?
In QuickBooks, ACH payments typically take 1-3 business days to process. However, weekends, federal holidays, and bank holidays may delay the processing time. Additionally, some banks may take longer to process ACH payments, so it’s always a good idea to check with your bank or the recipient’s bank for specific processing times.
Can I negotiate ACH payment fees with QuickBooks?
You can negotiate ACH payment fees with QuickBooks, especially if your business has a high volume of transactions. Although QuickBooks has set prices, it might offer discounts or special rates for loyal customers or businesses with high transaction volumes.
To start negotiating, you’ll need to share details about how many transactions you make, the average amount, and how often you process payments. It helps if you’re ready to agree to a minimum number of transactions or a contract length to get the best deal.
When you negotiate, you can get lower rates, cheaper monthly fees, or custom pricing plans. For instance, if your business handles over 1,000 monthly transactions, you could receive a discount of 0.25% + $0.25 per transaction instead of the regular 0.5% + $0.50.
Just remember, your negotiation results will depend on your business needs and how QuickBooks sets its prices.
Does QuickBooks offer discounts for bulk ACH payments?
Yes, QuickBooks offers discounts for ACH payments made in bulk. To qualify for a bulk discount, businesses must agree to a minimum number of monthly transactions, sign a contract for a set time, such as 6 to 12 months, and pay a fee monthly or once a year.
That said, it’s best to contact QuickBooks directly. They can help you determine whether you qualify for those ACH payment discounts.
Have you ever encountered a situation where a check was lost, stolen, or damaged? Perhaps the payee never received the check, or it was returned due to an incorrect address. In such cases, reprinting the check is the best course of action. Because it’s sometimes necessary, knowing how to reprint checks in QuickBooks is non-negotiable.
Another common scenario that may require reprinting checks is when there are errors or discrepancies in the original check. For instance, if the check amount or payee information is incorrect, you must void the original check and reprint a new one with the correct details. Whatever the reason, knowing how to reprint checks in QuickBooks can save you time and hassle.
The process for reprinting checks in QuickBooks differs slightly between QuickBooks Online and QuickBooks Desktop. Here’s a breakdown of the key differences:
Accessing checks:
QuickBooks Online: Locate checks through the “Reports” section by selecting “Check Detail.”
QuickBooks Desktop: You can access checks via the “Banking” menu by choosing “Use Register” or going directly to “Check Register.”
Reprinting process:
Both versions support batch printing for multiple checks, but the specific steps to reprint checks vary slightly between the two platforms.
Customization options:
The desktop version offers more advanced customization options for check layouts and formats, providing greater flexibility compared to the online version.
Understanding these differences ensures a smoother experience when reprinting checks, no matter which QuickBooks version you use.
This article takes you through the step-by-step process of reprinting checks in both QuickBooks Online and QuickBooks Desktop. Let’s dive in.
Why do you need to reprint checks in QuickBooks?
Reprinting checks in QuickBooks becomes necessary in the following situations:
Lost or misplaced checks: Sometimes checks get lost in the shuffle—whether it’s a paper slip that fell under a pile or never reached the recipient. If a check is lost before it’s cashed, you may need to reprint it for the payee.
Printing errors: Issues with alignment, smudging, or incorrect formatting are common while printing checks. If the details are off or the check looks illegible, a reprint ensures the recipient gets a readable, properly aligned check.
Duplicate requests: Your payee might ask for a copy of a check for their records, or your business might require a duplicate for internal accounting purposes. In these cases, reprinting a check helps keep everything in order.
Banking issues: Occasionally, the bank might return a check due to issues like insufficient funds, a closed account, or a mismatch in details. In such cases, you may need to void the original and reprint a new check.
QuickBooks can’t do everything, so let Method CRM help!
The process of reprinting checks in QuickBooks Online is intuitive. You can access the check reprinting feature in two ways. The first is through the “Expenses” tab in the left-hand menu bar. Alternatively, depending on your specific workflow, you can access the check reprinting feature from the “Payments” tab or the “Banking” tab. The steps you take afterward depend on whether you want to reprint a single or multiple checks.
Single check
Reprinting a single check in QuickBooks will suffice if the original check was lost, stolen, damaged, or returned due to an incorrect address or other error. Additionally, reprinting the check may be necessary if the payee never received the check or if the check was voided due to an incorrect amount or payee information.
Locate the check in the check register
Log in to your QuickBooks Online account and navigate to the “Banking” tab in the left-hand menu bar.
Click on the “Check Register” option from the drop-down menu.
In the Check Register window, select the bank account associated with the check you want to reprint from the “Account” dropdown menu.
To narrow the list of checks, enter the check number or date range in the “Filter” field.
Scroll through the list of checks and find the specific check you want to reprint.
Open the check to view details
In the “Check Register” window, click the check number or the “View” button to open the check details window.
Review the check details to ensure you have selected the correct check. Verify the following information:
Check number.
Date.
Payee.
Amount.
Memo.
Check the check status to ensure it has not been previously voided or deleted.
Review any attached documents, such as invoices or receipts, to confirm the check details.
If the check details appear correct, proceed with reprinting the check. If the details are incorrect, cancel the reprint process and investigate the discrepancy.
By carefully reviewing the check details, you can ensure you reprint the correct check and avoid any potential errors or discrepancies.
Select the “Print” option
From the check details window, click the “Print” button, which is usually located at the bottom of the window.
In the Print window, select the printer you want to use from the “Printer” dropdown menu.
Choose the correct paper size and layout for your checks. QuickBooks Online typically defaults to a standard check size.
Select the number of copies you want to print. Generally, you’ll want to print one copy.
Check the “Print check number” box if you want the check number printed on the check.
Review the other print settings, such as the font and formatting, to ensure they meet your needs.
Click “Print” to send the check to the printer.
Verify that the check has been printed correctly and that all the necessary information is included.
Sometimes, life gets in the way, and checks get lost, stolen, or damaged. Or maybe you just need to resend a batch of checks to a vendor or supplier. Whatever the reason, reprinting multiple checks at once is a common task for businesses. Luckily, QuickBooks Online makes it easy to select and reprint multiple checks in one go, saving you time and hassle.
Use the “Batch Actions” feature
To use the “Batch actions” feature to handle multiple checks simultaneously, navigate to the Check Register window, then:
Select the checks you want to reprint by checking the boxes next to each check.
Click on the “Batch actions” dropdown menu at the top of the window.
Select “Print” from the batch actions menu.
In the Print window, choose the printer and settings you want to use.
Select the number of copies you want to print for each check.
Click “Print” to print all the selected checks at once.
If you need to void or delete multiple checks, use the batch actions feature. Simply select the checks you want to void or delete, click on the “Batch actions” menu, and choose the desired action.
Select checks to be reprinted
To select multiple checks in the Check Register window,
Click on the first check you want to select by checking the box next to it.
Hold down your keyboard’s Ctrl key (Windows) or Command key (Mac).
While holding down the Ctrl or Command key, click on each additional check you want to select. This will allow you to choose multiple checks that are not consecutive.
To select a range of consecutive checks, click on the first check, hold down the Shift key, and click on the last check. This will select all checks in between.
Now, you’re ready to use the batch actions feature to reprint the selected checks.
Print selected checks
Review the selected checks to ensure you have chosen the correct ones.
Verify the check numbers, dates, and payee information to confirm accuracy.
Once satisfied with your selection, click the “Batch actions” dropdown menu.
Select “Print” from the batch actions menu to print the selected checks.
In the Print window, review the print settings, such as the printer, paper size, and orientation.
Make any necessary adjustments to the print settings.
Click “Print” to send the selected checks to the printer.
Verify that the checks have been printed correctly and that all necessary information is included.
Online payments, automated leads, and customer management?
If you’re using QuickBooks Desktop, you’ll notice a slightly different interface and set of features compared to QuickBooks Online. When it comes to reprinting checks, QuickBooks Desktop offers a more traditional desktop application experience, allowing you to customize your check templates, manage check numbers, and track check printing history, all of which can be useful when reprinting checks.
Single check
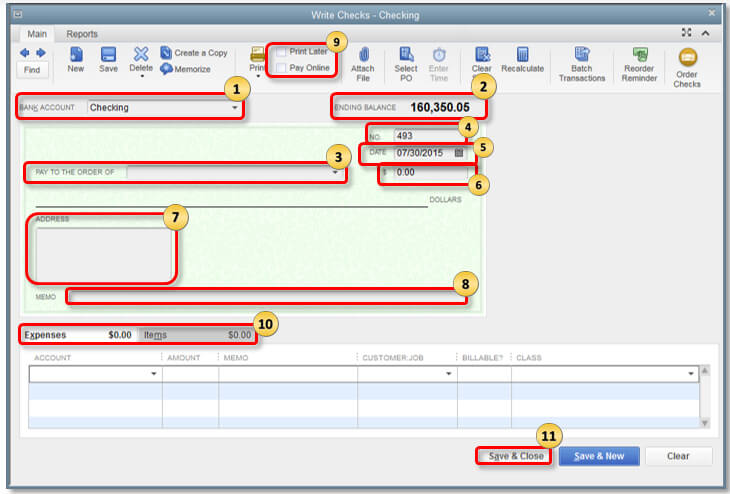
Reprinting a single check in QuickBooks Desktop may be necessary if a payee never received the check or the check was voided due to an incorrect amount or payee information. In any of these situations, QuickBooks Desktop allows you to easily reprint a single check, ensuring the payment is properly recorded and processed.
Locate the check in the check register
Open QuickBooks Desktop and select the company files you want to work with.
Click on the “Banking” menu at the top of the screen.
Select “Use Register” from the drop-down menu.
In the “Use Register” window, select the bank account associated with the check you want to find from the “Account” dropdown menu.
Click the “Go to Date” button and select the date range when the check was written.
Use the “Find” feature to search for the check-by-check number, payee, or amount. You can access the “Find” feature by pressing Ctrl + F on your keyboard.
Enter your search criteria in the “Find” window and click “Find” to locate the check.
Once you’ve found the check, click on it to select it and view its details.
Open the check to view details
With the check selected in the register, click on the “Edit Transaction” button or double-click on the check to open the “Write Checks” window.
In the “Write Checks” window, review the check details, including:
Check number
Date.
Payee.
Amount.
Memo.
Verify that the check details are accurate and match your records.
Check the “Check Status” field to ensure the check has not been voided or deleted.
Review any attached documents, such as invoices or receipts, to confirm the check details.
Select the “Print Later” option and then print
Once you have verified the check details, click the “Print Later” button in the “Write Checks” window.
QuickBooks will mark the check as “To Print” and add it to the print queue.
To print the check, click on the “File” menu and select “Print Forms” > “Checks”.
In the “Select Checks to Print” window, select the check(s) you want to print, including the one you marked as “To Print”.
Choose the correct printer and check stock.
Select the print settings, such as the number of copies and the print orientation.
Click “Print” to send the check to the printer.
Verify that the check has been printed correctly and that all necessary information is included.
Reprinting multiple checks in QuickBooks Desktop may be necessary for several reasons. One common scenario is when a batch of checks is lost or stolen, requiring the business to reprint all affected checks. Another reason is when a printer issue or paper jam causes multiple checks to print incorrectly or not at all.
Additionally, reprinting multiple checks may be required if a business needs to reissue checks to multiple vendors or employees due to incorrect information or payment amounts. Furthermore, in cases where a business is transitioning to a new check stock or printer, it may need to reprint multiple checks to ensure compatibility and accuracy.
Access the “Print Checks” window
Open QuickBooks Desktop and select the company files you want to work with.
Click on the “Banking” menu at the top of the screen.
Select “Write Checks” from the drop-down menu.
In the “Write Checks” window, click on the “File” menu.
Select “Print Forms” from the drop-down menu.
Choose “Checks” from the “Print Forms” menu.
The “Select Checks to Print” window will appear, where you can select the checks you want to print.
Click “OK” to proceed to the “Print Checks” window, where you can confirm the print settings and print the checks.
Select the checks to be reprinted
In the “Select Checks to Print” window, click on the first check you want to reprint to select it.
To select multiple consecutive checks, hold down the Shift key and click on the last check you want to reprint.
To select multiple non-consecutive checks, hold down the Ctrl key (Windows) or Command key (Mac) and click on each check you want to reprint.
You can also use the “Select All” button to select all checks in the list.
Review the list of selected checks to ensure you have chosen the correct ones.
Click “OK” to confirm your selection and proceed to the “Print Checks” window.
Print the selected checks
Review the print settings in the “Print Checks” window, including the printer, check stock, and print orientation.
Ensure the correct printer is selected and loaded with the proper check stock.
Choose the correct print settings, such as the number of copies and the print alignment.
Click “Print” to send the selected checks to the printer.
Verify that the checks have been printed correctly, including the check numbers, dates, payee information, and amounts.
Review the printed checks for any errors or omissions.
Sign and distribute the printed checks as needed.
Record the printed checks in your accounting records, including updating the check register and reconciling the bank statement.
Wish you could get more from QuickBooks? Method makes it possible.
Incorrect check printing can result from any of the following common printing issues in QuickBooks:
Check alignment issues: Verify that the check stock is aligned correctly in the printer. Adjust the printer settings or check stock alignment as needed.
Blank or incomplete checks: Check the QuickBooks print settings to ensure the correct printer and check stock are selected. Verify that the check information in QuickBooks is complete and accurate.
Error messages: Check the QuickBooks error log for specific error messages related to printing. You can research the error message online or contact QuickBooks support for assistance.
Outdated printer drivers: Ensure the printer drivers are up to date. Visit the printer manufacturer’s website to download and install the latest drivers.
QuickBooks software issues: Try restarting QuickBooks or restarting the computer. If issues persist, consider reinstalling QuickBooks or seeking assistance from QuickBooks support.
To ensure optimal print quality and alignment when printing checks, follow these tips:
Usehigh-qualitycheckstock: Select check stock specifically designed for printing. It should have a smooth finish and be of appropriate weight to prevent smudging or misfeeds.
Adjustprintersettings: You can configure your printer settings, including paper size and thickness, to match the check stock you use.
Calibrate the printer: Regularly calibrate your printer to maintain precise alignment and consistent print quality.
Verify printer alignment: Use alignment guides or test pages to ensure the printer is correctly aligned with the check stock before printing.
Setthecorrectprintorientation: Confirm that the print orientation matches the layout of the checks and that they print in the correct direction.
Printinsmallbatches: To avoid overloading your printer, print checks in smaller batches. This reduces the risk of misalignment or compromised print quality.
Key takeaways
Reprinting checks in QuickBooks is a surefire way to combat any number of issues that might go wrong with a check.
Remember that:
Reprinting checks is a common practice among businesses.
Reprinting on QuickBooks Online is like reprinting on a Desktop with slight differences.
You can reprint individual or multiple checks.
Altering check numbers can lead to duplicate payments and incorrect accounting records.
Tired of doing the same, repetitive QuickBooks tasks over and over again?
Can I reprint checks with different check numbers?
Reprinting checks with different check numbers is possible in QuickBooks, but it’s essential to understand the implications. When you reprint a check with a different number, QuickBooks creates a new transaction with the updated check number while the original transaction remains in the system. If not managed properly, this can lead to duplicate payments or incorrect accounting records.
To reprint a check with a different number, go to the “Write Checks” window, select the original check, and click “Edit.” Change the check number and save the changes. Then, go to the “Print Checks” window, select the revised check, and print it.
Can I reprint multiple checks at once in QuickBooks?
Reprinting multiple checks is a convenient feature in both QuickBooks Online and Desktop, allowing users to recreate lost, damaged, or incorrect checks efficiently. However, there are limitations to this feature. For example, users cannot reprint multiple checks with different bank accounts or check templates.
Additionally, a check that has already been reconciled or has a payment attached cannot be reprinted. Furthermore, reprinting multiple checks does not automatically update the check numbers or void the original checks, requiring manual adjustments to maintain accurate accounting records.
Can I customize the appearance of my reprinted checks in QuickBooks?
QuickBooks allows users to customize checks to suit their business needs. Users can personalize check templates by adding their company logo, changing font styles and sizes, and modifying the layout to include additional information, such as payment stubs or remittance addresses.
QuickBooks provides a range of customization features, including the ability to add custom fields, create multiple check templates, and use different colors and fonts. Users can also customize the check numbering, date, and memo fields to fit their specific requirements.
If you ever need to hand over the big accounting responsibilities to someone else on your team, this can mean changing who holds the title of primary administrator.
After all, this gives them the most access available, so they can manage settings, users, and all sorts of other features in QuickBooks.
Expecting to hand over the reins soon? Here’s how to change the primary admin in QuickBooks Online in a heartbeat.
What is the primary admin in QuickBooks Online?
The “Primary Admin” is the main user of your QuickBooks account with the most permissions. This is the person who sets up the account at first, but that role can be transferred to someone else later on.
This main admin has full access to everything across the account, which is why changing who the admin is over time may be necessary.
Some of the responsibilities include being the only one who can:
Add, edit, or remove users and change user roles, including Primary Admin.
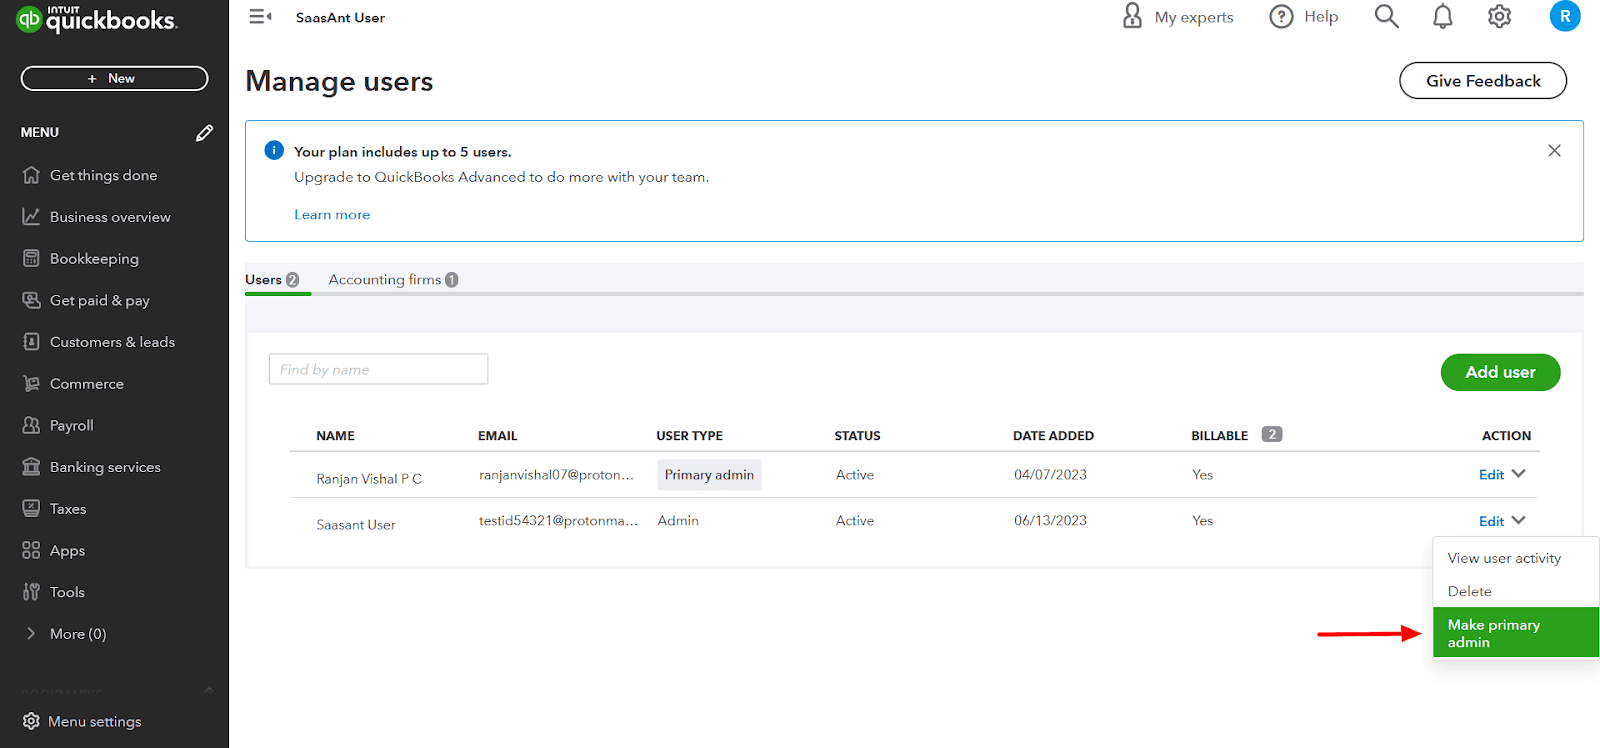
Important steps to change the primary admin in QuickBooks Online
Perhaps it’s a temporary handover to an accountant, a transition in the organization, or a team member or the original admin is leaving the company. Whatever the reason for the change is, QuickBooks makes it easy to assign a new primary admin.
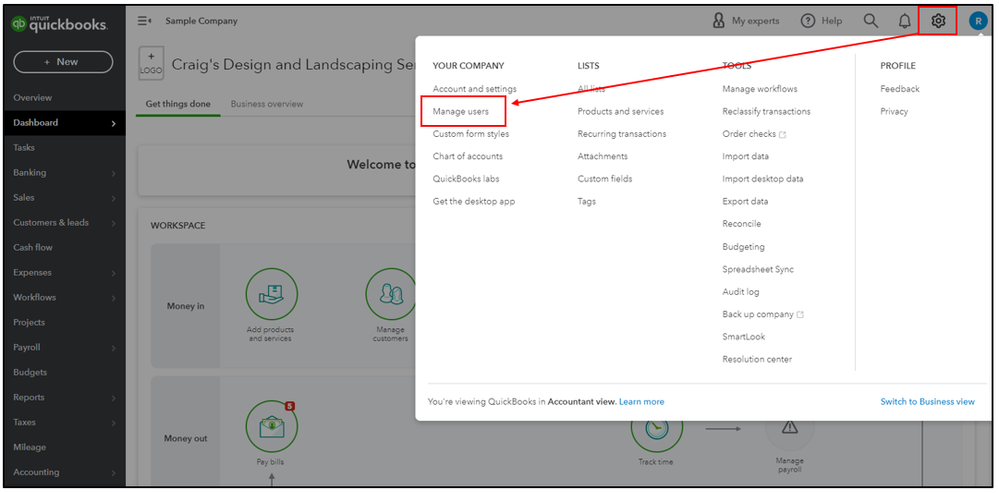
Step 1: Log in to the QuickBooks Online account
The first step is to log in to the QuickBooks account:
Head over to the QuickBooks Online website (or your desktop app, if you have it downloaded).
Enter your email address, user ID, or phone number, and your password.
Click Sign In.
If two-factor authentication (2FA) is enabled, enter the 6-digit verification number you received from QuickBooks via email or text message.
Note that only the the primary admin can transfer this role, so you’ll need to be logged in as that user to carry out the following steps.
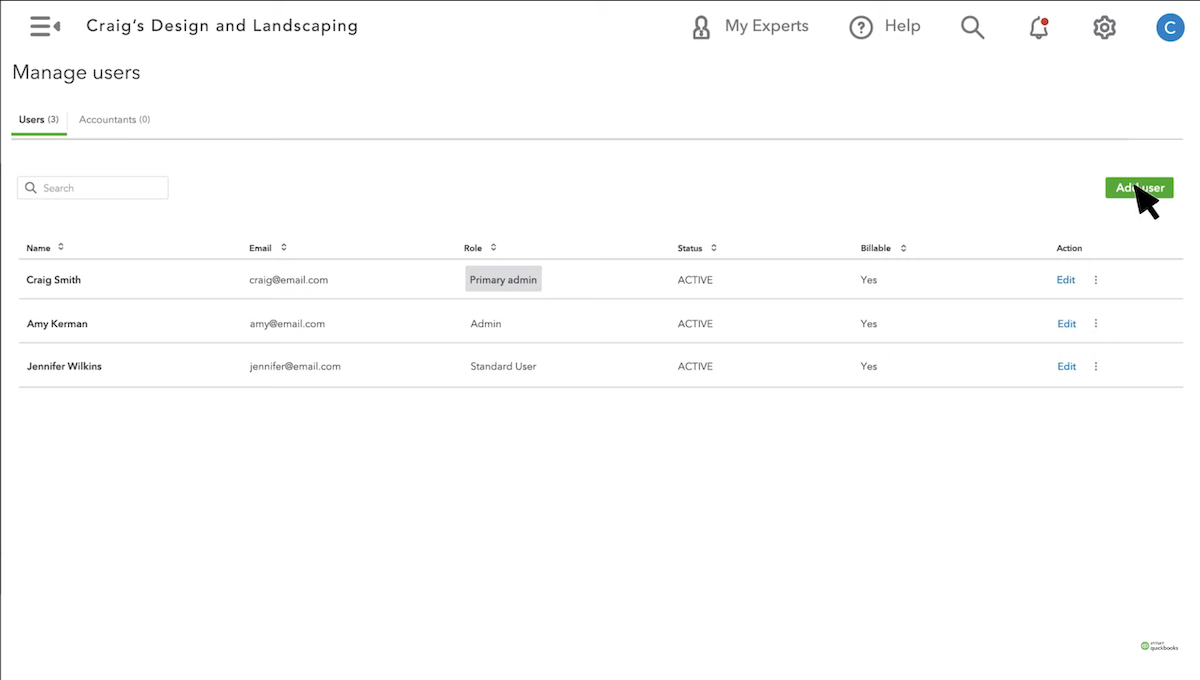
Step 2: Head to “Manage users” tab
Then, you’ll need to locate the part of your settings that lets you manage users:
Click on the gear icon in the top right-hand corner of your dashboard.
Access the “Manage users” menu option under “Your Company.”
For QuickBooks Desktop, the process is a little different. That’s because there’s both a primary Intuit Account Admin and a Primary Company Admin, which you’ll have to take note of as the roles are different.
In a nutshell, the Primary Company Admin is focused on managing user access and administrative tasks specific to a single company file within QuickBooks Desktop. On the other hand, the Primary Intuit Account Admin oversees broader account-level responsibilities across all Intuit services tied to that account (e.g., subscriptions, payroll, payments).
To transfer the primary company admin:
Open QuickBooks Desktop and log in as the current primary admin.
Select “My Company” in the “Company” menu.
Click on “Manage Your Account” (you may need to sign in with your Intuit Account credentials).
Scroll down to the “Primary Contact” section and click on “Change.”
If the new admin is already listed as a contact, select them from the list. If not, invite or add the new user by entering their details, and ensure they accept the invitation.
Once the new primary contact is selected, click “Save and close.”
If you’re looking to change the Primary Intuit Account admin:
In QuickBooks Desktop, go to “Company” > “Users” > “Intuit Account User Management.”
Locate the secondary admin you want to promote to primary admin. If they are not listed, add them first.
Click on their name, then select “Edit,” and choose “Change Primary Admin.”
Enter the verification code sent to the new admin’s phone number or email.
The new admin will receive an email invitation to accept their role as primary admin. Once accepted, they will become the primary Intuit Account admin.
Transferring primary admin abilities in QuickBooks Online
In some cases, you don’t want to officially give over the official primary admin role to another person. That calls for a simple change in roles and permissions, which you can assign and change in your settings as well. To do so:
Go to your settings by clicking on the gear icon on your dashboard.
Select “Manage users” under “Your company.”
Click “Edit” next to the contact you want to change.
Choose a specific role in the “Roles” area, and you’ll be able to see what they can and can’t edit or access within the QuickBooks account.
Add or remove additional permissions at the bottom of the page.
Stop spending your day sending emails, estimates, and invoices.
What permissions and roles a primary admin hold in QuickBooks Online.
How to change the primary admin in QuickBooks Online.
How to change the primary admin in QuickBooks Desktop.
How to add new users to your user list.
How to transfer primary admin abilities in QuickBooks Online.
By understanding these processes, you’re set up to manage admin roles and permissions in QuickBooks exactly according to your needs. This ensures your team has the access they need while maintaining control over your business’ financial data.
Method: A better way to manage QuickBooks user permissions
Have some doubts about changing the primary administrator in your QuickBooks Online account, or just want more control over who gains access to your sensitive financial data?
While QuickBooks allows you to assign a primary admin to oversee your account, Method CRM provides a more flexible solution for granting your team access to the data they need without jeopardizing sensitive financial information.
Method keeps your financial data safe and secure and provides everyone who needs it a complete look into your business performance. Rather than risk a full permissions overhaul, your team can access the data they need without risking your account.
Plus, with Method, you can:
Automate repetitive admin workflows.
Personalize user access.
Track every contact (leads, customers, and vendors) detail, interaction, and transaction.
Give your customers 24/7 self-serve tools to access documents and make payments.
And much more!
See what else is possible in our video demo below:
Ready to try it for yourself? Try Method free for 14 days—no credit card required.
How to change the primary administrator in QuickBooks Online FAQs
Who should be primary admin in QuickBooks Online?
The primary admin should be someone who needs to have those permissions and that level of access in the first place. If they need access to everything from subscription details to tool integration and bookkeeping information, it’s a smart idea to assign them as primary admin, so long as they’re able to handle the responsibilities that come with the role. As the primary admin has full control over the back end of the business, they need to be trustworthy and capable, given the amount of sensitive information they’ll be dealing with.
Can QuickBooks have two administrators?
QuickBooks can certainly have two administrators, but there can only be one primary admin. While the primary admin has access to absolutely everything in the account, other users with “all-access” roles won’t. The “all-access” role lets them access customers and sales and make changes to certain accounts and reports, but they won’t be able to manage other users or manage deeper aspects of the business.
What is the difference between primary admin and admin in QuickBooks?
Primary admins:
Full authority over the account.
Can transfer the primary admin role over to someone else.
Can manage subscription and billing.
Authorizes changes from other users.
Has full user management capabilities.
Regular admins:
High-level access but no ownership.
Limited control over more granular aspects.
Can manage users but can’t change the primary admin.
Requires primary admin approval for some changes and actions.
Applying vendor credits properly won’t just help your business save a little money but also help you keep your financial records up to scratch. That means keeping your healthy bookkeeping alive, which is a must for any company.
QuickBooks Online has the very useful ability to manage vendor credits within the system, letting small and medium-sized businesses deal with the entire process in one place.
Keep reading to learn how to apply vendor credits in QuickBooks Online with ease.
What is a vendor credit in QuickBooks?
Vendor credits represent amounts owed to you by a vendor, like bill credits or refund checks, that can later be applied to future bills or services. Where do they come from? Perhaps you’ve been overcharged or there was a mistake on the vendor’s end—this means they’ll need to refund you in some way.
If you’ve ever been a customer at any store, you’ll know that refunds aren’t always given. Sometimes, you’re offered store credit that you can use on a future purchase. Vendor credits in QuickBooks work the same way, where the amount owed is tracked and applied towards future bills and updated in your records.
Running your business takes more than bookkeeping.
Step-by-step guide to apply vendor credits in QuickBooks Online
Need to apply vendor credits in QuickBooks? The platform makes it easy for you to record them and either apply them to a bill now or later on. The process can be done in a few simple steps, which we’ll demonstrate below.
Recording the vendor credit
Vendor credits should always be recorded accurately. So, check, double-check, and triple-check your entry before you move on, as these credits will reduce your accounts payable and keep your financial statements sound. You don’t want to misrecord only to run ro issues when auditing or filing taxes, particularly with large amounts.
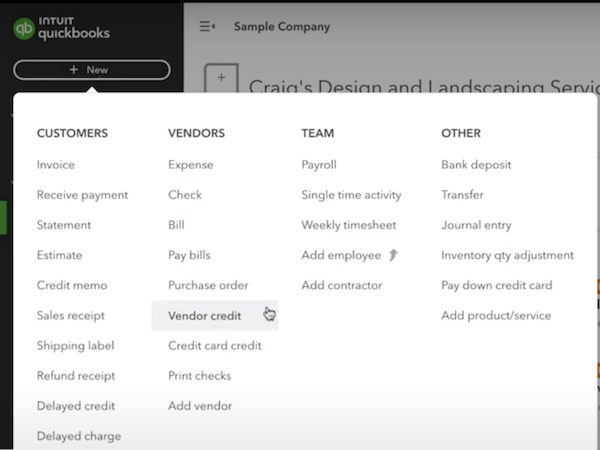
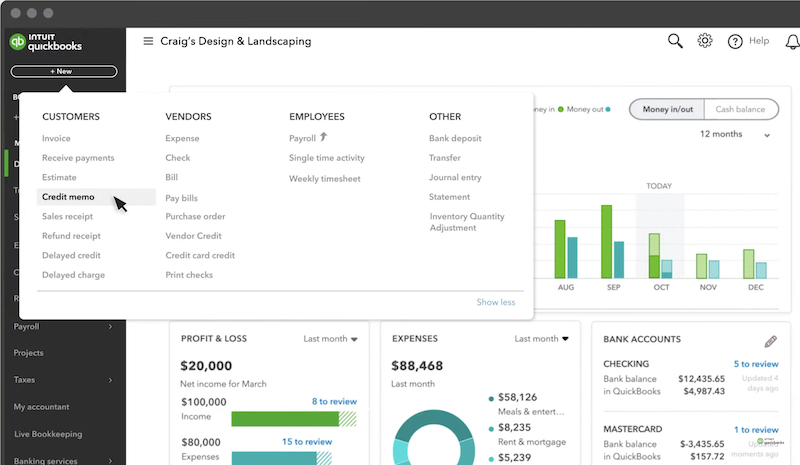
1. Navigate to the “+ New” button
Once you’ve logged into your QuickBooks Online account and have navigated to the dashboard, click the “+ New” button in the left-hand sidebar.
Once everything is filled in, be sure to click “Save and close” to confirm. You should see a pop-up at the top of your screen confirming your vendor credit saved successfully.
Stop spending your day sending emails, estimates, and invoices.
While you might not have gotten a refund to your original payment method, vendor credits are made to be used so that you can reduce the amount payable from that vendor. When you use those credits for bills, you match your records to your expenses more accurately. Ready to apply those credits to a bill you just received? Follow these instructions.
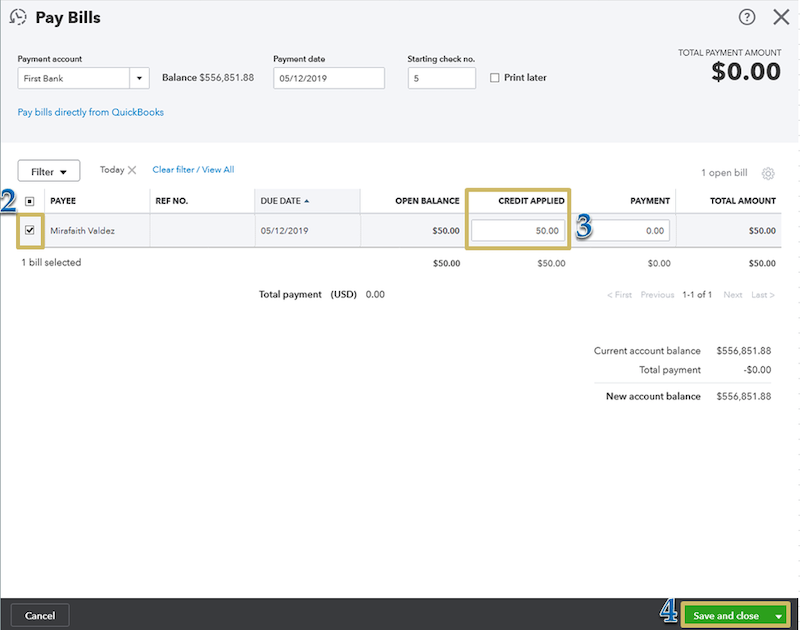
1. Click on “Pay Bills”
Your first course of action is to find the bill to which the vendor credit needs to be applied. To do so, click on “+ New” from the dashboard and select “Pay bills.” From there, you’ll find a list of bills that you can choose from.
2. Select the applicable credit in the “Credits” section
Find and choose the correct vendor from the list
Under the “Credit Applied” field, you’ll automatically see that available credit associated with that specific vendor. That makes it much easier to apply these credits towards future bills without the manual effort.
3. Confirm the credit amount and apply it to the bill
After completing the rest of the fields like you would when you pay a regular bill, ensure that the credit is present within that bill before you pay. Then hit “Save and close” to set the credit in place.
Applying the vendor credit to a future bill
If you don’t want to apply your vendor credit to your most recent bill, it’s also possible to wait to apply it to a future bill. Simply unmark the vendor credit on your bill, and it won’t be applied. You might want to do this to avoid using it on partially paid bills or for strategic reasons when you’re expecting a larger bill coming up. It can be smarter to hold off and apply that credit in moments when you’ll need it most.
Tips for efficiently managing vendor credits
The better you manage your vendor credits, the more you can improve your cash flow and financial management. But the reality is that business finances can get tricky, which is why you should take advantage of these tips to ease the burden.
Reconciling vendor statements regularly
Make sure to consistently review your vendor statements to see if they’re accurate and align with your financial records. Reviewing them at regular intervals will ensure you don’t miss anything too far in the future when it’s too late and you have many instances of misreported expenses. With accurate books in the long run, you won’t have to scour through months or even years of statements to find those missing credits.
Setting up reminders
Automated alerts are built into QuickBooks for good reason — to keep you on track and so that you don’t forget about credits that are about to expire. Business owners often have to juggle a variety of tasks, inside and outside of finances, so giving yourself a reminder will help you stay ahead of any upcoming payments.
Utilizing QuickBooks Online reports
As a financial management software, QuickBooks Online presents a variety of useful reporting features. The types of reports included will vary depending on your subscription but work on any operating system, with the highest-tier Plus plan giving you access to all of them.
There are a couple of vendor-related reports, including the:
Vendor Balance Detail.
Vendor Balance Summary.
Expenses by Vendor Summary.
Purchases by Vendor Detail.
Transaction List by Vendor.
Vendor Contact List.
These lists will give you a rundown of outstanding balances, including those vendor credits you have yet to use and what’s been applied. In addition, they won’t just showyou those details, but give you insights to understand and manage your overall spending with each vendor.
Creating a standardized process
Since managing your expenses relies on consistency and accuracy, creating a standardized process for handling vendor credits is a must for achieving this. With clear steps that can be repeated every time vendor credits need to be handled, anyone on your team can record and apply credits properly without the risk of costly mistakes.
What happens if I apply too much vendor credit to a bill?
Having a standardized system can’t be emphasized enough, especially when it comes to overapplying vendor credits. While you might forget to apply credits once in a while, overapplying is much more damaging to your bookkeeping. If you happen to forget, you’ll end up with a credit balance on your account, which can cause some confusion later on. The solution is to make sure everyone is on the same page. Contact the vendor to ask if those credits are reflected on their end and ensure they don’t change anything administratively.
Key takeaways
As long as you have a proper system in place that can be easily followed by all relevant parties on your team, handling vendor credits in QuickBooks is easy as pie. From this article, you’ve learned:
That a vendor credit is a monetary credit that can be used for future bills and purchases.
How to record and how to apply vendor credits to QuickBooks bills.
That you should reconcile your vendor statements, use QuickBooks’ online reports, and create a standardized process for vendor credit management.
If you’re ready to save time on all the QuickBooks manual data entry, consider integrating with tools like Method. As the #1 CRM for QuickBooks users, Method simplifies your workflow by instantly syncing customer data, invoices, and payment details between QuickBooks and your CRM system. This integration:
Eliminates the need for double data entry.
Gives your customers self-service tools for convenience.
Reduces human errors through user permissions, making your accountants happier.
Ensures that your financial information is always automatically up to date.
Check out the video below to see more about what Method does for your business.
QuickBooks Online lets you apply a single vendor credit to multiple bills, which is particularly helpful if you’ve got more than one outstanding invoice from that vendor. If the credit amount is more than the amount on a single bill, for example, you might want to be able to distribute that credit and use it up entirely.
Can I apply a vendor credit to an invoice?
Vendor credits can’t be applied to invoices. Why? Because of the direction of payment. Invoices are sales documents that you issue to your customers, while bills are charges owed to vendors. Similarly, they cannot be applied to payroll.
Do vendor credits expire?
Vendor credits don’t have expiration dates in QuickBooks Online, but there might be a timeframe set by the vendor. You might have to apply credits onto a bill within 90 days, for example, which means you should stay well on top of those reminders and reviews to avoid losing out.
Credit card payment fees are sneaky, and sometimes feel as though they’re chipping away at your hard-earned profits.
If your business uses QuickBooks, you’ll be happy to know that the platform doesn’t make these fee structures overly complicated.
In this guide, we’re breaking down exactly where and when QuickBooks payment processing fees occur and which transactions you can expect to be charged a little extra for.
Keep reading to learn once and for all: how much does QuickBooks charge for credit card payments?
What are QuickBooks credit card processing fees?
No one enjoys hidden fees that pop out of nowhere, but thankfully, QuickBooks is quite transparent when it comes to what transaction types they process and how much they charge to process them.
Here’s a detailed rundown on the types of fees you’re likely to encounter when using QuickBooks credit card processing. Exact transaction fees are below.
Invoicing and quick request rates
Cards: Fees apply whenever customers use Visa, Mastercard, or American Express to pay an online invoice or quick payment request.
Digital wallets: You can accept payments via Apple Pay, Google Pay, PayPal, and Venmo. As these are typically connected to credit and debit cards, expect those same transaction fees to apply when customers settle invoices using digital wallets online (2.5%).
ACH bank payments: These are electronic bank transfers that move funds straight from your customer’s account to yours.
Card reader rates
In-person card payments: For face-to-face transactions, or when customers tap, swipe, or insert their cards into a reader, charges and processing fees apply. This applies to any accepted payment cards such as MasterCard, Visa, and American Express.
In-person digital wallets: You can also accept payments through Apple Pay, Google Pay, PayPal, and Venmo using a card reader during in-person transactions.
Keyed-in payments
Processing fees of 3.5% per transaction also apply when you need to manually type in your customer’s card details to process a payment. This includes all major credit cards.
Payment dispute protection
QuickBooks offers automatic protection for credit card and debit card disputes and is an optional extra that attracts processing charges on top of the ones listed above. They’ll cover up to $25,000 per year, with an individual dispute limit of $10,000.
Grow your business without leaving QuickBooks Online.
Breaking down QuickBooks credit card processing fees
Now you’ve got a handle on what you’re being charged for when processing credit card payments, let’s look at the percentage deduction for each type of transaction. Knowing what you’re charged upfront makes it easier to budget and keep expenses in check.
So, how much does QuickBooks charge for credit card payments? Here’s a quick breakdown of what you can expect to pay per transaction based on how your customers choose to pay:
Online invoices and quick requests (cards and digital wallets): 2.99% per transaction, but this varies based on factors such as transaction type and volume.
In-person payments (using a physical card reader): 2.5% per transaction.
Keyed-in card payments (manual entry): Flat rate for keyed entries at 3.5% per transaction.
ACH bank payments: Fee of 1% per transaction, but this fee is capped at $10 for transactions exceeding $1,000.
Instant deposits to QuickBooks and external accounts: 1.75% fee (or free with QuickBooks Checking accounts.
Payment dispute protection: Starts at 0.99%.
These rates cover transactions made using Visa, MasterCard, Discover, American Express, Apple and Google Pay, PayPal, and Venmo.
Importantly, take notice that manually keyed-in payments attract higher fees than swiping and tapping, and it’s important to record accurately all of these transaction fees when it comes time to reconcile.
How to record credit card processing fees in QuickBooks
Tracking fees isn’t exactly the highlight of running a business, and you might be wondering why you even need to do it, given that fees are deducted automatically.
The reason why it’s good practice to keep track of all these fees is because it provides both justification for the final invoice and accounts for any discrepancies come reconciliation time.
The good news is that QuickBooks makes this process easier than you think. Let’s walk through it step-by-step:
Step 1: Access your expenses
Log into QuickBooks and click on the “Expenses” tab on the left-hand menu (then click “Expenses” in the drop-down). This section of the platform is basically your command center for keeping tabs on where your money goes.
Click on “New Transaction” and then select “Expense.” Now it’s time to officially put that fee on the record.
At a minimum, fill in these key details:
Payee: Type in “QuickBooks Payments” or just the name of your payment processor.
Payment account: Pick the bank account where the funds from your customer payments end up getting deposited after the credit card payment.
Date: Enter the exact date when the transaction fee was charged.
Amount: Record the processing fee according to the invoice. Be precise here, you’ll thank yourself later when sorting out reconciliation discrepancies.
Under “Category,” choose “Bank Charges” or create a meaningful custom label like “Credit Card Processing Fees.” Organizing it this way makes it a whole lot easier to track down later.
Optionally, you can add a memo if you want to include any extra details about the fee.
Step 4: Save and reconcile
Hit “Save and Close.” Just like that, you’re one step closer to a picture-perfect ledger. When it comes time to reconcile your bank statement, make sure this entry matches up.
Pro tips to stay on top of it all
Double-check the numbers, then check them again. Before hitting save and closing it off, give a few extra seconds to make sure you’ve got everything right.
It’s painful, we know, but you should regularly reconcile your accounts. Think of it like a financial tune-up. Once a month is a good practice.
Keep statements and records from QuickBooks handy. At some point, you’ll need them for quick reference, and exporting takes time you may not have.
For more information on QuickBooks payment fees, check out our video below breaking down everything you need to know.
Why use QuickBooks for online payments?
This is an important question, especially in light of some of the more expensive transaction fees. Understand that there are several benefits to keeping everything, including online payments, under one roof:
As a user-friendly platform, once you’re used to using QuickBooks, you’ll never look back. Everything is placed intuitively, and all aspects of accounting, tracking, and invoicing are integrated into one platform.
You can access your money faster. Payments in QuickBooks generally hit your account within one business day. While it’s not quite a “real-time” payment platform, it’s close enough to keep your cash flow steady.
The team at Intuit is always ready to help when you run into issues. Their knowledge base and help center articles are also easy to go through when you’re in a rush, and if you can’t find what you need there, the community is ready to help.
There are lots of payment options for customers. QuickBooks accepts all major credit and debit cards plus popular digital wallets. Essentially, more payment options mean it’s easier for your customers to work with you.
Why you might not want to use QuickBooks for online payments
Using QuickBooks for online payments makes sense if you’re looking to combine everything into an easy-to-use and comprehensive platform. But it’s not without its limitations, which is where integrating tools with the platform you know and love goes a long way.
Here are a few drawbacks to keep in mind, not only for QuickBooks but most small business accounting platforms:
Fees add up: When you’re using QuickBooks for online payments, you’re not just paying for the processing fee. You’re paying for the convenience of having everything all in one place, and these fees can really start to add up.
Occasional software issues: Like any online platform, QuickBooks can have the occasional glitch. If it happens at just the wrong moment, it can leave customers pretty frustrated.
Customization sometimes isn’t really that custom: QuickBooks is known for its lack of “uniqueness” in some areas, like tailored invoicing and payments. You can also face issues integrating it with your existing systems.
Locked-away features: A lot of the more useful features, like multi-currency and budget management, are only available on higher-paid tiers. For some small businesses, access to these features might come at a cost you can’t afford.
None of these drawbacks are real deal-breakers, and the good news is using a platform like Method negates most of them anyway. Method integrates perfectly with QuickBooks, giving you more control over your customer payments while also providing access to more useful reporting and lead generation features than are available on the native QuickBooks platform.
Wish you could get more from QuickBooks? Method makes it possible.
Want to keep using QuickBooks and hold onto more of your hard-earned money? There are a few practical ways to cut down on those processing fees.
First, you can incorporate those processing fees into your final invoices. Most vendors and customers understand that covering the processing fees is all part of the business—and they probably already do it themselves.
Picking the plan that best fits your business can also help. Some plans offer better value than others, especially if you’re paying for services you don’t actually use. Tapping or swiping cards for payment also typically costs less than a manual key-in. For digital wallets, swiping and tapping costs you less in fees than paying online.
Finally, try and convince your customers to pay using ACH rather than a card. If they’re QuickBooks users, they can deposit money using the platform instantly for a much smaller fee of 1% per transaction (capped at $10 for transactions over $1,000).
Key takeaways
Here is a quick recap to help you stay on top of those credit card processing fees:
Get familiar with fees and understand what QuickBooks is charging you for, it’s the first step in managing costs and avoiding surprises.
Keep track of those fees by logging them in QuickBooks, it keeps your ledger clean and makes reconciliation much easier.
Keep looking at the bigger picture, QuickBooks payments, accounting, and financial management all under one roof make sense for small businesses.
Integrate your existing CRM and QuickBooks with Method and experience simplified operations, better invoicing management, and a better chance at helping your business grow.
If you’re already using popular payment gateways like Stripe, Authorize.Net, or PayPal, solutions like Method have those integrations built right in. Plus, you get:
24/7 self-serve portals for easy invoice payments.
And yes, everything syncs back to QuickBooks without you lifting a finger.
But here’s the best part: you can tailor the experience to match your branding and processes, so you look as polished as you are.
This isn’t just about payment options. It’s about giving your customers a smooth, professional experience that sets your business apart. Check out the video below to see more of what Method makes possible.
Ready to see for yourself? Try Method free for 14 days—no credit card required.
How much does QuickBooks charge for credit card payments FAQs
What is a reasonable credit card processing fee?
Credit card processing fees typically hover around the 1.5% to 3.5% mark per transaction, depending on the provider and method of payment.
QuickBooks falls within that range, typically charging between 2.5% and 3.5%, so their rates are what is considered “reasonable.”
What counts as reasonable to you usually depends on your business priorities, whether you’re okay with paying a little extra for the convenience of having everything done under one roof.
How can I avoid QuickBooks fees?
You can accept cash and checks as payment, but you will end up paying for it in other ways like time spent manually processing and entering payment details plus a trip to the bank.
Another option is to use another payment processor, but it might not integrate with QuickBooks, leading to more manual work.
Does QuickBooks charge fees for credit card refunds?
Unfortunately, yes. You can issue refunds to customers, but QuickBooks keeps the transaction fees from the original transaction. Depending on your pricing plan, you could also be charged extra to refund the money. Consumer law also dictates that you cannot deduct this extra processing fee, you must provide a full refund of the customer’s invoice.
Tired of unpaid invoices piling up in your QuickBooks? Unpaid debts slowly create chaos in your accounts and put your business’ financial health at risk. Unfortunately, they’re the kind of problem that won’t go away on their own, and the longer you wait, the messier things become.
Thankfully, you can get your books back in order by writing off the debt. With this step-by-step guide, you’ll learn how to write off bad debt in QuickBooks in order to tidy up your accounts for a much sharper view of where your business finances stand.
What does writing off bad debt in QuickBooks mean?
Writing off bad debt is about accepting that a customer just isn’t going to pay their invoice — and then clearing that amount from your accounts receivable. It’s a way to make sure your records reflect the money you’re realistically going to collect, helping to keep your finances reliable and clear.
Unpaid debts unfortunately don’t just sit there harmlessly. The more bad debt you allow to pile up, the more it can mess with your business in ways you might not expect.
All those unpaid invoices can make it look as though you’re earning more than you actually are, giving a not-so-accurate profit forecast. Plus, chasing after debts that won’t get paid is a time sink and a waste of money, often resulting in nothing to show for it.
Worse still, you could end up paying taxes on income that never made its way to your account. Simply ignoring bad debt throws off your financial accuracy and can lead to decisions made based on bad data.
Take care of this debt head-on, and keep your accounts reflecting the position of your business much more clearly.
Push QuickBooks Online further than ever with Method.
How to write off bad debt in QuickBooks in 5 steps
If you’ve decided it’s time to write off bad debt, there’s an easy and straightforward process to getting it done in QuickBooks.
Note: The process for writing off bad debts may vary depending on your region’s accounting standards or tax regulations (e.g., U.S. vs. U.K.). Consult with an accountant familiar with your local requirements.
Let’s take a look at how to write off bad debt in QuickBooks Online.
Step 1: Open up the invoice you want to write off
Start by pinpointing the invoice that’s been causing the issues.
Open QuickBooks Online, go to “Accounts Receivable,” and find the invoice in question.
Double-check the customer details to make sure it’s the correct invoice, and confirm you’ve done everything reasonable to collect the payment
If you’re unsure which invoices are outstanding, you can create a report that outlines them for you:
Go to “Reports,” find and open an “Accounts Receivable Aging Detail” report.
Check which invoices and accounts are currently outstanding.
Best practice is to review this report monthly or quarterly to identify overdue invoices that may need follow-up or write-off as bad debt. After writing off bad debts, consider running a Profit and Loss (P&L) statement to ensure your financial records reflect accurate income and expenses.
Step 2: Set up a bad debt expense account
If you don’t have one already, you’ll need a specific account to keep track of uncollectable debts.
To set one up, go to your “Chart of Accounts,” click “New,” and then select “Expenses” as the account type. Name the account “Bad debts,” then save and close it.
Why this matters: This account will let you organize and track all of your bad debts in one place, so your financial statements stay clean and easy to understand at a glance.
Step 3: Create a credit memo
A credit memo helps balance out the unpaid invoices on your books. Using a credit memo ensures that your accounts receivable records remain accurate and provides an audit trail for tracking bad debts.
Generate the memo: Select “+ New” and then select “Credit memo.”
Go to the “Customers” menu and select “Bad debts” from the “Product/Service” section. Choose the customer you want to link to the bad debt.
In the “Amount” column, enter the exact amount you need to write off.
Ensure that the sales tax is included in the credit memo if applicable. This prevents overpaying taxes on income that was never received. You’ll need to reconcile sales tax reports after creating credit memos for bad debts.
Add the details: In the “Message displayed on statement” box, you can simply enter “Bad Debts.” This will appear on your balance statements.
Here’s where you can clear that unpaid invoice for good.
Go to “Receive Payments” under the “Customers” menu, select the customer, and check both the unpaid invoice and the credit memo to apply the credit. QuickBooks automatically selects the credit memo and the oldest open invoice, but make sure to double-check that this is the correct one. If it’s wrong, you’ll have to deselect the defaults and select the correct ones manually.
Finally, it’s time for you to wrap things up to ensure your financial records reflect the change.
Click “Save and close” to record the transaction and update your QuickBooks account.
Run the “Aging Accounts Receivable” report again to verify the invoice is no longer listed as outstanding.
And that’s how to write off bad debts in QuickBooks — you’re all done! Follow these steps for each of your outstanding invoices and you’ll get a much cleaner view of your company’s financial standing.
Why should you write off an invoice?
Unpaid invoices sit firmly in the “quiet but harmful” category. They can distort your financial reports and leave you with a misleading picture of your business’ performance.
Writing them off in QuickBooks helps make sure that your records reflect reality and not just wishful thinking.
As painful as it is to finally accept an invoice isn’t getting paid, taking this step does have several real advantages for your business:
Smarter cash flow management: Once you acknowledge that certain debts just won’t get paid, you can manage your budget, investments, and spending far more effectively.
Potential tax relief: Writing off your debts and thus reporting the correct cash flow to the IRS means you’ll be reducing your overall taxable income — significantly reducing your tax burden.
When a customer pays less than the invoiced amount, that’s what we refer to as an “underpayment.” These still constitute an unpaid amount and can have the same effect on your accounts as bad debt.
Handling these in QuickBooks is quite similar to writing off a bad debt:
Update the original invoice to match the real amount received is your first step.
If you do ultimately decide to stop pursuing the remaining balance, issue a credit memo for the unpaid portion.
Allocate the unpaid amount to the bad debt expense account using the same steps as writing off an entire unpaid invoice.
Wish you could get more from QuickBooks? Method makes it possible.
The difference between just plain old debt and “bad debt” is simply that bad debt refers to any money you’re owed but can’t recover. Beyond the initial effects of hurting your revenue, bad debt clouds your understanding of how your business is performing.
Here’s how to tackle bad debts and minimize their impact:
Run credit checks: Before executing a contract with any new customers or vendors, perform a basic credit score check. Contacting one of the three main credit agencies in North America can help you with this. These are Equifax, TransUnion, and Experian.
Set clear terms: Be upfront with what you expect in terms of payment deadlines. Set these expectations early on, before it becomes a problem, not after.
Follow up quickly: Don’t let any overdue invoices linger. Send reminders and follow up consistently to encourage payment.
Use software: If you’re reading this, you’re already using QuickBooks, but integrating your accounting systems with a platform like Method means you’ll have a better picture of your customers and automated routines to remind you when invoices are up for payment.
Just like taxes and depreciation, bad debts are unavoidable in business. But unlike your customers who don’t pay their invoices, you do have control over how you manage them.
Writing these off can make a huge difference in how your business copes with bad debtors.
Avoid these common mistakes when writing off bad debt in QuickBooks
Even with all the best intentions in the world, mistakes do happen when writing off debt in QuickBooks. Here’s how to steer clear of them and leave no gaps in your financial history.
Mistake 1: Losing valuable information
Yes, we know it’s tempting to just hit the delete button on bad debt, but doing so wipes out essential transaction history. This will disrupt and corrupt the audit trails and leave a lot of “please explain” gaps in your records.
How to protect your data:
Always use a credit memo to write off bad debts to keep them visible.
Avoid deleting invoices entirely so your transaction history stays complete.
Regularly back up your QuickBooks data for restore points before making significant changes, such as writing off bad debts.
Mistake 2: Items marked as unbilled
If the worst should happen and an invoice does get deleted, any items or services that were associated with it will automatically revert to an “unbilled” status. This leads to a snowball effect, creating more inaccuracies in your accounts receivable.
What to do instead:
Stick with creating credit memos rather than deleting invoices.
Review your “unbilled items“ after writing off a debt to make sure nothing is left floating.
Update the billing status for all items or services to keep your records accurate.
Mistake 3: Overpaying on sales tax
Of all the mistakes, this one probably hurts the most. If you forget to record your sales tax after writing off bad debt, you could end up overpaying your tax. Essentially, you would be paying taxes on income you never received — you can see why it hurts.
How to avoid overpaying:
Always include the correct sales tax on all credit memos.
After making write-offs, immediately double-check and reconcile your sales tax reports.
If in doubt, get your accountant to look over everything. A fresh set of professional eyes can catch mistakes that have been staring you in the face and get everything back on track.
There you have it, a definitive guide to writing off bad debt from those invoices that have caused havoc on your books. Let’s do a quick recap:
Stay on top of your receivables by regularly monitoring unpaid invoices to keep potential debts firmly under control.
The steps for how to write off bad debts in QuickBooks are simple and easy to follow. Remember to create a memo and assign the correct customer invoice to the newly created bad debts expenses account.
Use the tools QuickBooks gives you, like credit memos and reports, to keep your bookkeeping accurate and your accountant happy.
Keep your records spotless by following this step-by-step guide to writing off bad debts in QuickBooks. You’ll have a more consistent and reliable dataset on which to base the future direction of your business.
Ready to make financial management easier?
Take things a step further by integrating QuickBooks with Method CRM. With an unbeatable two-way sync with your accounting software, Method ensures that your QuickBooks data stays untouched, up-to-date, and error-free. All changes you make in one platform instantly and securely reflect in the other.
One of Method’s standout benefits is how it simplifies managing overdue invoices and identifying bad debt. While the process of writing off bad debt is completed in QuickBooks, Method makes it easier with tools to track unpaid invoices and customer payment histories in one centralized platform. This makes it easier to identify problem accounts and take action without disrupting your financial records.
The best part? Give your team full visibility into key contact details, including:
This complete view means you can make informed decisions — whether it’s adjusting credit policies or following up on overdue payments — while reducing the risk of costly mistakes caused by manual processes.
By automating data synchronization between Method CRM and QuickBooks, you can ensure that your financial records remain clean, compliant, and error-free. Check out the video below to see just some of what Method makes possible.
Bad debt in QuickBooks refers to money that’s owed to you (generally via an unpaid invoice) that, despite all efforts, you have determined won’t be paid.
QuickBooks allows you to write off these unpaid invoices as “bad debt expenses.” Recovering bad debt involves reversing the write-off by applying the payment to the previously written-off invoice and adjusting accounts accordingly.
The process removes the amount from your accounts receivable, ensuring that your financial reports reflect only the amount that you’re likely to collect.
Can I recover a bad debt after writing it off in QuickBooks?
Yes, bad debts can still be recovered even after they have been written off in QuickBooks. If a customer does end up paying their invoice after the fact, you can record the payment and reverse the bad debt write-off.
This process automatically updates your accounts receivable and financial statements to show the amount that has been recovered.
How frequently should I review my accounts receivable for bad debts?
Get in the habit of creating an “Aging Accounts Receivable” report to check your accounts receivable for bad debts at least once a month.
Regular checks help you catch unpaid invoices and increase the chance that you may be able to recover the debt before having to write it off. Pop it in your schedule to make sure your financial statements at months-end reflect an accurate cash flow.
Just got a new computer? Great. Before you get back to work, you’ll need to transfer QuickBooks to your new device. It’s important to keep your financial data intact and ensure everything runs smoothly.
Wondering how to transfer QuickBooks to a new computer without disrupting your business?
In this article, you’ll get a step-by-step guide that takes you through the entire process of transferring over to a new computer on Windows. Let’s get started.
What does transferring QuickBooks files to a new computer mean?
Learning how to transfer QuickBooks to a new computer is a lot like moving to a new house. Like your furniture, you’ll be using the exact same tools, settings, and data — just in a different space.
QuickBooks file transfer involves:
Installing QuickBooks on your new computer.
Backing up your company files from the old one.
Restoring those files onto the new system.
It’s about making sure that not just your software, but also your data, user preferences, and customizations all make the move too.
Sick of hunting for spreadsheets when updating your QuickBooks data?
You can move QuickBooks Desktop from an old computer to a new one with a few straightforward steps that ensure all your vital financial data, configurations, and custom settings are safely transferred.
Step 1: Prepare to use the QuickBooks Migrator Tool
The first step is to access the QuickBooks Migrator Tool within the QuickBooks software. The tool is designed to simplify moving QuickBooks files from one computer to another.
Before you can use the QuickBooks Migrator Tool, there are a few things you need to prepare for:
Administrator access: You must have admin rights on both your old and new computers.
External storage device: You need a USB drive with sufficient storage capacity to transfer your QuickBooks data. It’s recommended to use a drive with at least 16GB of free space.
Updated QuickBooks version: Ensure the software is up to date on your current computer. The Migrator Tool is only available for QuickBooks Desktop versions 2018 and newer.
Stable power source: Connect both computers to a power source to prevent interruptions during the process.
Password setup: Be ready to create a password to secure your data transfer.
Also, close all other applications before starting the migration process. Doing this:
Frees up all your computer’s resources for the migration process, reducing the risk of errors.
Prevents interruptions that might corrupt your data.
Enhances transfer speed.
Avoids conflicts that may cause the QuickBooks Migrator Tool to malfunction or fail.
Step 2: Understand how the QuickBooks Migrator Tool works
Before you launch the QuickBooks Migrator Tool, you need to know how it works to avoid any issues.
First, it creates a one-time password that you’ll use to unlock your files during the transfer. It then moves your QuickBooks company files and all supporting documents to a USB flash drive.
Once you’ve transferred the USB to your new computer, the tool automatically downloads the correct version of QuickBooks Desktop, ensuring that your files are correctly installed and ready to use without reformatting your drive or erasing any existing files. This automation minimizes the risk of data loss and makes the process much easier for you.
To protect your data, the QuickBooks Migrator Tool uses several security measures:
Password protection: The tool requires you to create a one-time password for your data files, ensuring that only you can access them during the transfer.
Data encryption: When copied to the USB drive, your QuickBooks files are encrypted, providing an additional layer of security to prevent unauthorized access.
Secure file handling: The tool manages the transfer process in a secure environment, minimizing the risk of data corruption or loss during the move.
Verification steps: This includes verification steps before and after the transfer to ensure all files are accounted for and correctly installed on the new computer.
While these security measures are robust, it’s smart to look into best practices for security on your end as well, such as:
Encrypting backups stored on external drives or cloud services.
Ensuring antivirus software is active when using USB drives to prevent malware risks.
Finally, note that the Migrator Tool is only available for QuickBooks Desktop versions 2018 and newer. Users with older versions must rely on manual methods or alternative tools.
These must be manually reconfigured on the new system.
Step 3: On the old PC, choose “File” in QuickBooks
Double-click the QuickBooks Desktop icon on your old computer to launch the application.
At the top of your QuickBooks window, you will see a menu bar with several options.
Click “File” in the top left corner of the menu bar.
Step 4: Choose Utilities → Move QuickBooks to another computer
Clicking on the “File” menu will activate a dropdown list of options. Within this list, hover your cursor over “Utilities” to expand the Utilities menu. Then, locate and click “Move QuickBooks to another computer.”
At this stage, the tool will lead you forward through a series of prompts:
If you haven’t closed other windows, you’ll receive a prompt to do so. Hit “OK.”
Click “I’m ready” to confirm starting the process.
Enter a secure, one-time password that you can easily remember. You’ll use the password to unlock your files during the transfer. Make sure your password meets the conditions as outlined.
Select USB flash drive: Insert a USB flash drive with enough free space and select it from the list of available drives.
Wait for the files to be copied. Depending on the size of your data, you may have to wait a few minutes.
Each of these prompts provides specific instructions and information designed to guide you through the process smoothly. Pay close attention to these prompts and ensure that every step is completed correctly to reduce the risk of errors.
Step 6: On the new PC, insert the USB flash drive
Safely eject the USB from your old computer. Locate an available USB port on your new PC and insert the flash drive.
Step 7: Open the USB flash drive
To open File Explorer, click on the File Explorer icon (a folder) in the taskbar, or press Windows + E on your keyboard.
In File Explorer, look at the left-hand pane under “This PC” or “Computer.” You should see a list of drives, including your internal hard drive and any connected external drives.
Find the entry that corresponds to your USB flash drive, usually labeled with the drive letter (e.g., “E:”) and possibly the brand name of the drive.
Click on the USB drive entry to open it. The contents of your USB flash drive should now be displayed in the main window of File Explorer.
When opening files from an external device, ensure your antivirus software is up to date and running. It will automatically scan external devices for malware.
It’s good practice to manually scan the USB drive for any unfamiliar or suspicious files, especially if the drive isn’t yours. Avoid using autorun features to prevent the automatic execution of files, which could pose security risks.
Step 8: Double-click the option “Move_QuickBooks.bat file”
The “Move_QuickBooks.bat” is a batch file that automates the transfer of QuickBooks files from your old computer to the new one. Double-click the file to execute it — it will move the necessary data files, configurations, and settings to your new computer.
If the “Move_QuickBooks.bat” file fails to execute, try these troubleshooting tips:
Ensure you have administrator access to run the batch file. Right-click the file and select “Run as Administrator.”
Sometimes, antivirus software may block the file. Temporarily disable your antivirus software and try again, but be wary of the lapse in security.
Ensure the batch file is in the correct folder where QuickBooks is installed.
Step 9: Enter the password for the QuickBooks Migrator Tool
After double-clicking the file, the Migrator Tool will ask for the password you set when starting the transfer process on your old computer. Enter the password correctly, and the tool will continue migration. Your password ensures no one can tamper with your files without your permission.
Forgot your password? Take the following steps:
Navigate to the “Help” menu.
Select “Reset Password” or “Forgot Password” from the options.
Follow the on-screen prompts to verify your identity.
When prompted, enter a new password and confirm it.
Save the changes and ensure the new password is securely stored for future use.
Step 10: Wait for the QuickBooks Migrator Tool to finish its task
Once you’ve downloaded and installed QuickBooks to your new computer, the Migrator Tool automatically transfers the QuickBooks data files, settings, and configurations. During this step, the tool will decompress the necessary files and transfer them to the new computer.
The expected wait time for the migration depends on the size of your QuickBooks files, but it typically takes anywhere from a few minutes to an hour. You may have to wait longer if you are moving larger files or using a slower network connection.
Monitor the progress and verify the successful completion of your QuickBooks migration with the following tips:
Keep an eye on the progress bar.
Look for a message confirming the success of the transfer.
Check the new system for your QuickBooks files to ensure they appear correctly and are fully accessible.
Open QuickBooks and confirm that your company files, settings, and user preferences are intact and working properly.
How to install QuickBooks Desktop on a new computer
To install QuickBooks Desktop on your new computer:
Download the QuickBooks installation file from the official QuickBooks website or get the installation CD if you have one.
Navigate to your downloads folder or to the CD drive if you’re using a CD.
Find and double-click on the installation file to initiate the installation process.
Follow the prompts to select the type of installation — either “Express” for default settings or “Custom” for tailored options.
Enter your product and license information when prompted and wait for the installer to complete the installation.
Once installed, open QuickBooks and proceed to restore your company file. If you’re transferring data, ensure the file backup from the old computer is accessible and use the “Open or Restore Company” option to load it.
Configure your preferences, including payroll, tax settings, and user roles, to match your previous setup.
Finally, update QuickBooks to the latest version for optimal performance and security.
Note that if a backup is created in a newer version of QuickBooks, it cannot be restored in an older version due to file format incompatibility, so you need to ensure your new system meets updated hardware requirements.
Sometimes, something might go wrong during the installation. Here are the common errors you might encounter and how you can resolve them:
Error 1904: File failed to register: Run the QuickBooks Install Diagnostic Tool to repair installation issues. Ensure your system meets the software’s requirements.
Error 1603: Fatal error during installation: Update Windows to the latest version and retry the installation.
Framework .NET installation error: Install or repair Microsoft .NET Framework using Microsoft’s official tools.
Access denied errors: Run the installer as an administrator and verify user permissions.
License validation error: Double-check the product and license numbers entered during installation.
Reasons to transfer QuickBooks to a new computer
So, why transfer? Of course, chances are that you got a new computer and are ready to get rid of the one currently hosting your QuickBooks platform.
But there are also a few benefits you may not have considered that you can expect from running QuickBooks on a new computer:
Improved performance: Provided your computer is a newer one, faster hardware means smoother QuickBooks operation.
Enhanced security: New systems often come with updated software and security features to protect your sensitive data.
Greater storage capacity: You’ll likely have more space for files and backups.
Reduced risk of crashes: Modern hardware helps prevent system errors and interruptions.
Let’s look a little closer at the three most common reasons people want ti kniw how to transfer QuickBooks to a new computer.
Upgrading the computer
A more powerful computer lets you:
Run complex financial reports.
Process large volumes of data.
Manage multi-user access with greater speed and efficiency (provided you have the proper license).
Load data and features faster.
Navigate QuickBooks smoother with less risk of crashes or lags.
Additionally, modern computers often come with enhanced security features, ensuring that your sensitive financial information is better protected while offering a more enjoyable user experience.
Here are the recommended hardware specifications for optimal QuickBooks performance:
Processor: 2.4 GHz or higher (preferably multi-core).
RAM: At least 8 GB (16 GB or more for larger files or multi-user setups).
Storage: Use an SSD (Solid-State Drive) for faster load times and at least 2.5 GB of free disk space for QuickBooks installation.
Operating System: Windows 10 or 11, 64-bit.
Display: Minimum resolution of 1280×1024 or higher.
Network: Reliable internet for QuickBooks Online or multi-user mode.
Technical issues with the current system
Transferring QuickBooks to a new computer is sometimes necessary due to persistent technical issues affecting performance. For instance, frequent system crashes resulting from outdated hardware or software conflicts may disrupt daily operations.
Similarly, slow performance caused by insufficient RAM, a failing hard drive, or outdated processors can frustrate tasks like generating reports or processing transactions. Upgrading to a new computer with better specifications can resolve such problems and ensure smooth business operations.
System crashes or slowdowns are recurring and unresolved by updates or repairs.
Repairing your current computer costs as much as or more than upgrading.
Technical issues are causing significant downtime or delays in business operations.
Your computer no longer meets the hardware requirements for the latest QuickBooks version.
Your data storage is unreliable and backups fail frequently.
Access to QuickBooks from multiple locations
While QuickBooks Online is cloud-based, Desktop isn’t — which means you can only access your data on the computer it’s installed on. So, you might choose to transfer your QuickBooks to a more portable device.
But what if there was a better way? QuickBooks-integrated software like Method CRM enable anytime, anywhere remote access to your QuickBooks Desktop data. That means users can connect from multiple locations without the need for cloud-based services like QuickBooks Online or hosting on a virtual server.
With Method, your business can maintain secure, role-based access to sensitive financial information, ensuring productivity and compliance across distributed teams while limiting QuickBooks access only to those who need it.
Need to create an invoice while you’re on the road? Update a customer’s details mid-flight? Process a payment remotely? Method has you covered.
Thanks to its patented two-way, real-time sync with QuickBooks Desktop, you can create estimates, invoices, sales orders, and process payments directly in Method CRM — and they’ll instantly update in QuickBooks. No double entry and no extra work.
Give your customers more control with secure self-serve portals for online payments and e-signatures. Combine the power of QuickBooks Desktop with cloud access, and you get a clear, complete view of your customer relationships – wherever you are.
Curious to see more? Check out the video below to get a glimpse into what Method makes possible.
Tips to smoothly transfer or move QuickBooks to a new computer
Take note of the following tips to ensure a smooth transfer of QuickBooks from one computer to another.
Create a backup for your data
Backing up your data ensures that it’s secure during the migration process, giving you the option to restore things to the way they were before you started should anything go wrong.
Here’s how to create a backup of your QuickBooks Desktop data:
Open QuickBooks and log in to your company file.
Go to the “File” menu, select “Back Up Company”, and then choose “Create Local Backup.”
Select “Local Backup,” pick your backup destination, and click “Next” to set preferences.
User preferences (settings customized for your workflow).
Customer and vendor information (contact details and histories).
Payroll data (for employees and tax filings).
Ensure data compatibility
Check the QuickBooks software version and file formats. QuickBooks files created in older versions may not be fully compatible with newer versions, potentially causing issues when opening or processing data. Also, check that both systems meet QuickBooks’ hardware and software requirements to avoid performance issues.
Use the following compatibility checklist to guide your transfer:
Software version compatibility: Ensure both computers are running compatible QuickBooks versions.
Operating system compatibility: Confirm that the new system is on Windows to support your QuickBooks version.
File format compatibility: Verify that the new version of QuickBooks supports your company files.
Hardware requirements: Check if the new computer meets QuickBooks’ minimum hardware specifications.
Data backup: Ensure a complete data backup before proceeding with the transfer.
Deactivate QuickBooks on the old system
Close any open QuickBooks files and sign out of your account. Go to the “Help” menu in QuickBooks. Then, select “Deactivate QuickBooks.” Follow the prompts to complete the deactivation process. Ensure the program is fully unlicensed and no longer running on the old system.
Having trouble with the deactivation process? Here are some common challenges and possible solutions:
Error message during deactivation: If QuickBooks cannot deactivate, restart your computer and try again.
License not deactivating: Ensure you are signed in as an admin user to deactivate the software.
Lost or forgotten license number: Retrieve the license number by checking your original purchase email or QuickBooks account. If it’s gone for good, you’ll have to get in touch with Intuit support.
Update QuickBooks
Install the latest QuickBooks updates before transferring data to your new computer to ensure your new system runs the most current version of the software with all the latest features, bug fixes, and security enhancements. Installing updates beforehand helps avoid compatibility issues when transferring your data and ensures a smooth and efficient migration process.
To check for and apply updates in QuickBooks:
Open QuickBooks and select the “Help” menu at the top.
Click on “Update QuickBooks” from the dropdown.
In the “Update QuickBooks” window, go to the “Options” tab.
Choose “Mark All” to select all available updates.
Click “Save” and then go to the “Update Now” tab.
Click “Get Updates” to download and install updates.
Restart QuickBooks to complete the update process.
Transfer all important files to the new system
When transferring QuickBooks to a new system, move all related files and settings along with the company files. This includes custom templates, report configurations, user preferences, and any integrated third-party apps that might be in use.
Learning how to transfer QuickBooks to a new computer is a surefire way to ensure continuity while improving performance.
Remember that:
Migrating to a new computer can permanently solve nagging technical issues with your current system.
Backing up your data before migrating ensures data safety if the process goes wrong.
Ensuring software compatibility between both systems is key to the migration process.
Copying all related files completes the QuickBooks transfer process.
If you and your team want to access QuickBooks Desktop wherever, whenever, start your free trial of Method — no credit card required.
How to transfer QuickBooks to a new computer FAQs
Can I access QuickBooks from any computer?
Yes, but first, your QuickBooks license should allow multiple users or installations. A multi-user license is required for QuickBooks Desktop to enable access from different machines.
Additionally, the system requirements on each computer must meet QuickBooks’ hardware and software specifications. If using QuickBooks Online, access is granted via a web browser with no installation needed, but each user must have the proper login credentials and subscription plan to access the data.
Can I install QuickBooks on multiple computers?
Yes, but you must have the appropriate license. For QuickBooks Desktop, a single-user license allows installation on one computer. In contrast, multi-user licenses allow installation on multiple machines within the same company network, with each user needing a separate license.
QuickBooks Online, however, is cloud-based, and users can access it from multiple if they have internet access and the correct subscription plan.
Does the Migrator Tool work for all versions of QuickBooks?
No, it doesn’t. The QuickBooks Migrator Tool is designed to transfer QuickBooks Desktop files between computers. It works with QuickBooks Desktop Pro, Premier, and Enterprise versions. However, the tool is only available for properly licensed and updated 2018 and newer versions of QuickBooks Desktop. It is not compatible or necessary with QuickBooks Online, which uses cloud-based technology.