Ever wished for a simpler way of doing things when you’re writing invoices? Businesses grapple with how to change the invoice template in QuickBooks Online and a number of other challenges that greatly slow down their work.
But we’re here to help!
QuickBooks Online invoice templates help you create professional-looking invoices that reflect your brand, and we want to make sure you’re able to take advantage of all of them.
Here at Method CRM, we’ve been supporting QuickBooks-based businesses since 2010. Method is the customizable CRM that automates your real-world workflows, so everything fits the way your business actually works, saving you hours every week.
In this blog, you’ll learn:
- The basics of creating QuickBooks Online invoice templates
- How to personalize them
- How to change invoice template in QuickBooks Online
Let’s get started.
Key takeaways
- You can change invoice templates in QuickBooks Online by going to Settings > Custom form styles, where you can create, edit, and manage invoice templates.
- QuickBooks Online lets you create multiple invoice templates, but the way you set a default depends on whether you’re using the standard or modernized invoice experience.
- You can customize invoice templates with your logo, brand colors, fonts, layout, and selected fields to better match your business.
- Some invoice details, like payment terms and due dates, can be edited directly on individual invoices in addition to template-level changes.
- Not all template changes behave the same way, so it’s important to review how QuickBooks applies updates before assuming they affect past invoices.
- If you need more flexibility than QuickBooks Online offers, Method gives you more control over invoice design, workflow automation, and QuickBooks-connected invoicing.
How to create a QuickBooks Online invoice template
A personalized QuickBooks Online invoice template lets you include elements that matter to your business.
Follow these four steps:
- Step 1: Go to the “Settings” menu and select “Custom Form Styles”.
- Step 2: Click the “New style” button and then “Invoice” to create a new QuickBooks invoice template.
- Step 3: Customize your template and decide what information to include.
- Step 4: When you’re happy with your new template, click “Done” to save it.
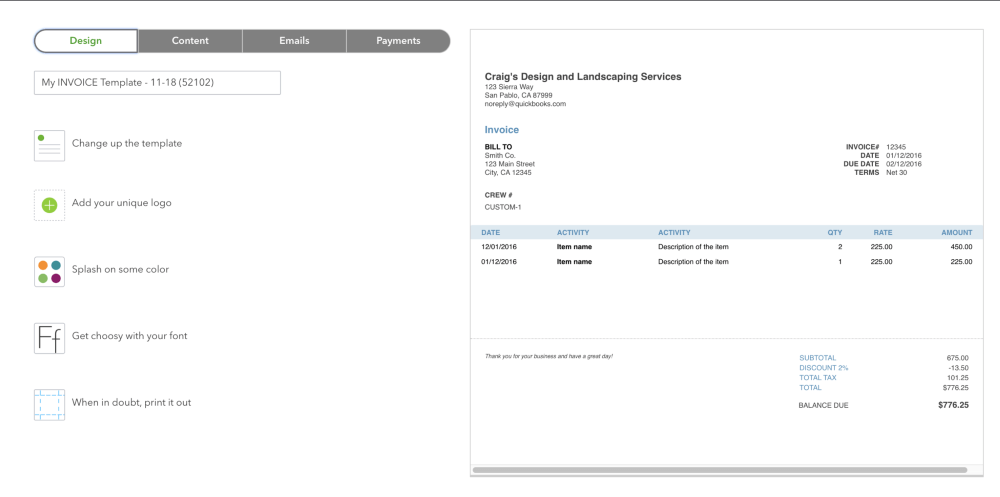
Image credit: Gentle Frog
How can I change the default invoice template QuickBooks Online has?
Let’s say you decide that you want to set a specific invoice template as your default in QuickBooks Online invoice templates.
Intuit explains how to change invoice template in QuickBooks Online:
- Create a new sales form.
- Select ⚙ Manage.
- Select the Design ▼ dropdown.
- Select Remove default from the Modernized template section. The default template will automatically be the standard template.
- Select Add/Edit to edit the standard template.
- Select Done. This new (Standard) template will now be your default.
Although QuickBooks currently allows you to modify which template is treated as the default, there are specific constraints worth noting.
Intuit also adds that, aside from the standard template, you can’t set other custom templates as a default template, nor can you edit the modernized template.
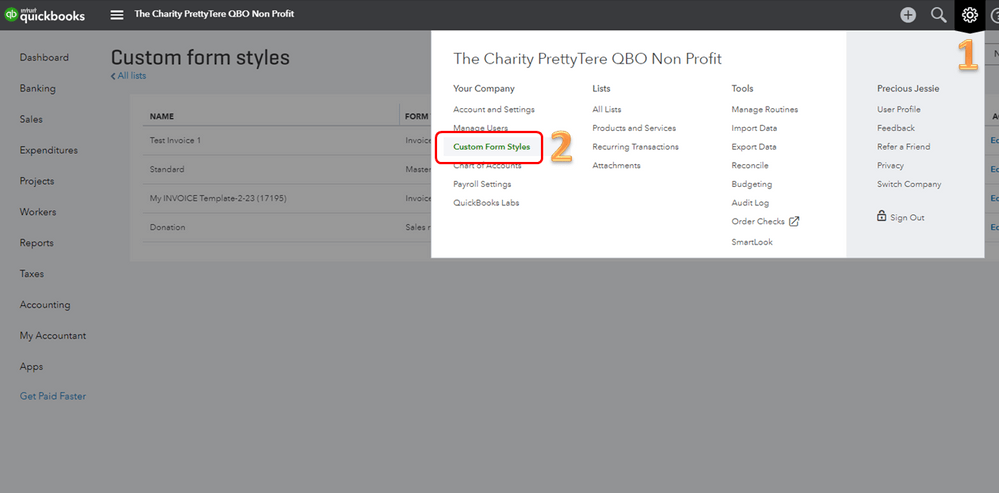
Image credit: QuickBooks
The best ways to personalize your QuickBooks invoice templates
You want to take advantage of the flexibility and customization options that these templates offer.
Below is a tutorial on how to customize your invoice template in QuickBooks Online.
Keep reading for some of the best ways to take customization to the next level with your QuickBooks Online invoice templates.
Apply your branding
Incorporating your branding into your QuickBooks Online invoice template ensures brand recognition and consistency. There are a few different ways you can do this.
First, you can easily add your company’s logo to your invoice template.
Additionally, your QBO invoice template allows you to choose a color scheme that matches your brand colors.
The font on your invoices should represent your brand for added cohesiveness. Make sure it’s also easy to read.
Browse the many options in QuickBooks Online templates to find one that aligns with your brand aesthetics.
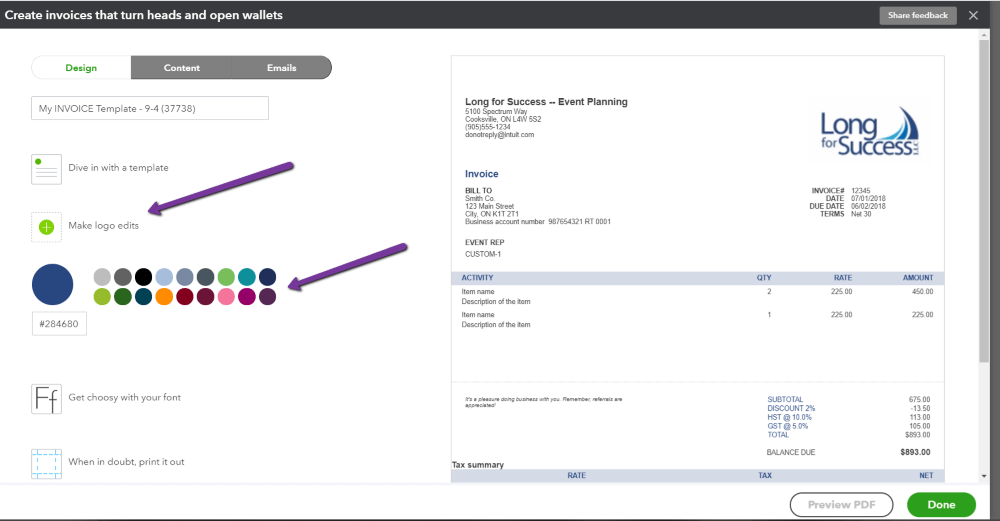
Image credit: My Cloud Bookkeeping
Add custom fields as needed
One of the strengths of QuickBooks Online invoice templates is the ability to include custom fields that capture details specific to your business.
You can use custom fields for information such as:
- Purchase order numbers
- Delivery dates
- Internal reference notes
To add custom fields in QuickBooks Online:
- Step 1: Go to Settings ⚙ → Custom fields
- Step 2: Select Add field
- Step 3: Enter a name and choose the data type
- Step 4: Select Transaction, then choose Invoice
- Step 5: Turn on Print on form
- Step 6: Save your changes
Once created, you can manage how these fields appear on your invoice by going to ⚙ Manage → Customization while working on a form.
By using these customization options, you ensure your QuickBooks Online invoice templates:
- Represent your brand
- Convey necessary information
- Meet your business’s unique requirements
These personal touches can go a long way in creating a professional impression and strengthening relationships with your clients.
How to create and send an invoice in QuickBooks Online
Creating and sending an invoice using QuickBooks Online is quite straightforward.
Ready to create an invoice? You can watch the quick video tutorial below or follow the step-by-step guide to get started:
- Step 1: Log in to QuickBooks and access your account to start creating new sales invoices.
- Step 2: Find and select the “+ New” button.
- Step 3: Select “Invoice” to open the invoice window and form.
- Step 4: Use the “Add customer” dropdown menu to find and select the customer who will receive the invoice. QuickBooks will fill in the details you have saved for them. If you need to add a new customer, select “Add New” from the drop-down menu.
- Step 5: Enter the transaction details:
- Products and services: What you provided to the customer, including descriptions, rates, and quantities. If you have not previously entered this product or service, you can select “Add New” to add it.
- Additional information: Any discounts, taxes, or additional charges
- Step 6: To customize the look of the blank invoice template, select ⚙ Manage to adjust fields, layout, and design settings.
You can also change what your customer sees here. For example, you might select certain fields (like shipping) while deselecting others (like total discount).
- Step 7: To complete the invoicing process, you can review your settings (including whether you accept online payments) and send the invoice by clicking “Review and send” to email it, or “Text” to send a unique link via SMS that the customer can use to access the invoice online. Note that text invoices are currently available only to customers with QuickBooks Payments.
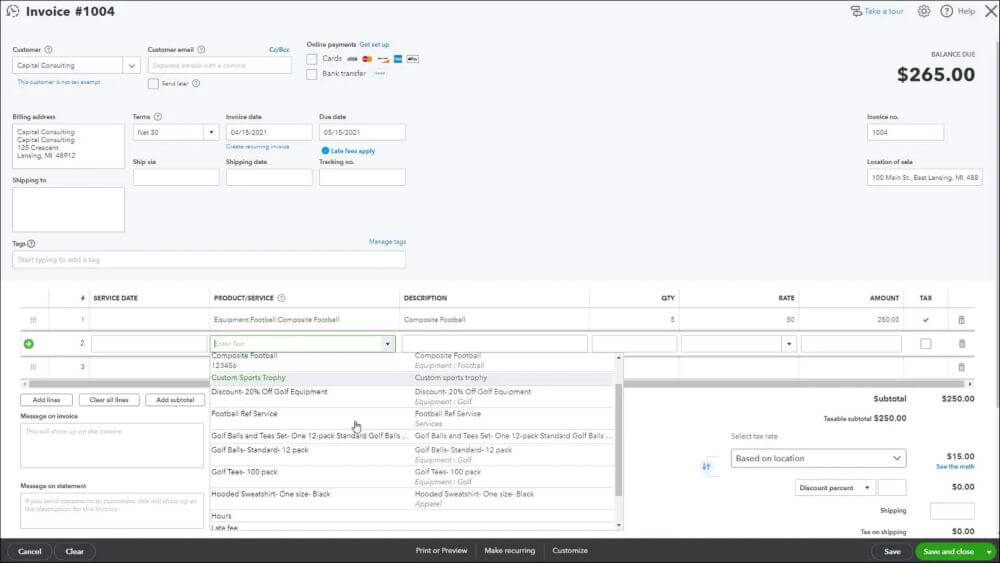
Image credit: Teach U Comp
How to import customized invoices into QuickBooks Online
If you want to use your own branded invoice design, QuickBooks Online allows you to import a custom template created in Microsoft Word. This lets you keep your formatting, layout, and branding consistent across every invoice.
Here’s how to do it:
Step 1: Prepare your Microsoft Word (.docx) template
Start by creating your invoice template in Microsoft Word and saving it as a .docx file.
Before you upload it, it’s important to understand that QuickBooks has strict formatting requirements.
Your template must:
- Be a single-page document (QuickBooks will extend it automatically for multi-page invoices)
- Be under 2 MB in size
- Use one of the supported fonts: Arial Unicode MS, Courier, Courier Bold, Courier-Oblique, Courier Bold-Oblique, Helvetica, Helvetica Bold, Helvetica Oblique, Helvetica Bold-Oblique, Times Roman, Times Bold, Times Italic, Times Bold-Italic Symbol, Zapf Dingbats
- Follow a simple structure (avoid nested tables, merged cells, or complex layouts)
To allow QuickBooks to insert invoice data correctly, you’ll also need to include placeholders using EZ Map fields. These are written in angle brackets, such as <invoice_date> or <customer_name>.
QuickBooks uses these fields to automatically match your template with its internal data. If the fields aren’t recognized, you may need to review or adjust the mapping during the import process.
Step 2: Upload your custom invoice template
In QuickBooks Online:
- Click the gear icon (Settings)
- Select Custom Form Styles
- Click New style, then choose Import style
- Select Invoice as the form type
- Upload your .docx file and click Next
This is where QuickBooks begins processing your template.
- Next, choose Import style
- Select the form type
- Upload the .docx file
- Review field mapping, preview, and save
Step 3: Review and match your fields
QuickBooks will scan your template and attempt to match your placeholders with its system fields.
If you used standard field names, most of this will happen automatically.
You should still review the preview to confirm:
- Dates appear in the correct locations
- Customer details are mapped properly
- Line items display as expected
If anything looks off, you can adjust the field mappings before continuing.
Step 4: Preview and save your template
Once everything looks right:
- Click Next to preview the full invoice
- Confirm the layout, spacing, and formatting
- Click Save and give your template a name
Your custom invoice template is now ready to use when creating invoices in QuickBooks Online.
With Method, invoices fit the way your business works. Create branded QuickBooks invoices, tailor the fields and layout to your process, and keep everything synced in real time without double entry or manual fixes.
Automate your QuickBooks Online invoices with Method
Connect your QuickBooks Online account to Method and your customers, items, and invoices converge into one workflow. Creating or updating an invoice in Method changes the data in QuickBooks automatically, meaning you never have to worry about entering the same information twice.
What changes after you connect? Once connected, your QuickBooks customers, items, and previous invoice history are imported into Method. Any new actions or updates that occur in Method sync to QuickBooks immediately and updates made in QuickBooks typically appear in Method within 10 minutes.
With the connection activated, your entire team now has access to create and manage invoices using the customer and workflow information stored in Method. On top of that, you can create invoices at various points during the sales cycle by triggering them through specific steps such as approval of an estimate, completion of services, or fulfillment of a sales order.
- Create an invoice once instead of rebuilding it in QuickBooks.
- Keep customer, item, and invoice details aligned across both systems.
- Give sales and operations access to invoice status without sending them into QuickBooks.
- Use reminders and workflow automation to follow up on unpaid invoices.
Connect QuickBooks to Method for free
Effortless invoicing with Method and QuickBooks templates
Need a quick way to create a professional invoice? Method’s free invoice generator lets you build and download a branded PDF. It is a useful starting point for a one-off invoice, while a connected Method account gives you a complete invoicing workflow.
Move beyond one-off PDFs: Once you connect QuickBooks Online to Method, invoices created inside Method can sync directly to your accounting records. Standalone PDFs created with the free generator do not enter QuickBooks automatically.
Here are four reasons Method is a smart choice for QuickBooks users:
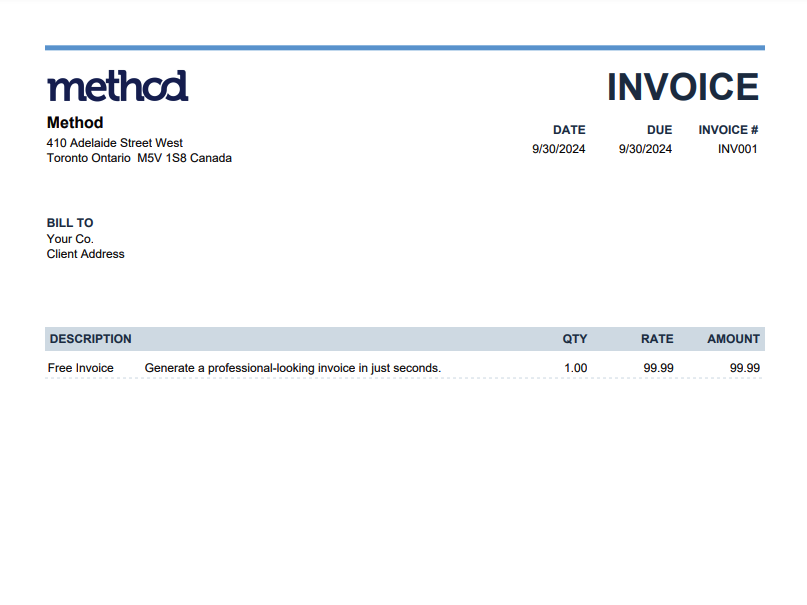
1. Preview an example professional invoice for free:
Enter your company and customer information. Add the products or services that have been delivered. Download your completed, printed and/or electronic invoice as a clean-looking PDF in just minutes. When you’re ready to handle repeat invoicing, track payments, view customer histories, and much more in one convenient place, begin a Method trial and connect your QuickBooks Online account.
Connect QuickBooks to Method for free
2. Free customized and branded invoices:
Add key business elements like your business logo, contact information, and unique payment terms.
Tailor the QuickBooks invoice format to include essential details and create not only a professional look, but also establish constant branding across all your sales forms.
3. Avoid errors and save time:
Managing dozens of invoices is time-consuming, and that’s where Method’s tools make a huge difference. They keep everything organized. In turn, you can apply invoice payment terms and easily track overdue invoices.
4. Keep it QuickBooks compatible:
Method CRM syncs with QuickBooks Desktop and QuickBooks Online. You can leverage features like invoice preview, invoice screen customization, and more to create and manage invoices across platforms.
This integration lets you start with a sample invoice format and customize it to be as unique as your business.
What happens when you connect QuickBooks Online to Method?
The setup follows three clear steps. Once connected, Method begins bringing the QuickBooks records your team needs into the CRM.
1. Start your free trial
Create your Method account without a credit card or long-term contract.
- Enter your basic business information.
- Choose QuickBooks Online as your accounting platform.
2. Connect QuickBooks Online
Sign in through Intuit, select the correct company, and authorize the connection.
- Review the requested access.
- Start the initial QuickBooks sync.
3. See your QuickBooks data in Method
Your customers, items, and invoice history begin appearing automatically.
- Work with connected records inside Method.
- Keep future updates aligned through two-way sync.
Ready to connect your invoices and QuickBooks data?
Start your Method trial, connect your QuickBooks Online account, and bring your customers and invoice history into one workflow.
QuickBooks Online invoice templates FAQs
How do I edit an invoice template in QuickBooks?
To edit an invoice template in QuickBooks Online, follow these steps:
- Step 1: Click on the Gear Icon in the upper right corner
- Step 2: Select “Custom Form Styles”
- Step 3: Find the template you want to adjust, then click “Edit”
- Step 4: Use the Design, Content, and Emails tabs to make changes to the layout, fields, and messaging.
- Step 5: Customize the appearance and information on your template
- Step 6: Click “Done” and save your changes
Do invoices need to be numbered?
Yes, you should number invoices. An invoice number provides a unique identifier for tracking and managing invoices. They’re also essential for accounting and tax purposes.
QuickBooks Online automatically assigns a unique number for your invoice templates in QuickBooks, but you can also customize them.
How do I issue an invoice?
To issue an invoice using QuickBooks Online, follow these steps:
- Step 1: Open QuickBooks Online and click the “+ New” button.
- Step 2: Select “Invoice”.
- Step 3: Fill in the details, including the customer’s name, the products or services provided, and the cost. You can also enable payments (card/ACH) before sending.
- Step 4: Choose one of your QuickBooks invoice templates.
- Step 5: Click “Save and send” to email the invoice to your customer.
Where are invoice templates stored in QuickBooks Online?
Select the Gear icon in the upper right-hand corner, then select “Custom Form Styles.” You’ll be able to see existing templates there, edit them, or add new ones.
Can I create multiple invoice templates in QuickBooks Online?
Yes, this is done through the “Custom Form Styles” section. Access it by clicking on the Gear icon in the upper right-hand corner, then add the new templates you’d like to use.
Why can’t I change my invoice template in QuickBooks Online?
If you can’t change your invoice template, it may be due to user permissions, browser issues, or limitations within the selected template. In some cases, you may be editing a standard template that has fewer customization options. Trying a different template or checking your access level usually resolves the issue.
Can I customize the design of my invoice template?
Yes, QuickBooks allows you to customize colors, fonts, layout, and which fields appear on your invoice. You can make these changes in the Design and Content tabs within Custom Form Styles.
How do I add a logo to my invoice template in QuickBooks Online?
QuickBooks lets you add up to 10 distinct logos, and presents the following steps for doing so:
- Go to Settings ⚙ and select Custom form styles.
- Select New style and choose the appropriate form type.Note: To add a logo to an existing template, locate the form in the list and select Edit under the Action column.
- Select the Design tab.
- Select Make logo edits.
- Select the Add a logo + box.
- Locate and select your image file.
- Select Open.
- Select Save, then Done to save your changes.
Note that although you can store multiple logos in your account, only one logo can be used on each invoice template at a time.
Can I edit invoice fields like payment terms or due dates?
Yes, you can edit these fields for each invoice you send, add new terms, or update your default invoice fields.
Do changes to an invoice template apply to existing invoices?
Yes, according to Intuit, any customization changes you make will apply to all existing and future invoices.
Can I switch invoice templates when creating an invoice?
Yes, you can switch invoice templates while creating an invoice. From the invoice screen, go to ⚙ Manage → Design ▼, then select a template under Other template.
Automate your way to stress-free days with your free trial of Method.
Is it safe to connect my QuickBooks Online account to Method?
Yes. Method connects to QuickBooks Online through Intuit’s secure authorization process. You sign in directly through Intuit and approve Method’s access to your QuickBooks company, so you do not share your QuickBooks password with Method.
Only Method administrators can access and manage the QuickBooks sync preferences. Review Method’s QuickBooks Online sync preferences for more information.
Can I disconnect QuickBooks Online from Method?
Yes. A Method administrator can open Profile → Integrations → QuickBooks Sync and select Disconnect Sync. No new information will move between Method and QuickBooks until the connection is restored. Method’s Help Center explains how to disconnect or reconnect QuickBooks Online.