How to create an invoice in QuickBooks Online and Desktop

Did you know that 66% of businesses spend over five days a month on invoicing? With invoices taking up a massive chunk of your time, accounting software like QuickBooks is a lifesaver.
Whether you’re a small business owner, freelancer, or accountant, creating an invoice in QuickBooks saves you time and helps you maintain accurate financial records.
Keep reading for step-by-step instructions on:
- How to create invoice in QuickBooks Online and Desktop.
- Creating an invoice in QuickBooks from estimates and sales orders.
- Tips on invoice automation and personalization.
Let’s dive in!
Benefits of creating an invoice in QuickBooks
Before covering how to create invoice in QuickBooks Online and Desktop, let’s go over some of the reasons why you should in the first place.
Creating an invoice in QuickBooks comes with several benefits that greatly enhance your invoicing process and overall financial management, such as:
- Time-savings: With features like pre-filled customer information, item lists, and customizable templates, you save significant time and effort while generating professional-looking invoices.
- Accuracy: QuickBooks ensures accuracy in your invoices by performing automatic calculations based on predefined settings, significantly reducing your chance of errors.
- Customization options: QuickBooks provides a range of customizable invoice templates that let you tailor the appearance and layout of your invoices to align with your branding. You can add your company logo, choose fonts and colors, and include personalized messages to create a cohesive and visually pleasing look.
- Improved tracking and organization: QuickBooks automatically tracks your invoices, making it easier to keep tabs on outstanding payments, view payment histories, and reconcile accounts.
- Collaboration: QuickBooks Online offers cloud-based accessibility, allowing you to create, access, and send invoices from anywhere with an internet connection. Plus, you can collaborate on invoices in real time.
Integrations: QuickBooks integrates with other functions and add-ons (through apps.com), such as expenses, inventory management, and customer relationship management, giving you a holistic view of your business health.
How to create invoice in QuickBooks Online: Step-by-step video tutorial
This step-by-step video tutorial shows you how to create invoice in QuickBooks Online. Discover the various features and customization options QuickBooks Online offers so you can simplify your accounts receivable and create invoices that reflect your brand.
Convert an estimate to an invoice
Here’s how to create invoice in QuickBooks Online from an existing estimate:
- In “Sales”, select “All sales”.
- Find the estimate you want to convert. If it shows “Declined” in the status column, you must update the status in the corresponding drop-down menu to “Pending” or “Accepted”.
- If the status shows “Accepted”, click “Convert to invoice” in the “Action” column of your estimate. If it shows “Pending”, you can find “Convert to invoice” in the drop-down menu.
- Double-check your invoice, make any final updates, and click “Save”.
Note: If you have QuickBooks Payments and requested a deposit on your estimate, it will convert to an invoice automatically when the deposit is paid.
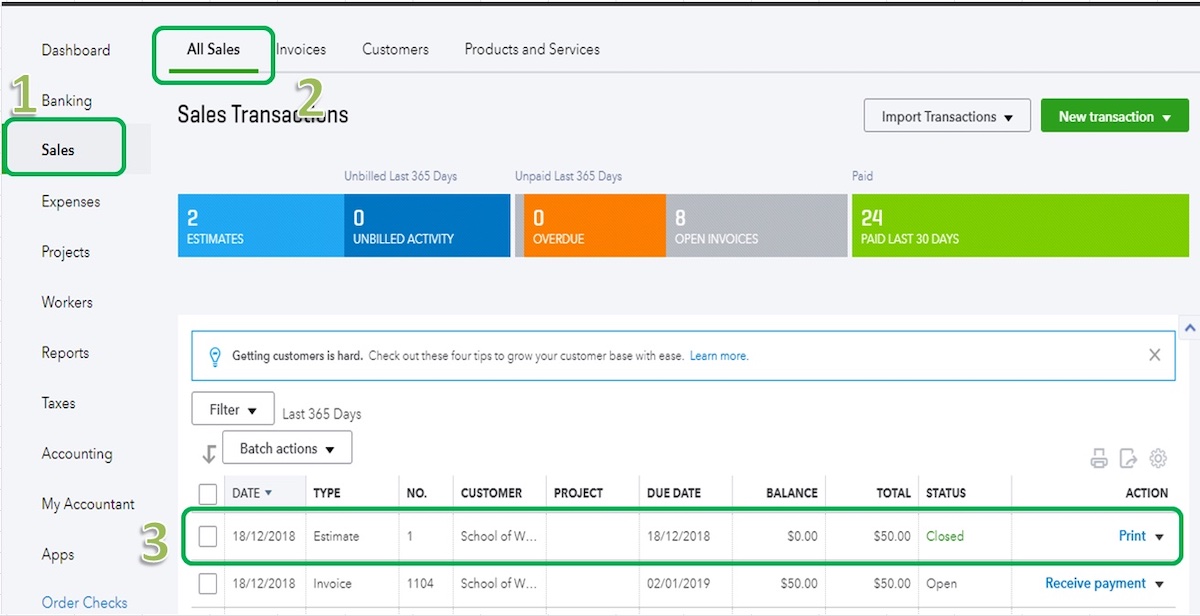
Image credit: Intuit QuickBooks
Convert a sales order to an invoice
QuickBooks Online does not currently support sales orders but integrated third-party software like Method does.
Because QuickBooks Online lacks them, creating sales orders in Method won’t sync to QuickBooks. But you can convert a sales order to an invoice directly in Method, which automatically syncs with your accounting software.
How to create an invoice in QuickBooks Desktop
Create an invoice from scratch
- From the “Home” screen or the “Customers” menu, select “Create Invoices”.
- Select a customer or customer job from the “Customer: Job” drop-down list, or click “Add New” if they are not yet in your system.
- Fill in the details, like the date sent and due, invoice number, recipient information, and any terms.
- Select all the invoice items in the detail section. Note: The description and amount are automatically populated when adding items based on your configurations. You can edit or delete them accordingly with each new invoice.
- Select “Save & Close”.
Create an invoice from a sales order
There are two ways to create an invoice from a sales order in QuickBooks Desktop.
From the Sales Orders window
- In “Sales Orders”, select “Create Invoice”.
- Select “Create invoice for all of the sales order(s)” to add all items from your sales order to the invoice. If you only want some items on your invoice, select “Create invoice for selected items”.
- Make any necessary changes to the invoice.
- Click “Save & Close”.
From the Invoice window
- From the QuickBooks “Home” screen or the “Customer” menu, select “Create Invoices”.
- In the “Customer: Job” drop-down list, select a customer or customer job.
- Choose one or more sales orders that contain the items you want in the invoice.
- Make any necessary changes to the Invoice.
- Click “Save & Close”.
Create an invoice from an estimate
When a customer accepts your estimate, you can convert it into an invoice.
If you haven’t yet completed the work, you can still send an invoice, provided you are charging a fixed amount. If time and costs impact your pricing, you can convert the estimate to an invoice when you complete the work.
There are two ways to accomplish this.
From the Estimate window
- Open your chosen estimate.
- Select “Create Invoice” at the top of the form.
- If progress invoicing is turned on, you’ll likely receive a prompt for the items and quantities on the invoice that you should fill out accordingly.
- Adjust the information in your invoice as needed.
- Click “Save & Close”.
From the Invoice window
- From the QuickBooks “Home” screen or the “Customer” menu, click “Create Invoices”.
- On the “Customer: Job” drop-down list, select a customer or customer job.
The available “Estimates” window appears. - Choose the estimate you want to include in the invoice. Note: QuickBooks will only allow you to select one estimate at a time.
- Adjust the information in your invoice as needed.
- Click “Save & Close”.
How to personalize and automate your QuickBooks invoices
Now that you know how to create invoice in QuickBooks Online and Desktop, you should start thinking of ways to personalize.
While QuickBooks invoices are customizable and visually appealing, they’re a popular choice for thousands of businesses worldwide, meaning it can be challenging to make them unique.
Luckily, you can do more to make your invoices stand out and give your customers a positive experience.
As a no-code platform, Method empowers small businesses using QuickBooks to simplify and automate their regular work processes.
This is especially true when it comes to creating custom invoices. Simply drag and drop the elements you want to include in your invoice with Method’s web report designer.
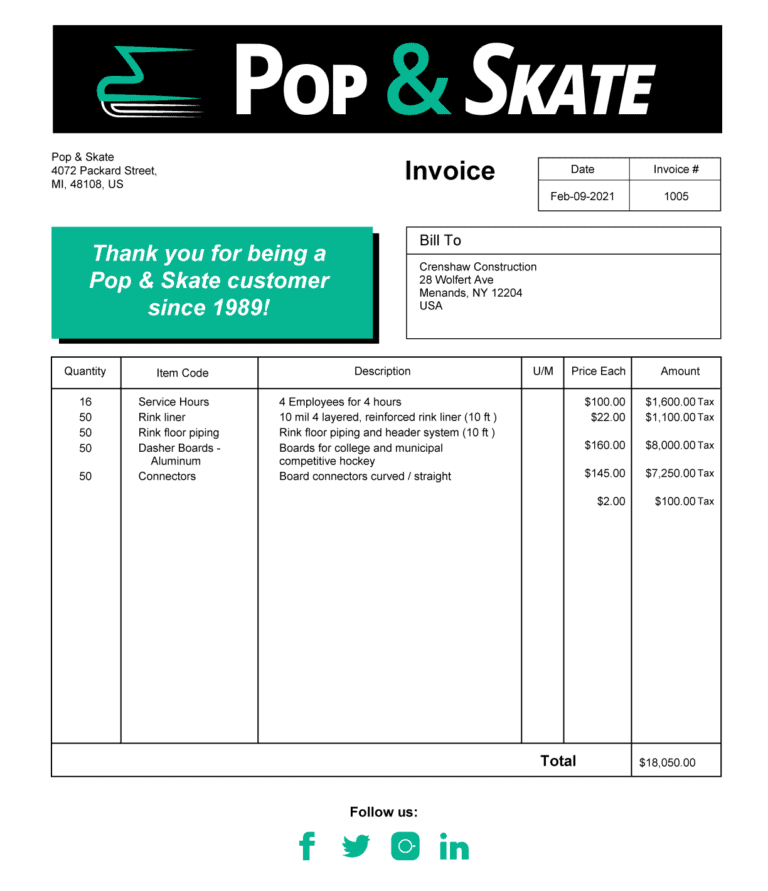
For example, you can personalize your invoices with a thank you note, social media icons that link to your company’s accounts, and e-signature functionality that enables instant, online agreement between parties.
Here’s an example of a customized invoice you can create in Method.
The best part is that with Method, you can automate your QuickBooks invoicing process entirely, from creation to delivery. As a result, you improve efficiency, productivity, and the experiences of both your customers and your team.
QuickBooks invoices FAQs
Is invoicing free in QuickBooks Online?
QuickBooks Online isn’t free, but it offers various plans with invoicing, all with different pricing. Learning how to create invoice in QuickBooks Online varies depending on the specific plan you choose.
Can I accept payments in QuickBooks Online?
You can accept payments in QuickBooks Online, but you have to sign up for QuickBooks Payments for an additional fee. To do so, follow these steps:
- In “Settings” (gear icon), select “Account and Settings”.
- Select “Payments”, then “Learn more” in the QuickBooks Payment section.
- Click “Set up Payments”.
How to schedule recurring invoices in QuickBooks?
To set up recurring invoices in QuickBooks Online:
- In “Settings” (gear Icon), click “Recurrent Transactions”, then “New“.
- Select “Invoice” as the “Transaction Type” and click “OK”.
- Change the “Type” to “Scheduled”, then select “Automatically send emails“.
- Click “Save template”.
In QuickBooks Desktop:
- On your main screen, select “Quick Create”, then “Invoice“.
- Choose an existing customer or add a new one.
- Fill out the relevant fields and toggle the online payment option to “On”.
- In “Edit”, click “Memorize invoice”.
- Click “Save and send”
- Now, in your “Settings” (gear icon), you can set up a recurring transaction through this invoice. Make sure to set the “Type” as “Scheduled” and that you check the “Automatically send emails” box.
Regardless of your QuickBooks version, you’ll have to repeat the above steps for every customer you want to create a recurring invoice for. Fortunately, software like Method simplifies the recurring invoice process and improves overall efficiency.
Send eye-catching invoices automatically with Method. Start your free trial.
Image credit: leszekglasner via Adobe Stock


