
Setting up inventory in QuickBooks Online is more complicated than it needs to be.
Does QuickBooks keep track of inventory? Yes, but there are limitations and pitfalls that you need to be aware of when using QuickBooks for inventory purposes.
Even if you know how to set up items in QuickBooks, you must be meticulous when tracking inventory. This is because, for one, there are plenty of opportunities for human error.
Another issue is that QuickBooks is designed specifically for accounting purposes, so depending on how complicated your inventory system is, you risk jumbling up valuable information.
But QuickBooks Online inventory tracking has one glaring problem: negative inventory.
Negative QuickBooks Online inventory certainly isn’t a new issue, but it is a persistent one. If kept unchecked, negative inventory can have a devastating impact on your business.
Keep reading to learn more about negative inventory, and more importantly, how to fix negative on hand inventory.
How negative inventory quantities happen
There are a few ways that your business might have negative inventory quantities — some intentional, some unintentional.
For example, demand for your product might exceed your current supply. As a result, you may choose to sell more of your product than what’s logged into your inventory.
In this case, you’d input a negative number into your inventory.
Another more common possibility is human error. One of your employees could overlook a negative sign when inputting inventory numbers, or make an incorrect calculation in your system.
They also might neglect or forget about manually updating your system as new inventory comes in, which is an experience we had with a customer recently.
Why QuickBooks negative inventory is bad
There are a lot of disadvantages when your QuickBooks account displays negative inventory.
Perhaps the biggest is that it makes your financial information inaccurate. If you have a negative inventory, you’ve either sold more than you have, or you’ve neglected to update your inventory database. Either way, the numbers you produce won’t match up, rendering them useless.
Another issue is that it points towards bigger problems in your operations. If you’re consistently presenting negative inventory numbers, something is going wrong at your business.
Whether it’s mis-inputting, overselling, or failing to meet demand, negative inventory is a red flag for your business’ health. Negative inventory can also do serious damage to your relationships with both suppliers and customers.
If your inventory levels aren’t accurate, you risk overselling your product and disappointing customers when you can’t deliver on time or at all. On the other hand, you also run the risk of ordering too much or too little from suppliers, which will frustrate them when you need to fix the mistake at the last minute.
How to view negative inventory
Any negative inventory you have in QuickBooks will show up on your balance sheet. Beyond that, you can view it in the following reports.
Inventory Valuation Detail (IVD) report
The IVD report is your best choice for evaluating the extent of your negative inventory. The Quantity on Hand (QOH) column of the report displays both current and past negative inventory amounts.
To download an IVD report in QuickBooks:
- Go to your Reports menu.
- Click the Inventory tab.
- Select Inventory Valuation Detail.
Negative Inventory Listing report
If you are using QuickBooks Enterprise version 15.0 or later, you can get a Negative Inventory Listing report. It’s a good way to isolate your current negative inventory quantities, but it does not display past negative amounts.
To download a Negative Inventory Listing report:
- Go to your Reports menu.
- Click the Inventory tab.
- Select Negative Inventory Listing.
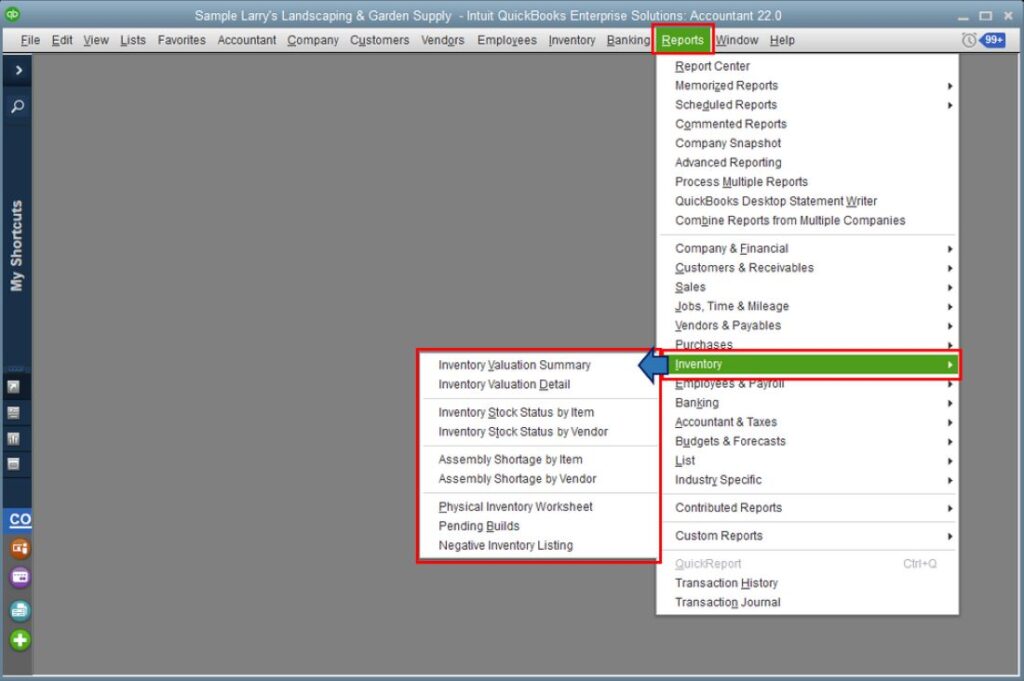
Image credit: Intuit
Note: if you want to know how to enter a negative amount in QuickBooks, it’s only possible for dollar amounts — not for inventory.
Our learnings: Fixing QuickBooks negative inventory in wholesale distribution
Whether you’re a QuickBooks user or ProAdvisor, it’s worth understanding the importance of properly maintaining inventory levels in QuickBooks Online and how to fix negative inventory levels.
For us, it all started with a support call from a Method:CRM user.
“We have duplicate invoices in QBO, and we believe your sync is causing it.”
After spending several days working on what turned out to be a fairly simple issue with QuickBooks Online inventory, we wanted to share our learnings.
Use case: Distributor using QuickBooks Online + Method:CRM
Our user is a wholesale distributor of medical equipment parts. They use Method to streamline the order-taking process for their 25 field staff.
In Method, they create invoices using a customized workflow that simplifies the adding of the 15 to 30 line items that go on a typical invoice. Method then syncs those invoices into QuickBooks Online.
For them, combining QuickBooks with Method:CRM offered needed functionality otherwise only available in “QuickBooks Online Enterprise.”
They had roughly 600 parts in QuickBooks Online. When first setting up Quickbooks, they entered these parts as inventory items.
However, they didn’t actually track inventory quantities or adjust inventory levels when new stock came in. You could say there was a little “inventory neglect” happening here – not a unique situation, surely.
What was happening with the QuickBooks Online API?
For the technically inclined readers, when Method synced the invoices to QuickBooks, timeout errors started to occur.
After sending the invoice to QuickBooks via the QuickBooks Online API, the response would hang and return:
“GatewayTimeout; errorCode=006002; statusCode=504”
Despite the timeout response, the original invoice request must have continued running on Intuit servers as, after 10 minutes, the invoice would show up in QuickBooks Online. Yes…10 whole minutes!
The problem, however, is that our sync took the timeout error to mean that the invoice was not created and queued up a retry, which caused a duplicate.
What was happening inside QuickBooks Online
Our goal was to keep the client’s field staff operation humming along uninterrupted while we helped them sort out the problem.
While we dedicated developer time to diagnose the root cause, customer service did multiple things to help out the customer, namely:
- Deleting duplicate invoices manually (which hung the UI for 10 minutes each time).
- Writing workarounds to limit the potential for duplicates.
However, inside QuickBooks Online, the interface had become slow and barely usable. We saw the following error on all transactions inside QuickBooks Online:
“Something’s not quite right – The action could not be completed because another user was creating, editing or deleting a transaction with inventory products at exactly the same time. Please try again in 30 min. If the issue persists, please contact Customer Support.“
Our hypothesis and how we solved the issue
After many Method developers and customer service put days into solving this problem, we suddenly had a hunch: perhaps the ‘inventory neglect’ was causing QuickBooks’ inventory calculations to grind to a halt.
We figured that’s what was likely causing the invoices to process so slowly.
We analyzed the 600 inventory items, and the only thing that stood out to us was that over 50 items had large negative quantities. Which is a bad state for inventory….could that be the smoking gun?
We called the user and walked them through resetting all inventory quantities to positive. It took them only 30 minutes.
Immediately, the QuickBooks Online interface was back to its normal responsiveness, new invoices synced over from Method instantly, and no more errors. That was it!
QBO + Negative Quantity On Hand = Strange Behavior + Errors + Time Wasted
We will continue to work with Intuit Developer Support (who are awesome) to see if improvements can be made in the future to avoid this.
How to fix negative inventory
So, it’s pretty clear now that negative inventory is not something you want in QuickBooks, but how do you fix it? Well, the first step is to prevent negative inventory from occurring in the first place.
But if you’re past the point of no return, follow these four steps to fix negative inventory in QuickBooks.
Step 1: Review quantity on hand
To review your quantity on hand, you can download an Inventory Valuation Detail or Negative Inventory Listing report, which will display your inventory quantity even if negative.
Beyond that, you can hover over the quantity field for any transaction type to quickly view your quantity on hand. You can even set reorder points to alert you when stock is running low.
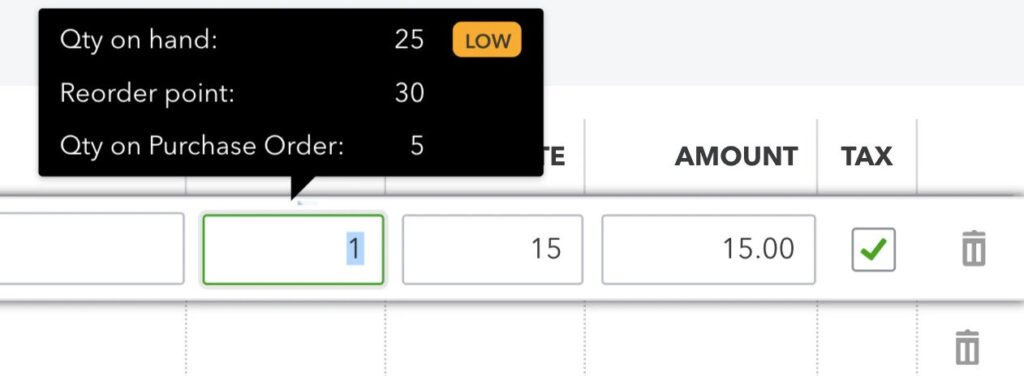
Image credit: Intuit
Step 2: Convert open purchase orders to bills
The next step is to make sure you add your open purchase orders to their respective expenses, checks, or bills in QuickBooks. If you know how to alphabetize customers in QuickBooks, it’s helpful to organize them as you search for any open purchase orders.
Once you’ve identified the purchase orders you want to add:
- Select ‘+ New’ in the top-left corner.
- Select ‘Expense’, ‘Check’, or ‘Bill’, depending on how you want to convert your purchase order.
- Select your vendor from the ‘Payee ▼’ drop-down menu. You should see all your open purchase orders with them.
- Find your chosen purchase order and click ‘Add’. This adds all the items to your customer’s bill.
- Click the ‘Billable’ checkbox, and add the customer you’re billing in the ‘Customer’ column.
- Hit ‘Save and close’.
Step 3: Take physical inventory
In a perfect world, your online records always perfectly match your physical inventory levels. But of course, this is not always the case. So, it’s really important that you regularly take physical inventory. Otherwise, your online records are useless to you and will cause more harm than good.
In reality, it’s impossible to have negative inventory. So, checking your physical stock sheds light on where your business’ inventory levels truly are and why your online database says otherwise.
Step 4: Replenish stock
Just as important as selling and delivering your product is ensuring that you always have enough of it to sell more down the line. If you don’t replenish your inventory, your business will experience a stockout, leading to upset customers.
If your QuickBooks inventory is negative, chances are that you’ve run out of stock. If you realize that you’re running low on inventory, it’s important to replenish your stock immediately. A good tip is to try and actively replenish your inventory as you distribute it to customers.
Bottomline: How to prevent negative inventory
All in all, the best way to fix negative inventory in QuickBooks is by preventing it from ever occurring. However, if your business does display negative inventory, it’s important to address it as quickly as possible.
If you have “Enterprise” level clients in QuickBooks Online, and they use inventory items, we recommend a periodic check to ensure inventory quantities are accurate.
If you know how to clear a transaction in QuickBooks, that can also be helpful for removing irrelevant or incorrect inventory information.
Hopefully, this post will help you tackle negative QuickBooks Online inventory issues without wasting too much time and resources.
FAQ: Negative QuickBooks inventory
How does inventory work in QuickBooks?
Inventory works in QuickBooks only once you activate it in your settings. Then, you can add inventory items to your database and monitor what sells directly through QuickBooks.
Inventory features are available for QuickBooks Desktop, Online Plus, and Advanced.
How many inventory items can QuickBooks Online handle?
QuickBooks Online Pro and Premier can handle up to 14,500 inventory items (with group items containing a maximum of 20 items). QuickBooks Online Enterprise can handle over 100,000 inventory items.
How to delete an inventory adjustment in QuickBooks Desktop?
To delete an inventory adjustment or adjust inventory quantity on hand in QuickBooks Desktop:
- Go to the ‘Vendors’ menu.
- Select ‘Inventory Activities’ and click ‘Adjust Quantity/Value on Hand’.
- Make your adjustment in the Qty Difference column. The number you input should be positive if you’re increasing the quantity and negative if decreasing it.
- Click ‘Save and close’.
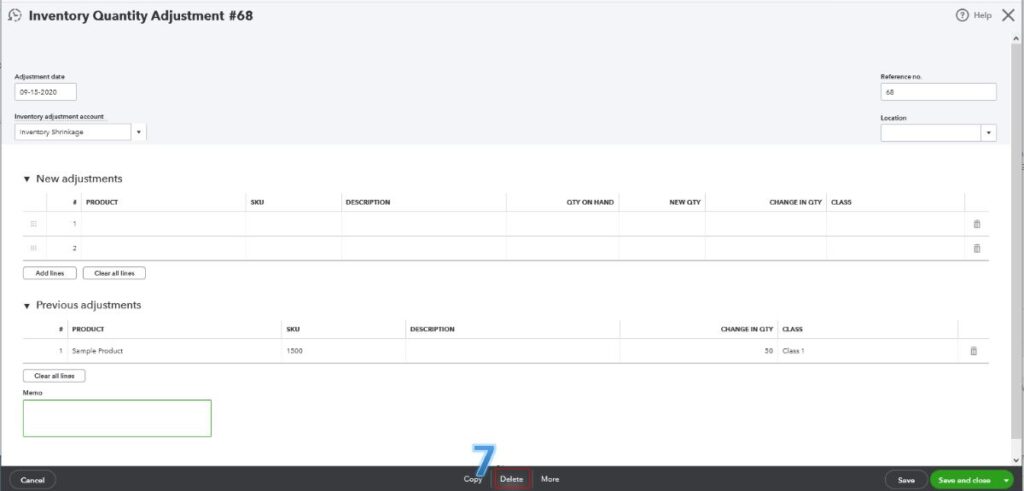
Image credit: Intuit
How to zero out an invoice in QuickBooks?
To zero out an invoice in QuickBooks, you need to create a credit memo and add it to your invoice. This will set your invoice to zero and clear it from your accounts receivable.
You can create a credit memo using the ‘+ New’ button, clicking ‘Credit Memo’, and filling in the details. Once it’s created, here’s how you can apply it to your invoice:
- In your ‘Sales’ menu, click ‘Customers’.
- Select ‘Receive Payment’ and fill out the necessary details.
- Choose your invoice in the ‘Outstanding Transactions’ section.
- Click ‘Save and close’.
See for yourself how Method tackles negative QuickBooks inventory.
Image credit: joey333 via 123RF